Previewing and Publishing
Studio is being deprecated, please head over to the documentation page for Mattercraft, our most advanced 3D tool for the web, where you can find the most recent information and tutorials.
ZapWorks Studio provides the ability to preview or publish a project using the options found along the top of the UI, to either test an experience or make it live, respectively.

You can find more information on launching experiences here.
Previewing
Section titled “Previewing”Throughout the creation process in ZapWorks Studio, experiences should be tested regularly to ensure that there are no errors and all functionality is working as expected. To speed up testing, Studio allows you to generate a preview zapcode of the project in its current state, using the Preview option along the top of the UI.
The resulting zapcode can be scanned with the Zappar app (available on Android and iOS) or the Zappar WebAR portal.
Zappar WebAR does not currently support world-tracked experiences.
This preview zapcode is only active for 5 minutes, please do not use it on your final target image or call-to-action designs.
Publishing
Section titled “Publishing”When an experience is completed, or if it’s been updated, it can be published to a project on your ZapWorks account. Publishing an experience makes it live, meaning it can be launched using any of the project’s triggers ie. its zapcode, QR code, deep link, etc.
Before a Studio experience can be published, a new project must be created on your ZapWorks account.
Studio experiences can only be published to projects in ZapWorks that have their tool set to ZapWorks Studio.
To publish a Studio experience, open it in ZapWorks Studio and select the Publish option found along the top of the UI. If you’re not currently logged in to your ZapWorks account in Studio, you’ll be prompted to do so.
The next modal will list all of the projects on the account, sorted by their creation date, with the option to filter projects by name using the search bar.
When a project is highlighted, a preview of its zapcode will be displayed. Clicking Choose Selected will take you to the next screen, from where you can publish your experience.
Preview/Publish Modal
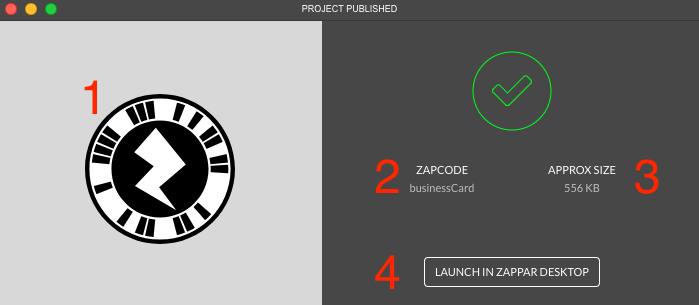
Section titled “Preview/Publish Modal”Once an experience has been previewed or published, a modal will pop up, displaying a zapcode that can be scanned with the Zappar app, or WebAR portal, to launch the experience. The approximate download size of the experience is also displayed on this modal. We recommend keeping experiences under 5mb. For more information on reducing an experience’s size, refer to the optimization article.
If your experience is tracked to an image, you will need to point the device’s camera at your target image (preferably a printed version) after scanning the zapcode.

| Diagram ID | Description |
|---|---|
| 1 | The scannable trigger. |
| 2 | The name of the project the experience was published to. |
| 3 | The approximate download size of the experience. |
| 4 | Launches the desktop version of the Zappar app, used for debugging purposes. |
Congratulations! You’ve completed the Getting Started guide.
Head over to our Tutorials section to learn how the functionalities covered in this guide come together to create complete experiences.
Alternatively, you can check out the rest of the documentation to take a more in-depth look at Studio’s other features.