Using Math.random to increase re-scannability
Studio is being deprecated, please head over to the documentation page for Mattercraft, our most advanced 3D tool for the web, where you can find the most recent information and tutorials.

Difficulty Level: Intermediate
Coding Knowledge Required: Intermediate
Time to Complete: 45-60 minutes
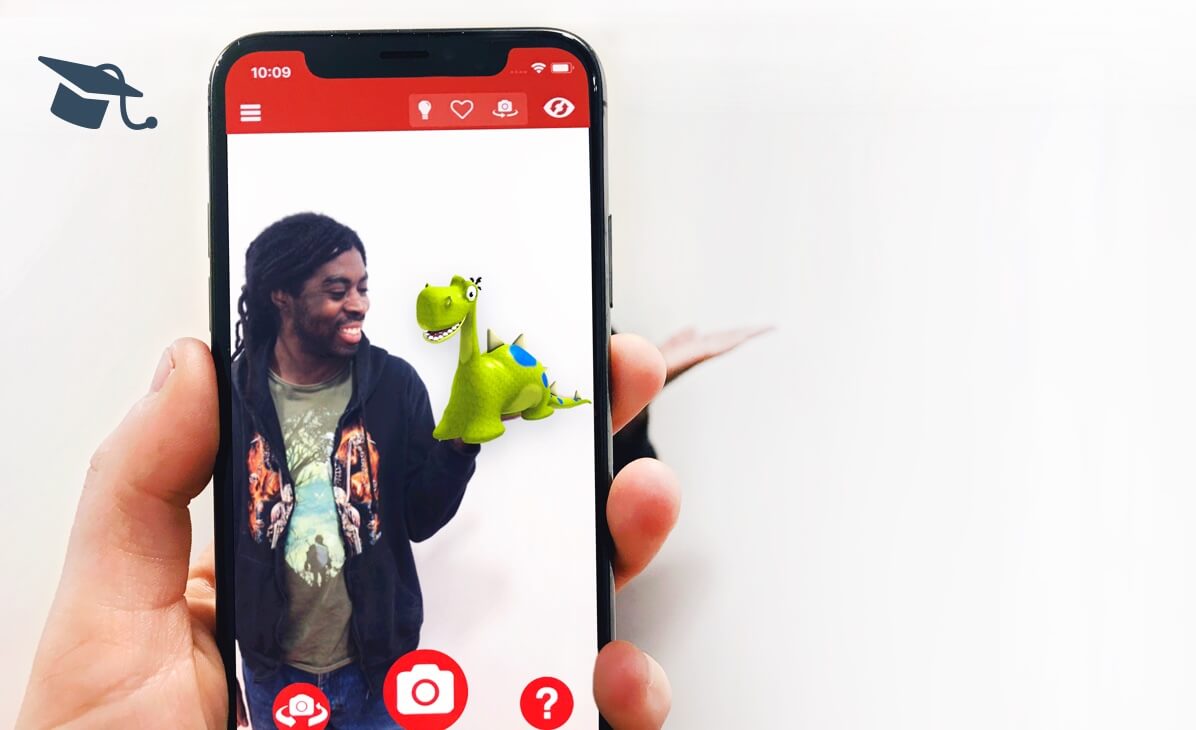
In this step by step guide, we’ve built on the 3D Photo Feature project by adding a feature which randomizes the 3D model that appears in the experience for the user to take a picture with. Make sure to scan the zapcode above for a sneak peek at what you are about to build.
This project is designed as an introduction to some of the basic functions provided by the JavaScript Math library, covered in our TypeScript Primer which can be accessed through Studio’s scripting environment.
Through the use of the Math.random() function we can increase the re-scannability of our experiences, and give a greater reason for the user to return.
We’ll also be covering how to create a home screen in your experience, which users can navigate to and from, through the use of screen symbol communication.
You can download a folder with the completed project, and all of the assets you’ll need for this tutorial here.
Step by Step
Section titled “Step by Step”Part 1: Setting up the project and welcome page assets
1) Setting up the project
Open Studio and create a new ‘Blank Project’, you can give it any name you like, but we’ve gone with ‘randomCharacterPhotoFeature’.
2) Importing the asset files
Import the image files within the ‘WelcomeScreenAssets’ folder you’ve downloaded into your project’s ‘Media Library’.
3) Creating the welcome screen
In this step, we’ll be adding a welcome screen that will be displayed to the user when they scan our experience.
3.1) Setting up the welcome screen assets group in the hierarchy
Change your project’s orientation to portrait using the option above the 3D view.
In the ‘Controllers’ panel select the ‘orientation’ controller, then right-click the ‘portrait’ state and select ‘Make Default’.
Users are more likely to take selfies in portrait mode, so it makes sense for us to set our experience’s default orientation to match for a better user experience.
Make sure you’ve selected the ‘base’ controller again before continuing.
The base is a special entry in the controller panel that returns Studio to the default behavior where properties that haven’t been added to any controller, can be modified.
Create a new group in the hierarchy by right-clicking the ‘root’ node and selecting ‘New > Group’.
Give the group a name which makes it easy to identify, we’ve gone with ‘welcomeScreenAssets’.
Organising the nodes in your hierarchy into groups is good practice, as it makes it easier to navigate.
In the group’s ‘Properties’ panel, change the ‘relativeTo’ property to ‘Z.screenLeft’.
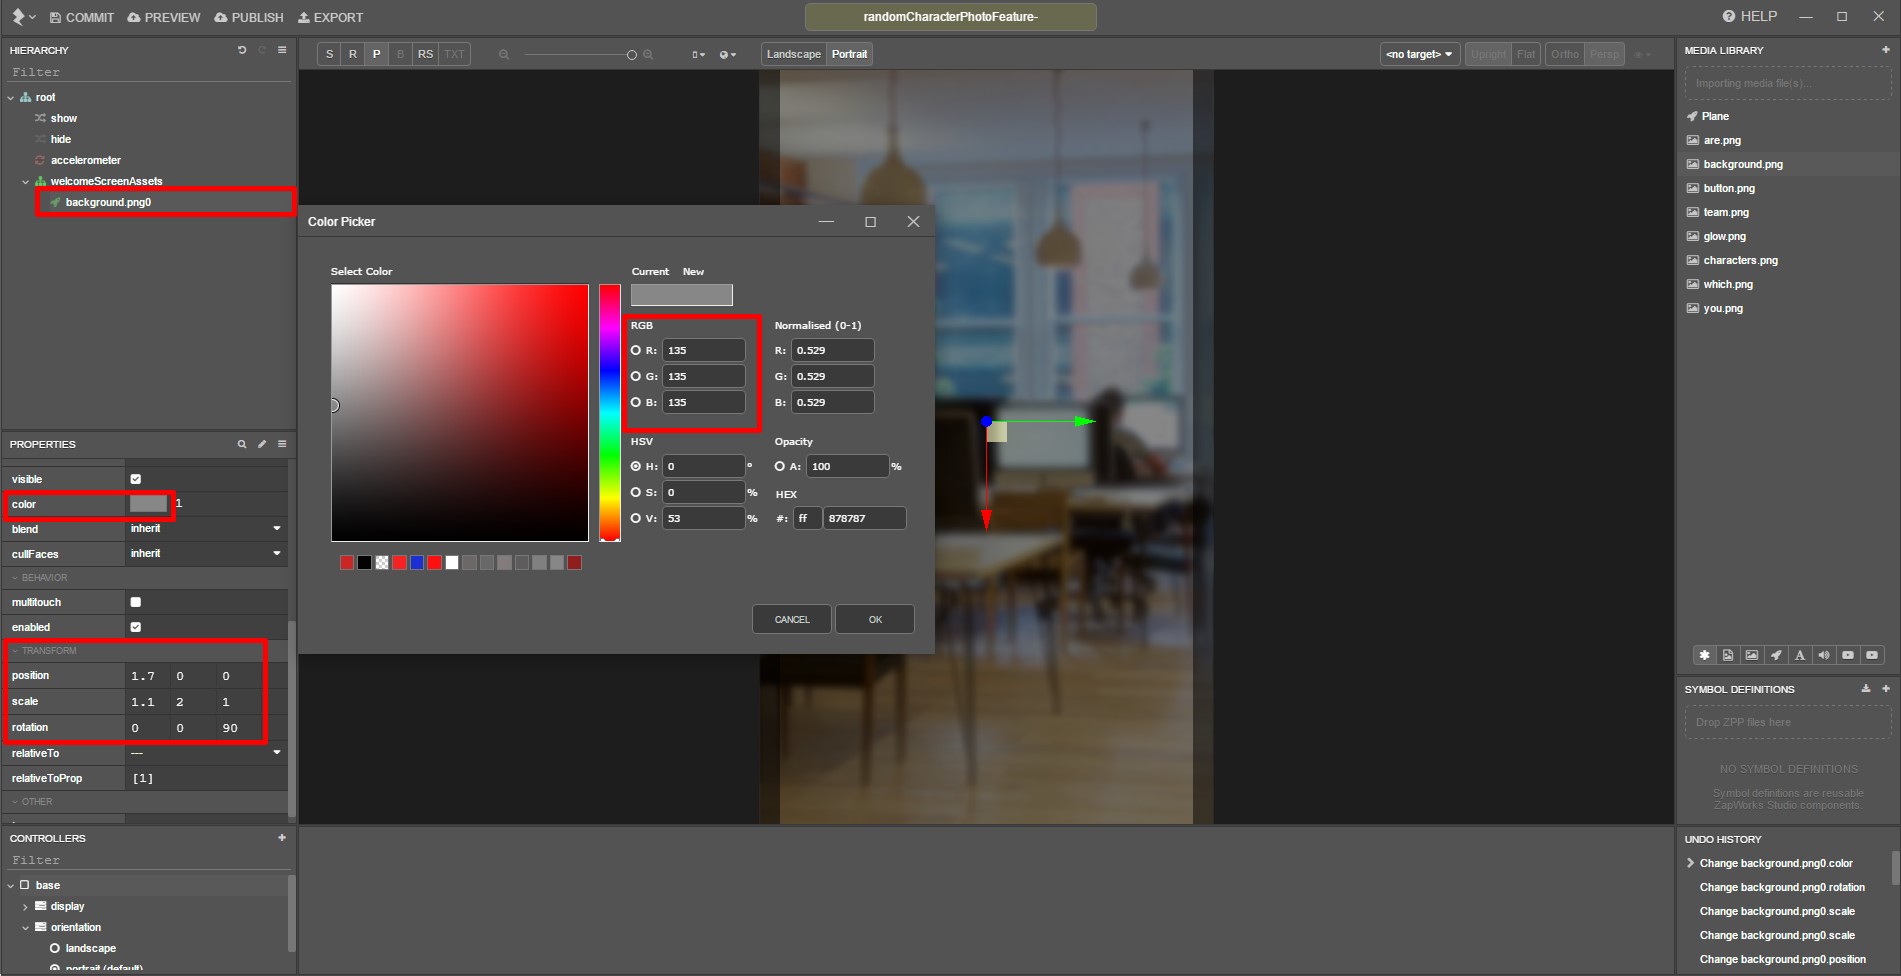
3.2) Setting the transforms for the ‘background’ node
Drag the ‘background’ image file from the ‘Media Library’ into your hierarchy, within the ‘welcomeScreenAssets’ group.
In its ‘Properties’ panel, set the:
| position | 1.7 | 0 | 0 | |
| scale | 1.1 | 2 | 1 | |
| rotation | 0 | 0 | 90 |
Darken the image by changing its ‘color’ RGB values to [135, 135, 135].
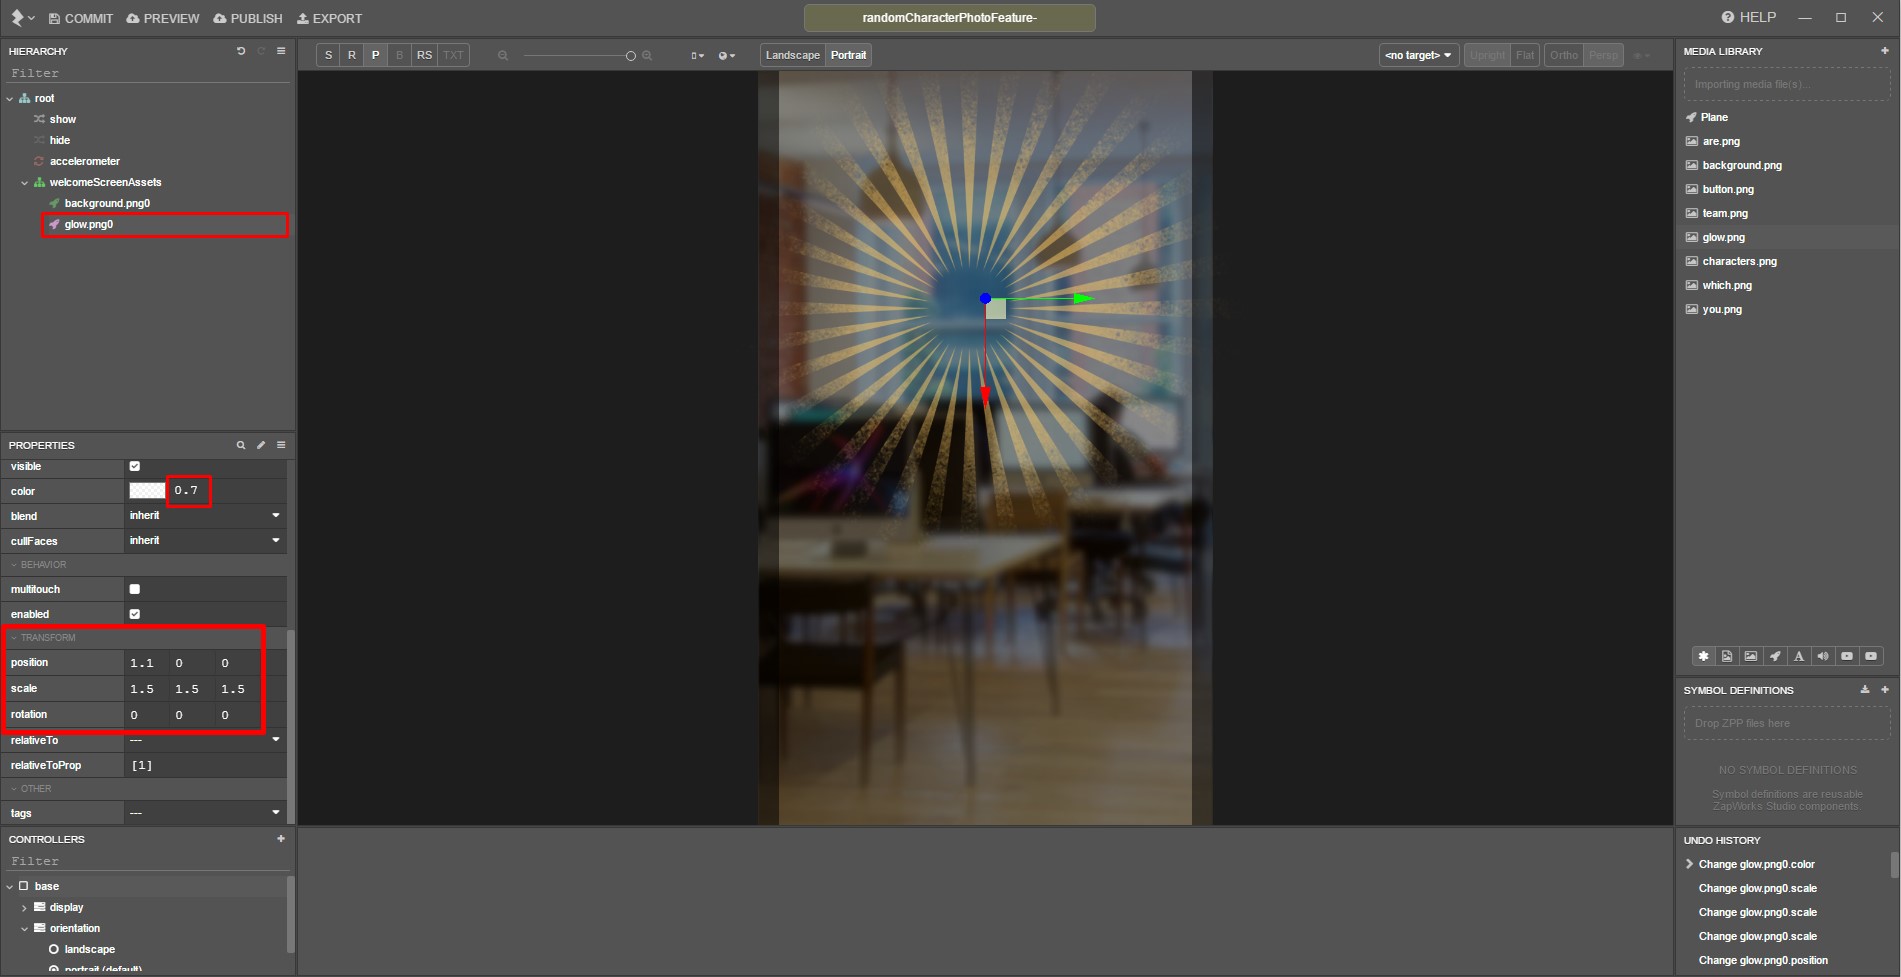
3.3) Setting the transforms for the ‘glow’ node
Drag the ‘glow’ media file into the same group, beneath the previous node and set the:
| position | 1.1 | 0 | 0 | |
| scale | 1.5 | 1.5 | 1.5 | |
| rotation | 0 | 0 | 0 |
Change its color opacity setting to 0.7.
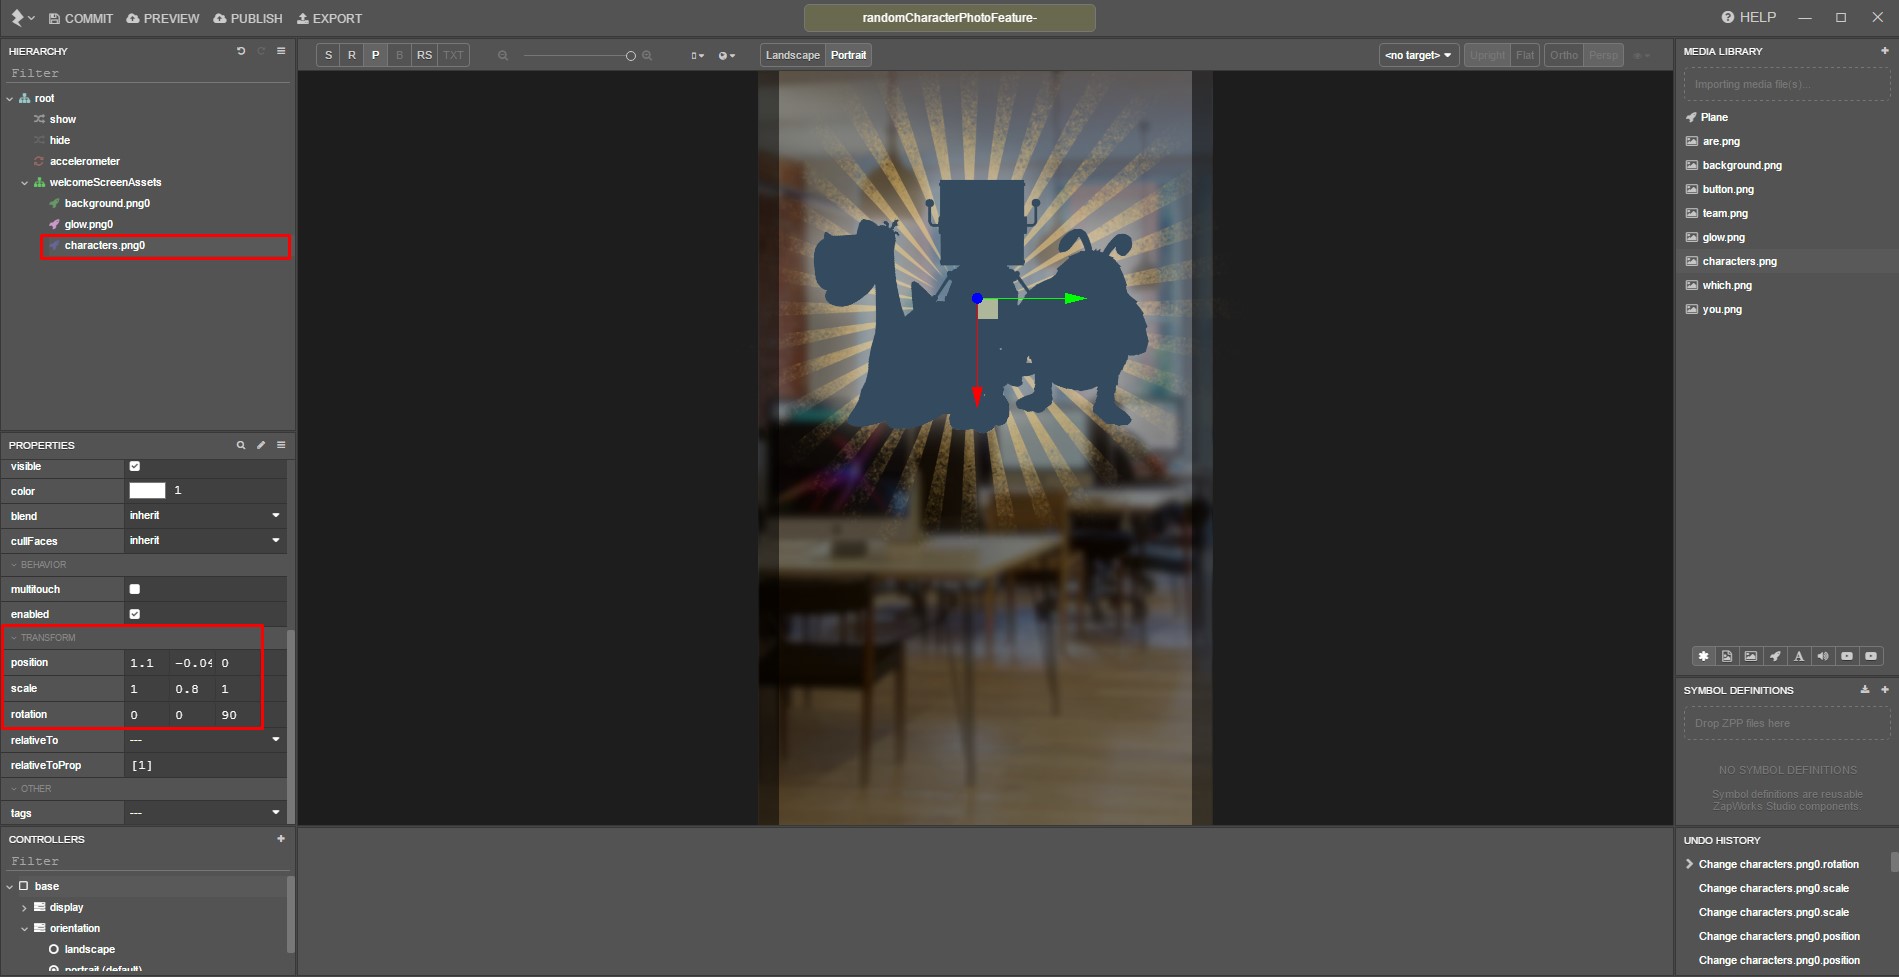
3.4) Setting the transforms for the ‘characters’ node
Drag the ‘characters’ media file into the ‘welcomeScreenAssets’ group, beneath the previous node and set its:
| position | 1.1 | -0.04 | 0 | |
| scale | 1 | 0.8 | 1 | |
| rotation | 0 | 0 | 90 |
You’ll want to keep an eye on the nodes’ position in the hierarchy. Nodes later in the hierarchy will be displayed over objects earlier in the hierarchy in the 3D view.
4) Adding the welcome screen text images
Create a new group within the ‘welcomeScreenAssets’ group and rename it to ‘textGroup’, making sure it is at the bottom of the group.
Change the group’s rotation values to [0, 0, 90].
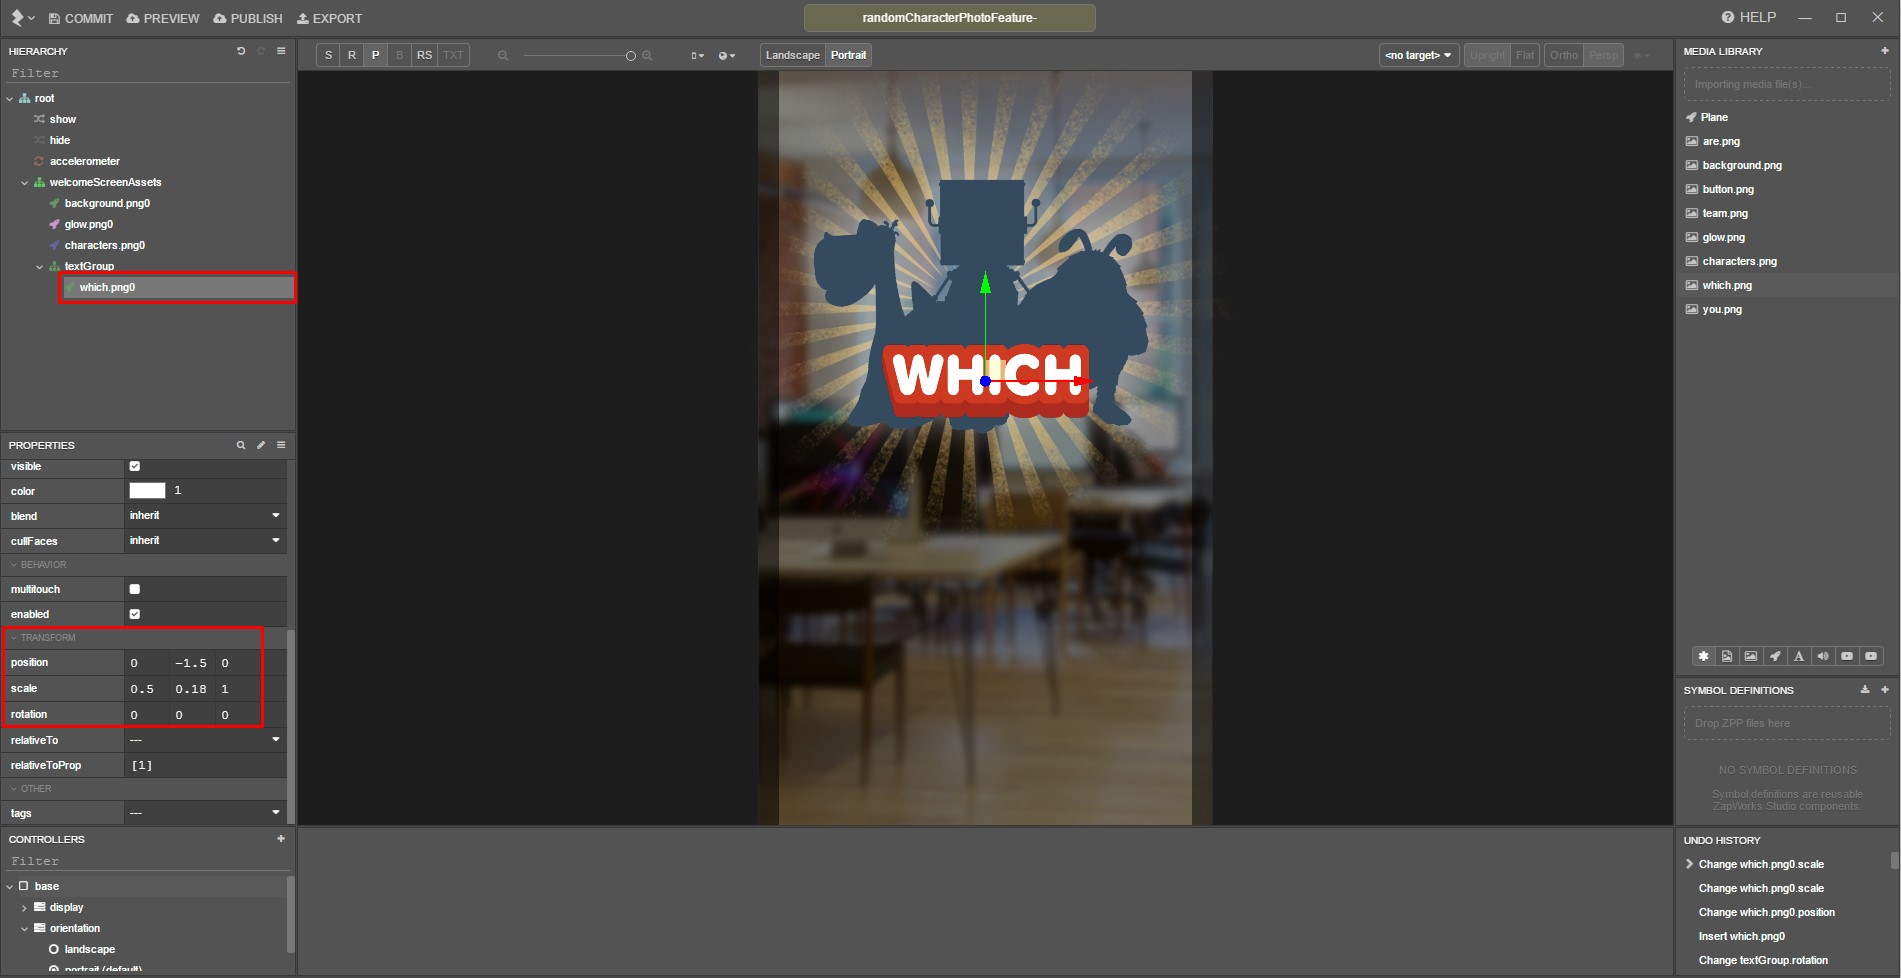
4.1) Setting the transforms for the ‘which.png0’ node
Add the ‘which.png’ media file to the group and set its:
| position | 0 | -1.5 | 0 | |
| scale | 0.5 | 0.18 | 1 | |
| rotation | 0 | 0 | 0 |
4.2) Setting the transforms for the ‘team.png0’ node
Add the ‘team.png’ media file to the group, beneath the ‘which.png0’ node and set its:
| position | -0.3 | -1.8 | 0 | |
| scale | 0.42 | 0.15 | 1 | |
| rotation | 0 | 0 | 0 |

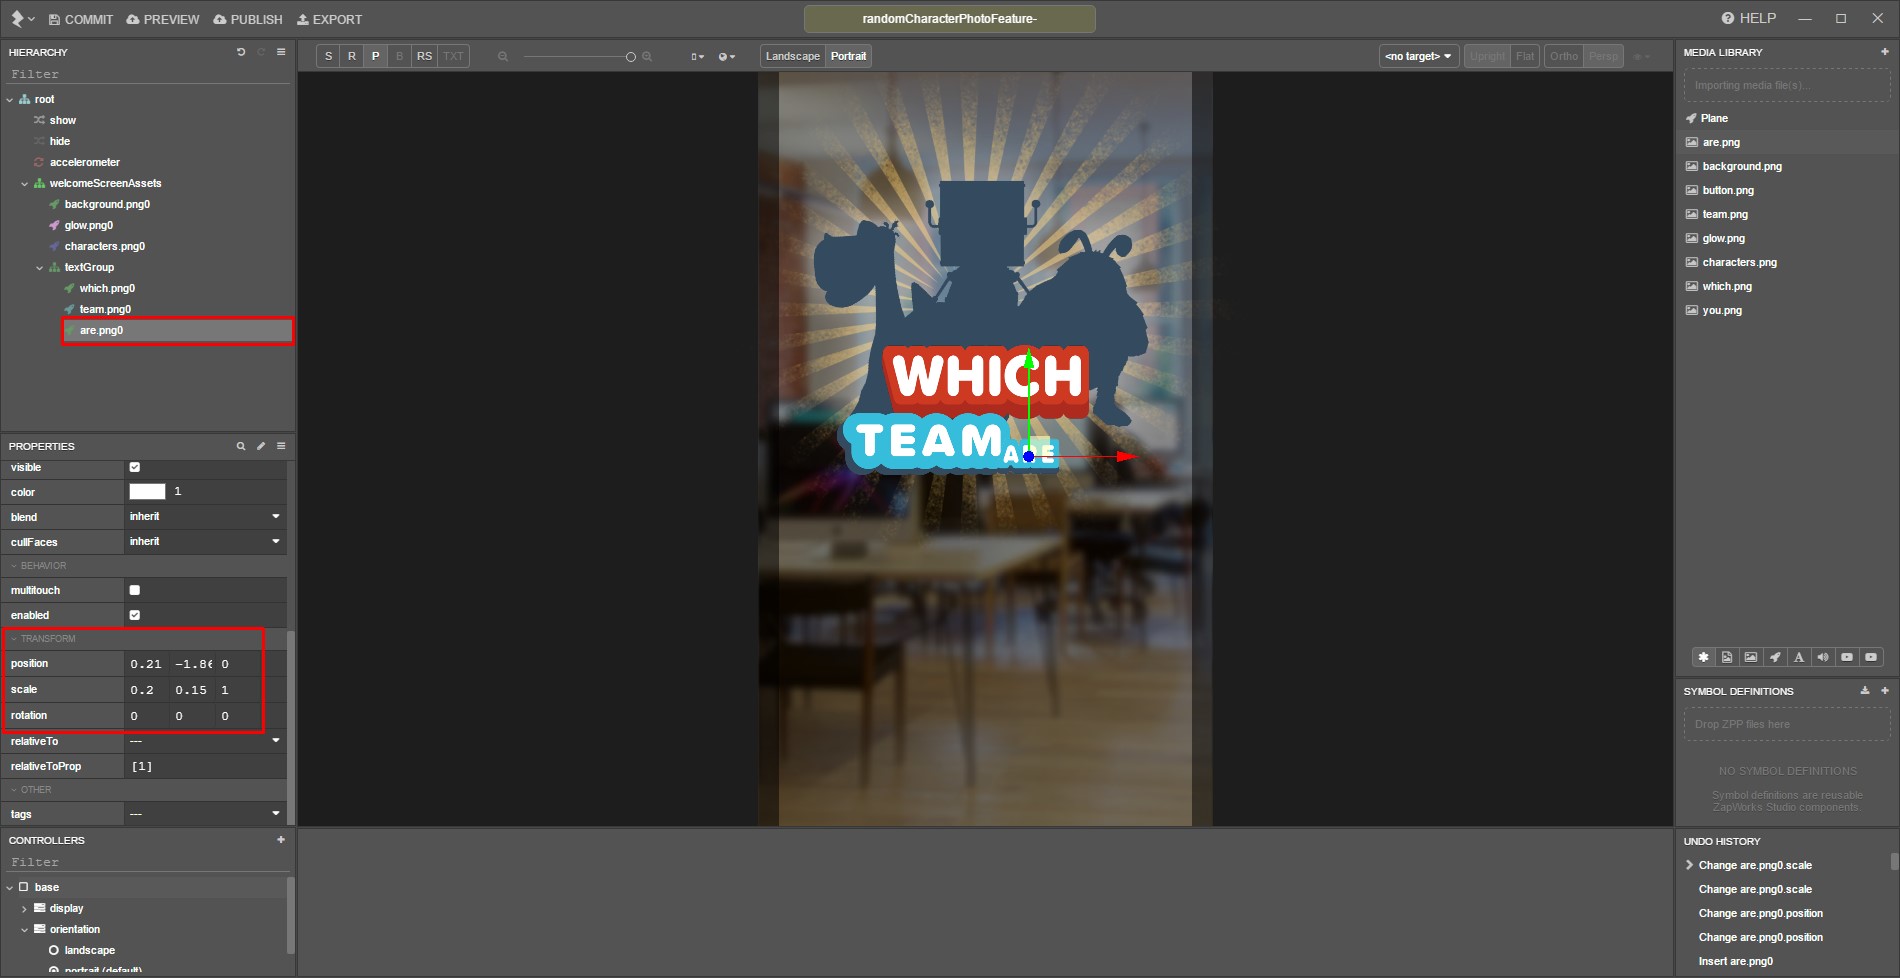
4.3) Setting the transforms for the ‘are.png0’ node
Add the ‘are.png’ media file to the group, beneath the ‘team.png0’ node and set its:
| position | 0.21 | -1.86 | 0 | |
| scale | 0.2 | 0.15 | 1 | |
| rotation | 0 | 0 | 0 |
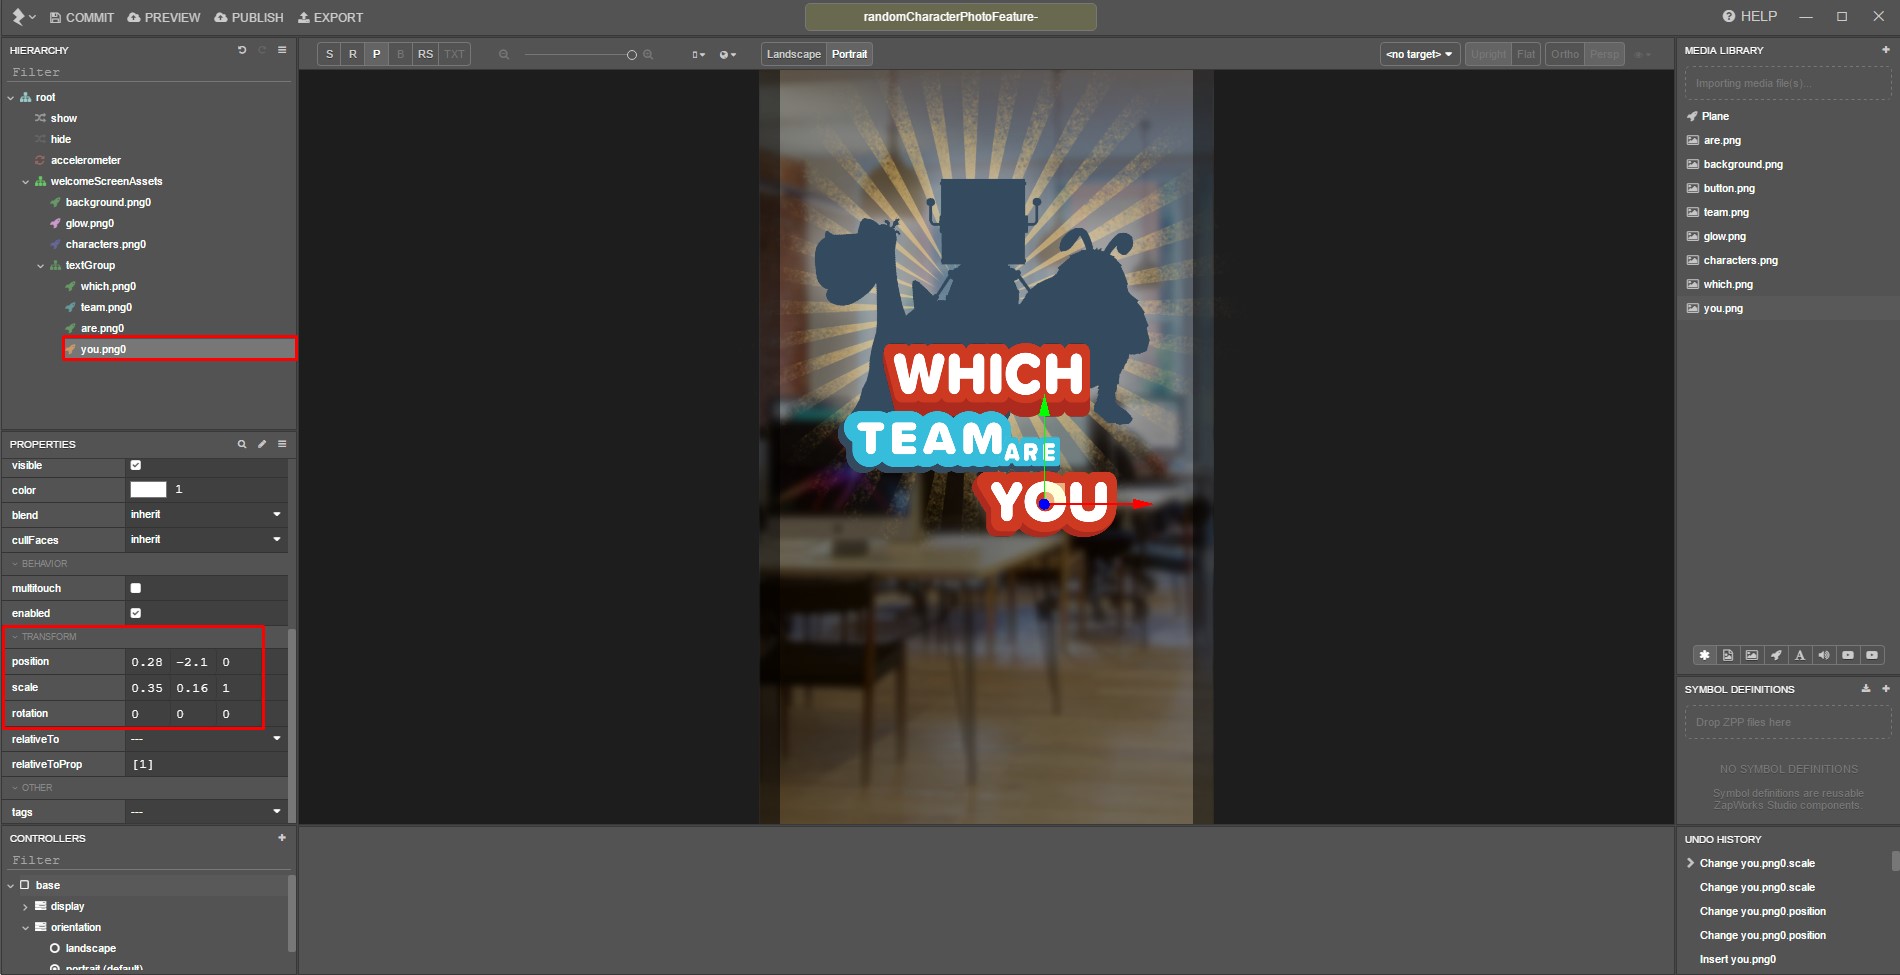
4.4) Setting the transforms for the ‘you.png0’ node
Add the ‘you.png’ media file to the group, beneath the ‘are.png0’ node and set its:
| position | 0.28 | -2.1 | 0 | |
| scale | 0.35 | 0.16 | 1 | |
| rotation | 0 | 0 | 0 |
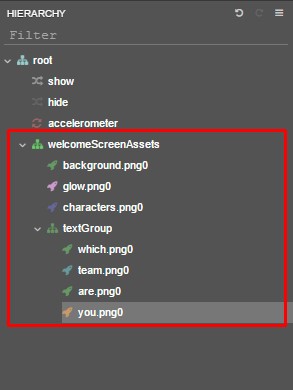
Your hierarchy should look like this:
5) Creating the randomization button
Next, we’ll add the visual elements of our randomization button so that it’s ready for when we add the functionality later on in the tutorial.
5.1) Setting up the button group in the hierarchy
Right-click on your root node and create a new group called ‘buttonGroup’.
Set the group’s ‘relativeTo’ property to ‘Z.screenRight’.
Add a plane from your Media Library to this new group.
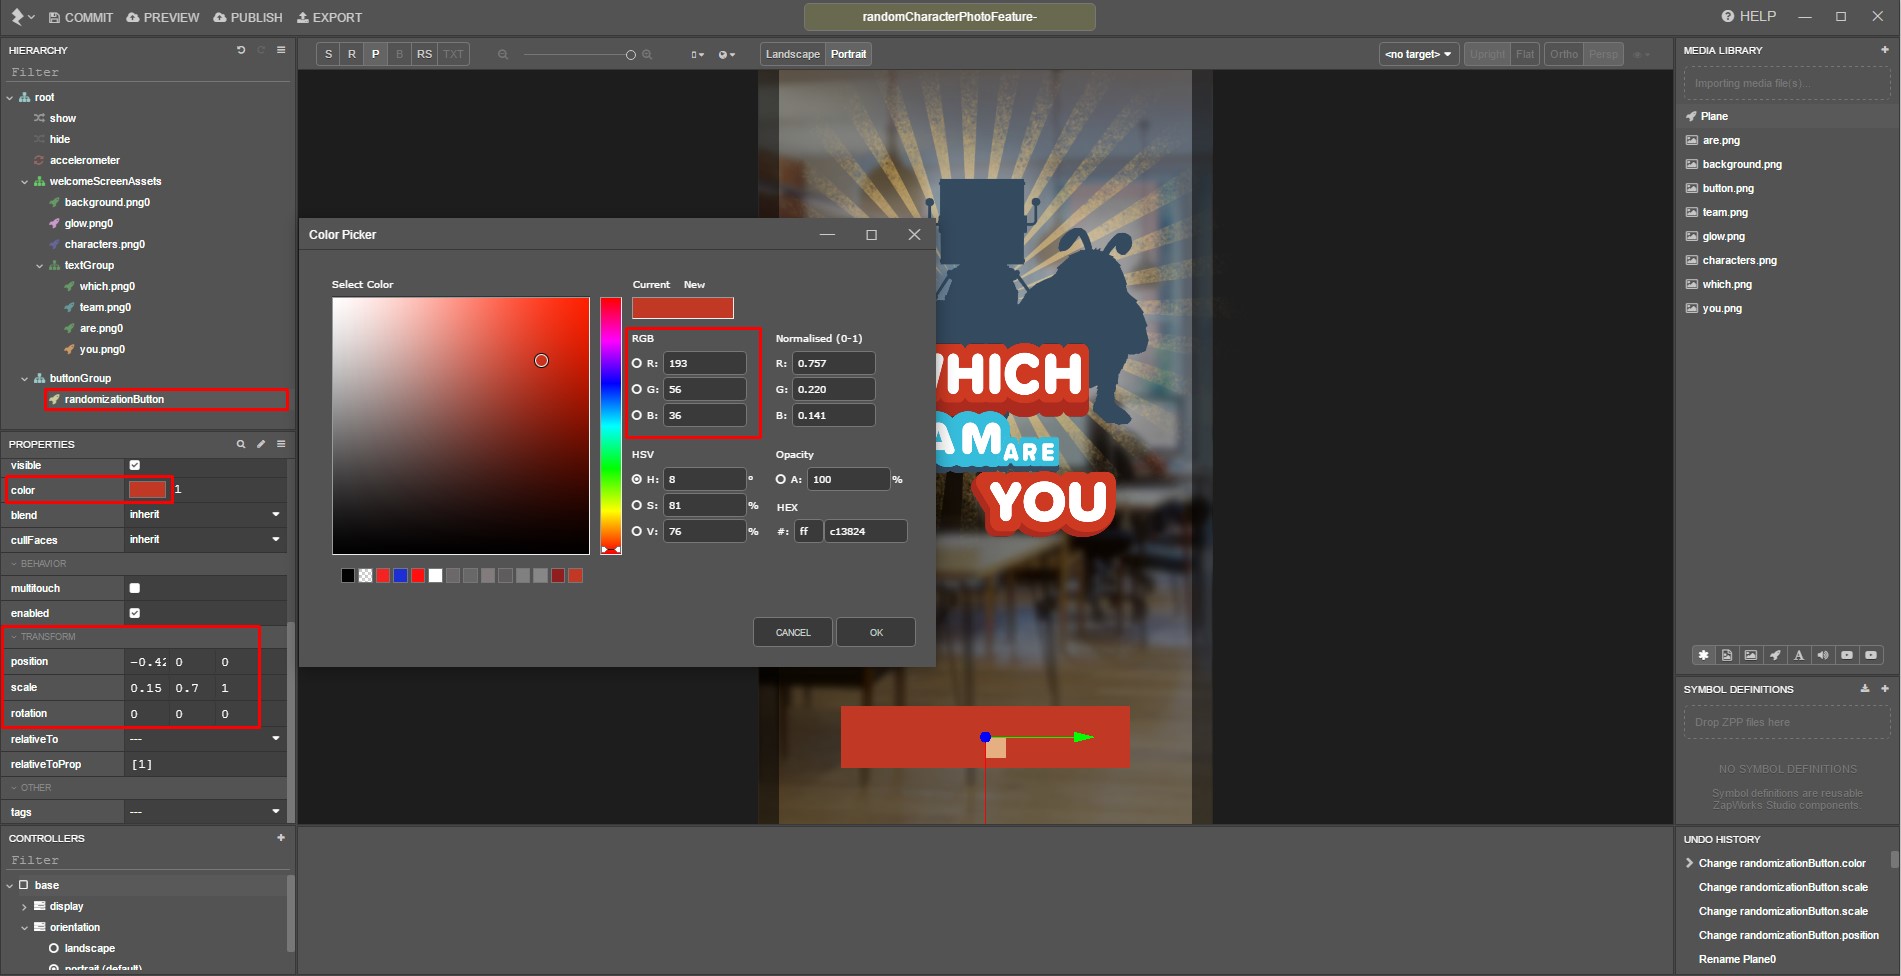
5.2) Setting the transforms for the ‘randomizationButton’ node
Right-click the plane node and select ‘Rename’, then rename it to ‘randomizationButton’.
Change its:
| position | -0.42 | 0 | 0 | |
| scale | 0.15 | 0.7 | 1 | |
| rotation | 0 | 0 | 0 |
Select the color box in the node’s ‘color’ property and change the RGB values to [193, 56, 36].
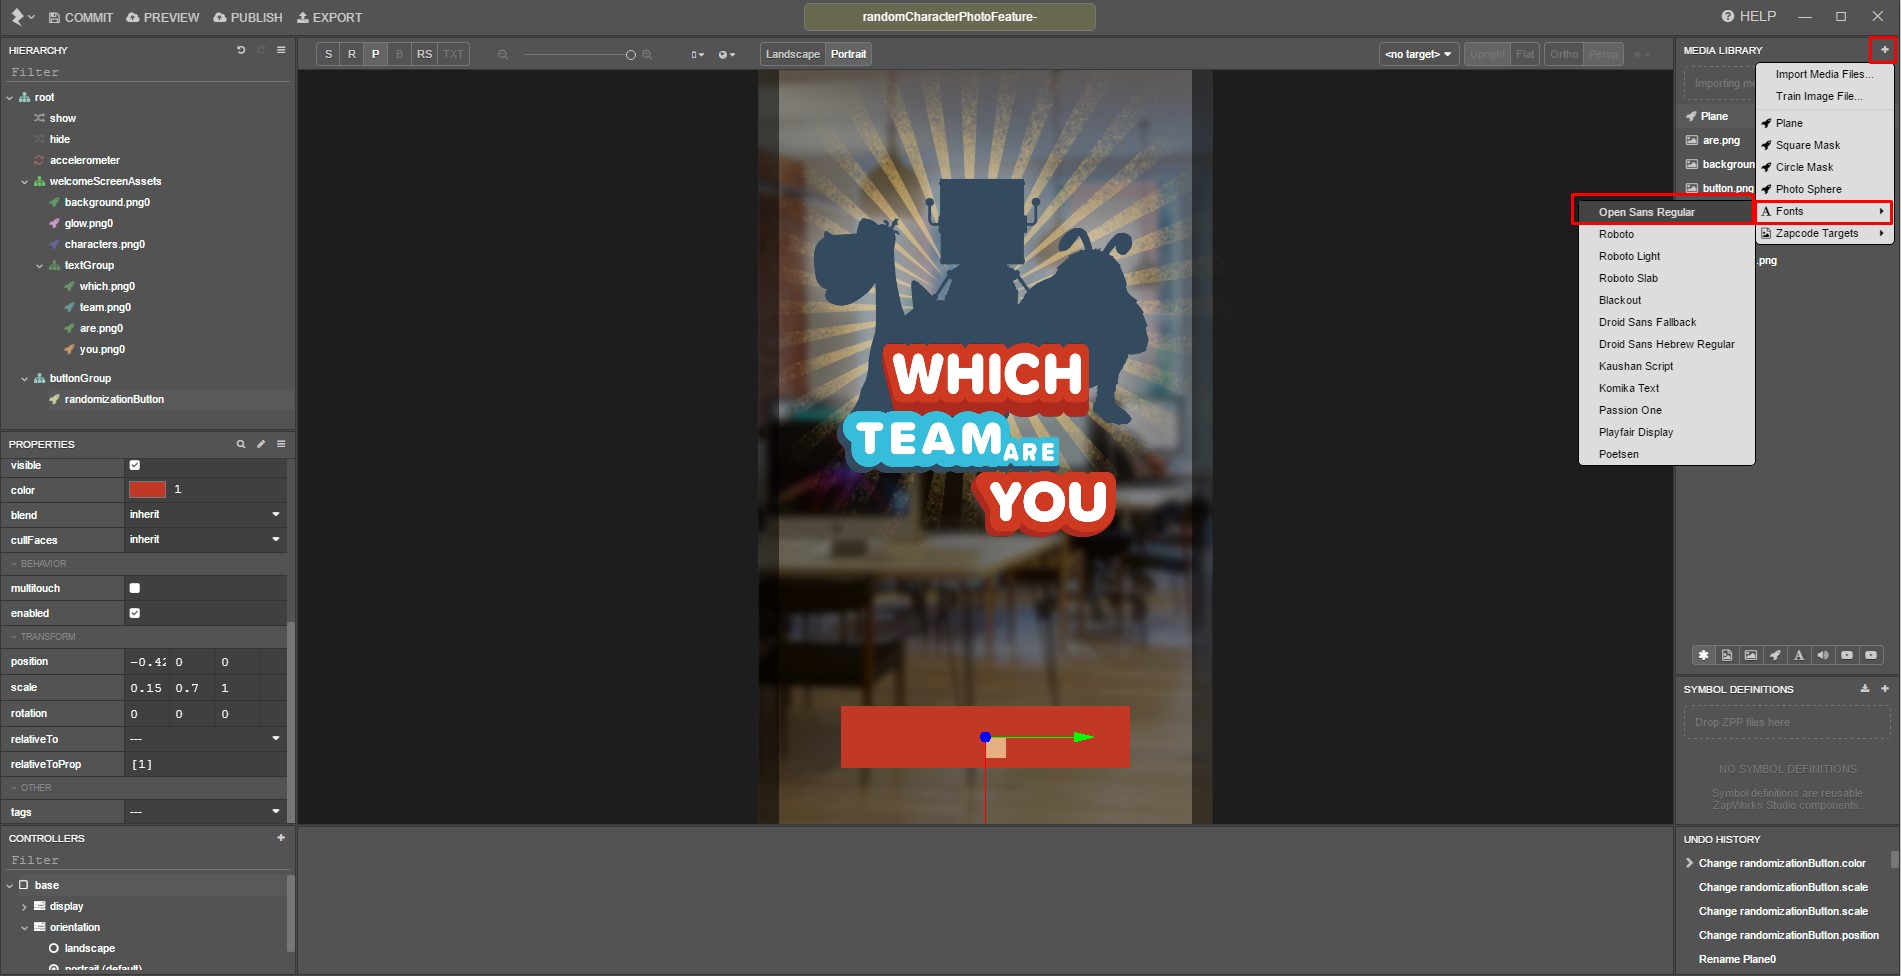
5.3) Adding text to the button
Import a font to your ‘Media Library’ by clicking on the + symbol in the panel and selecting ‘Fonts > Open Sans Regular’.
Right click the ‘buttonGroup’ node and select ‘New > Text’, and rename the new text node to ‘buttonText’.
Change its:
| position | 0.01 | 0 | 0 | |
| scale | 0.5 | 0.5 | 1 | |
| rotation | 0 | 0 | 90 |
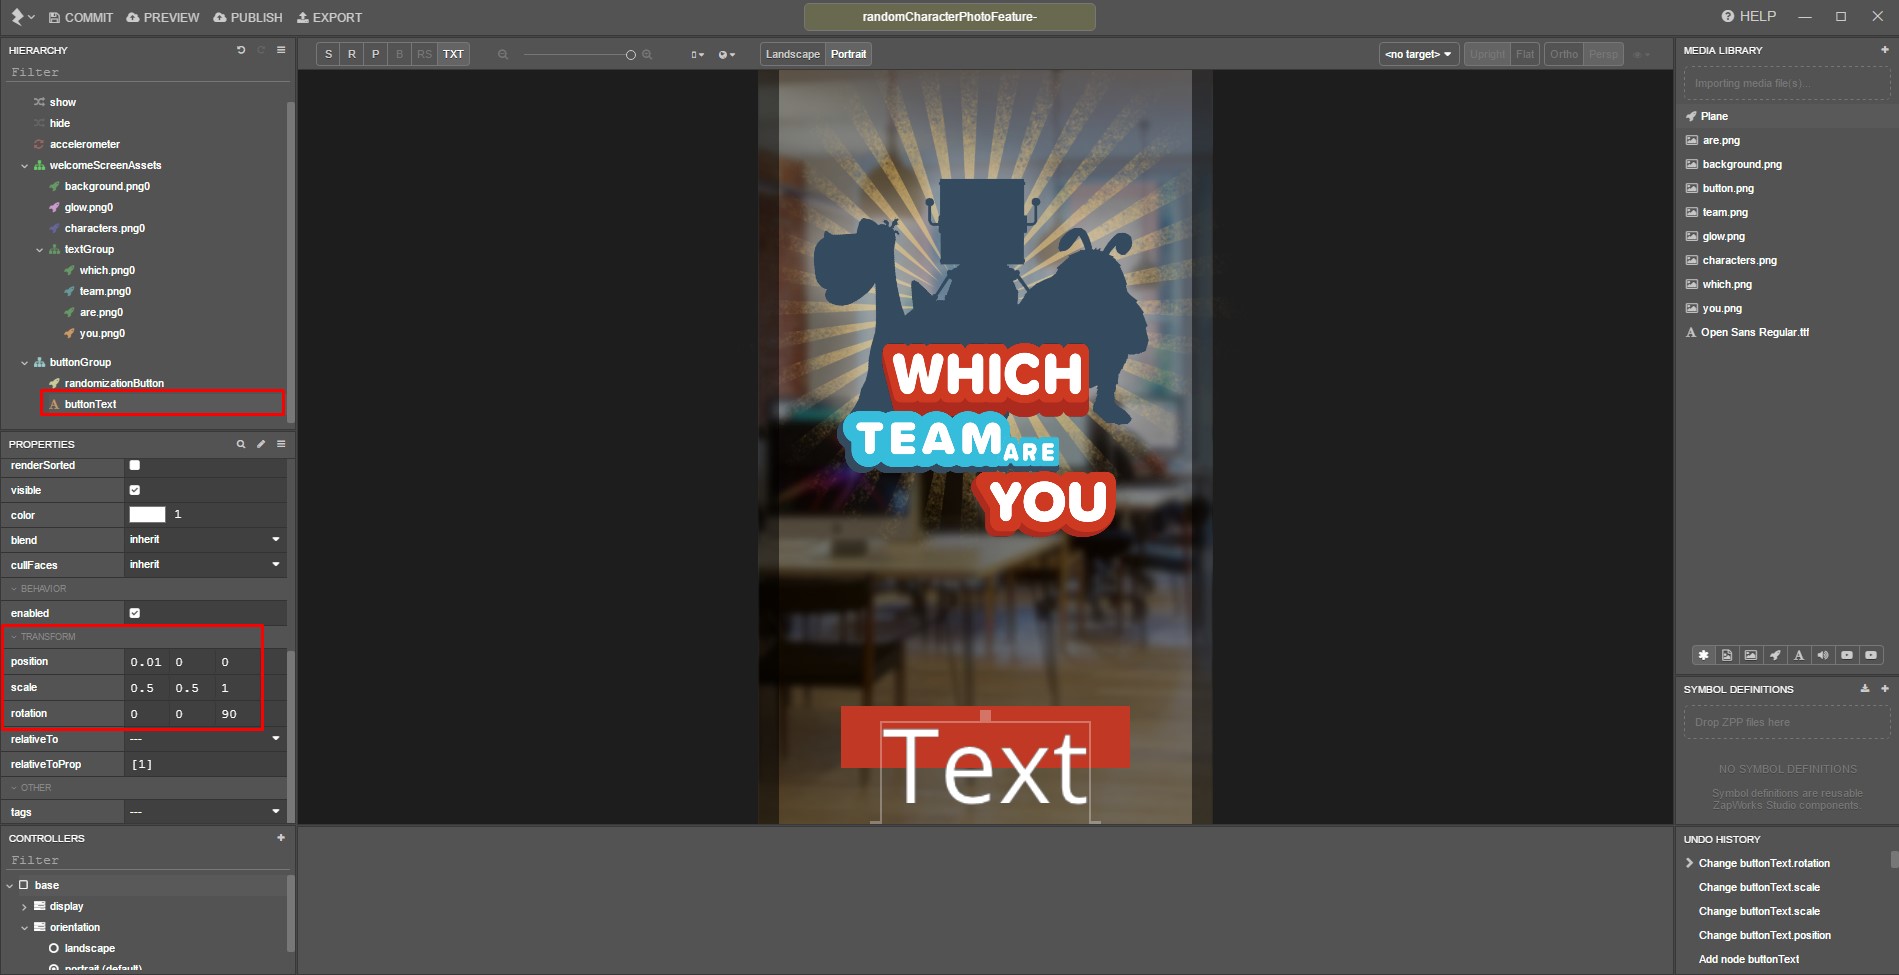
Make sure the text node is beneath the ‘randomizationButton’ node in the hierarchy or it will be obscured.
Don’t worry about the size of the text for now as it will be resized once we input our text.
Change its text property to ‘LET’S FIND OUT’, and make sure its font property is set to ‘Open Sans Regular’.
5.4) Adding a ‘pointerdown’ script to the ‘randomizationButton’ node
Create a new ‘pointerdown’ script on the ‘randomizationButton’ node by right-clicking and selecting ‘New > Script > pointerdown’.
We’ll be adding some code to this script later on in the tutorial.
Your welcome screen is now set up.
Part 2: Animating your welcome screen
In this step, we’ll be adding a simple animation to the welcome screen to make it more visually appealing.
6) Creating a new timeline
Add a new controller to the ‘Controllers’ panel by clicking the ’+’ symbol and call it ‘glowController’.
Right-click the new controller, select ‘New Timeline’, and call it ‘glowAnimation’.
Change the timeline’s ‘length’ property to 6000.
Use the zoom function to view the entirety of the timeline.
7) Adding the node’s properties to the timeline
Select the new timeline in the ‘Controllers’ panel, and then select the ‘glow’ node in the hierarchy.
Within the node’s ‘Properties’ panel, click on the ’+’ symbol next to the ‘scale’ and ‘rotation’ properties.
We’ll then be able to modify those properties from within our timeline to create an animation.
8) Animating the glow node’s rotation
In the timeline set the time to 6001, and change the rotation values to (0, 0, 359).
Click and drag to select both the ‘rotation’ keyframes on the timeline, right click and select ‘Make Transition’.
9) Animating the glow node’s scale
In this step, we’ll be making the glow appear to grow and shrink at intervals of one second.
We’ll be doing this by creating keyframes at 1000ms intervals, and editing the glow node’s scale property.
To speed up the process a little, we’ll be pasting our keyframes where necessary.
Set the time to 0, right click on an empty section of the timeline and select ‘Add keyframe at current time’. Make sure that the node’s ‘scale’ value is still at (1.5, 1.5, 1.5).
Set the time to 1000 and change the scale to (1, 1, 1).
Click and drag to select the keyframes, right click and select ‘Make Transition’.
Set the time to 2000 and change the scale back to (1.5, 1.5, 1.5).
Delete the transition that appeared to the right of the keyframe at 2000 by right-clicking it and selecting ‘Delete transition’.
Click and drag to select the ‘scale’ keyframes at times 0, 1000 and 2000.
Right-click on the timeline and select ‘Copy Keyframes’.
With time 2000 still selected, right click and select ‘Paste’.
Set the time to 4000, and paste the keyframes again.
Click and drag to select the keyframes at 6000 and 6001, then right click and select ‘Make Link > with left value’.
Lastly, click on the loop option found to the right of the timeline’s ‘Length (ms)’ property, to make the timeline loop.

The glow animation is now set up, you can preview it by clicking on the play button in the timeline controls.
Now we just need to set the animation to play, which we can do by selecting the ‘show’ script in the hierarchy, dragging the timeline within the parent.on("show") function, and selecting ‘play’.
Part 3: Preparing the Zapbot photo feature subsymbol
Our welcome screen is now ready, so we’ll be setting up one of our photo features next.
10) Creating the subsymbol
Add a new symbol to the project by clicking the ’+’ in the ‘Symbol Definitions’ panel and select the ‘Photo feature 3D’ template.
Name the new symbol ‘ZapbotPhotoFeature’.
11) Importing the Zapbot model
Enter the ‘ZapbotPhotoFeature’ symbol by double-clicking on its symbol definition. You should be greeted with the familiar photo feature screen.
If your 3D view is in landscape mode you can change its orientation to portrait by selecting the option above the 3D view.
In the ‘Controllers’ panel select the portrait state within the orientation controller, right-click it and select ‘Make Default’.
Remember to click back on the ‘base’ controller before making any further changes.
Import the ‘Zapbot.pod’ file from within the ‘3D Models > Zapbot’ inside the assets download folder by dragging the file into your ‘Media Library’.
You can click and drag the model’s textures files from the folder into the texture pop-up, to assign them automatically.
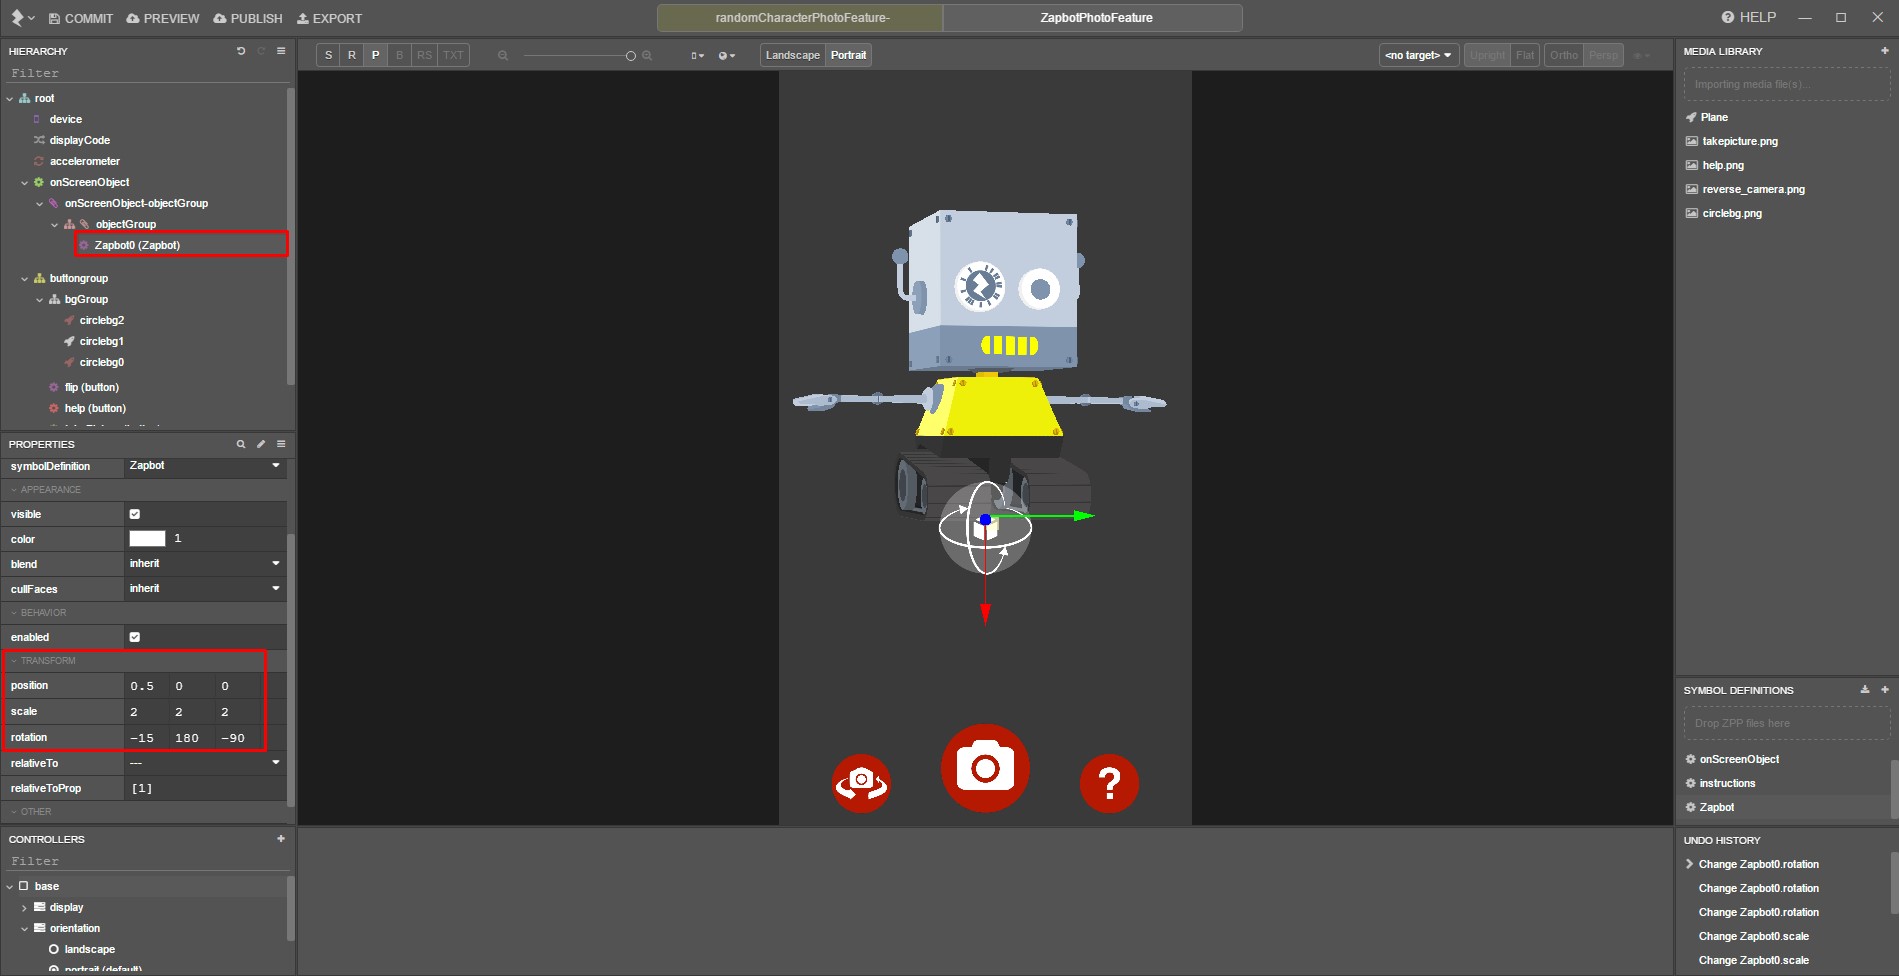
Drag the resulting model’s symbol definition into the hierarchy under ‘onScreenObject > onScreenObject-objectGroup > objectGroup’.
Set the model’s transforms to:
| position | 0.5 | 0 | 0 | |
| scale | 7 | 7 | 7 | |
| rotation | -15 | 180 | -90 |
Due to changes in the 3D import process, the scale applied to the model in the image below is now outdated, please use the values provided above.
12) Adding the photo feature share message
Select the ‘buttonCode’ script node within the hierarchy, and find Z.device.snapshot(); on line 21 within the script.
In a new line directly before it, add the following line of code:
Z.device.snapshotMessage("#TeamZapbot");
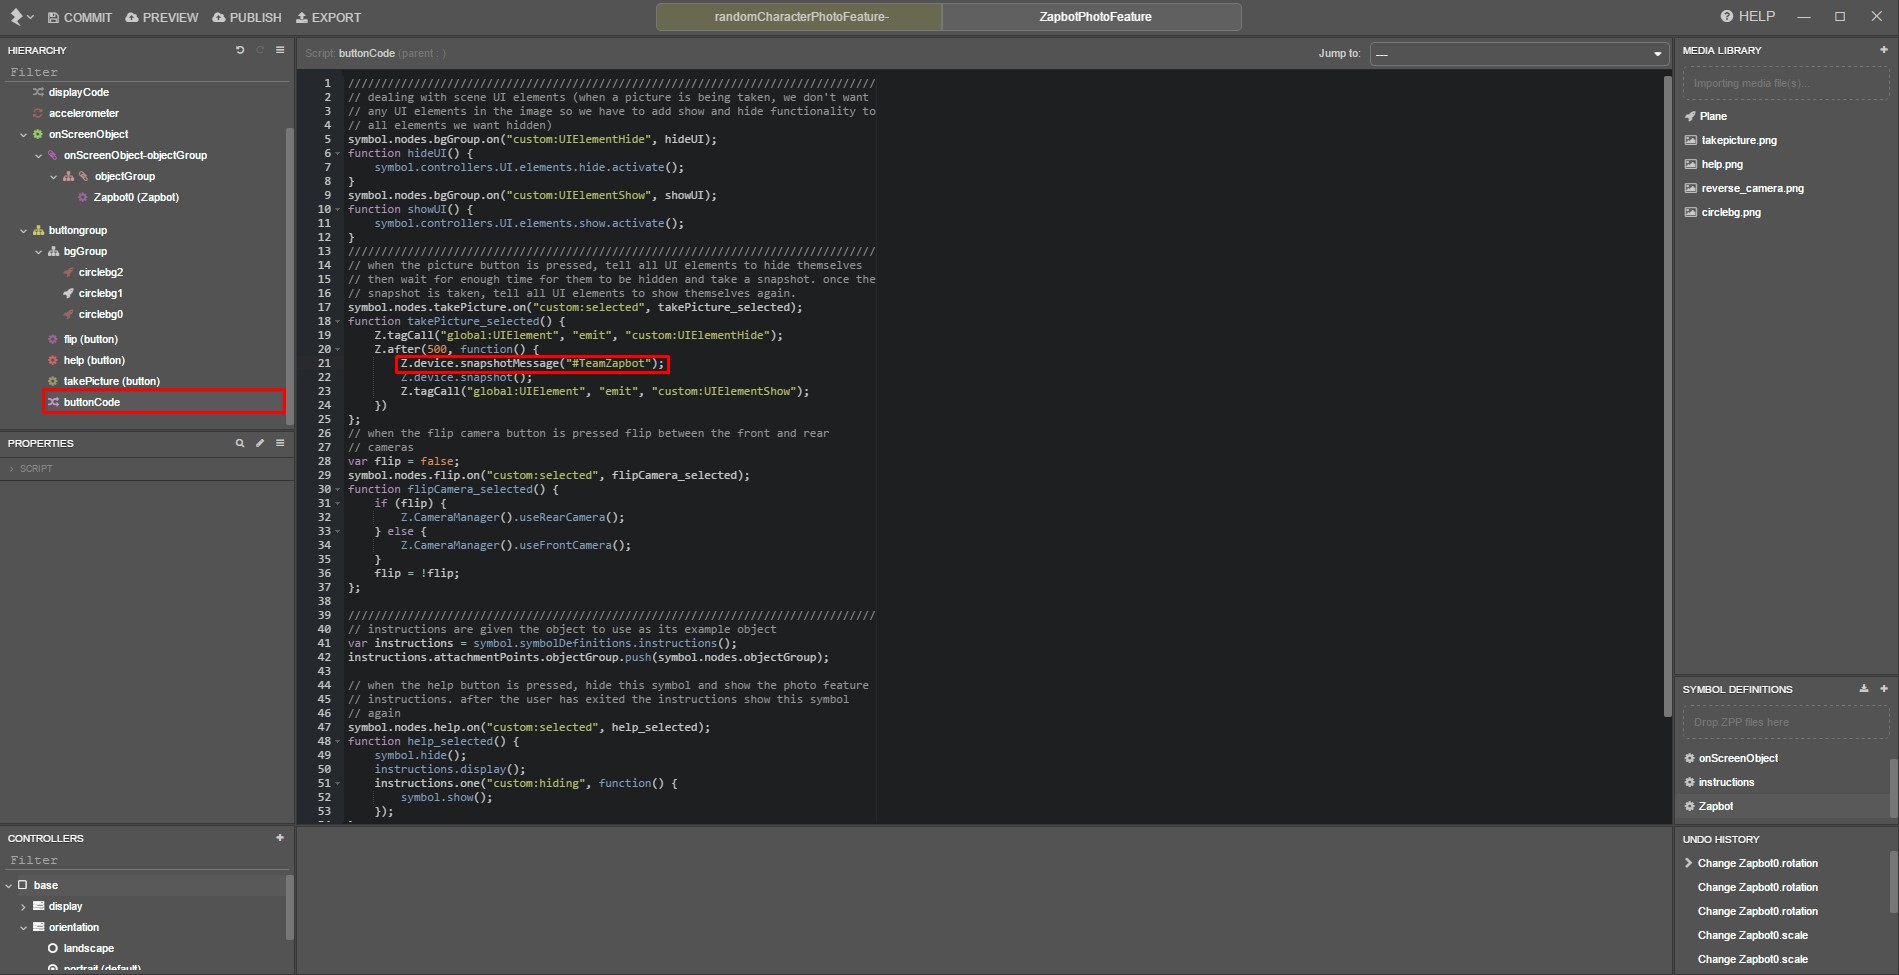
This will pre-fill the social media share field with our message.
Some social media platforms will ignore this pre-filled message and display a blank field.
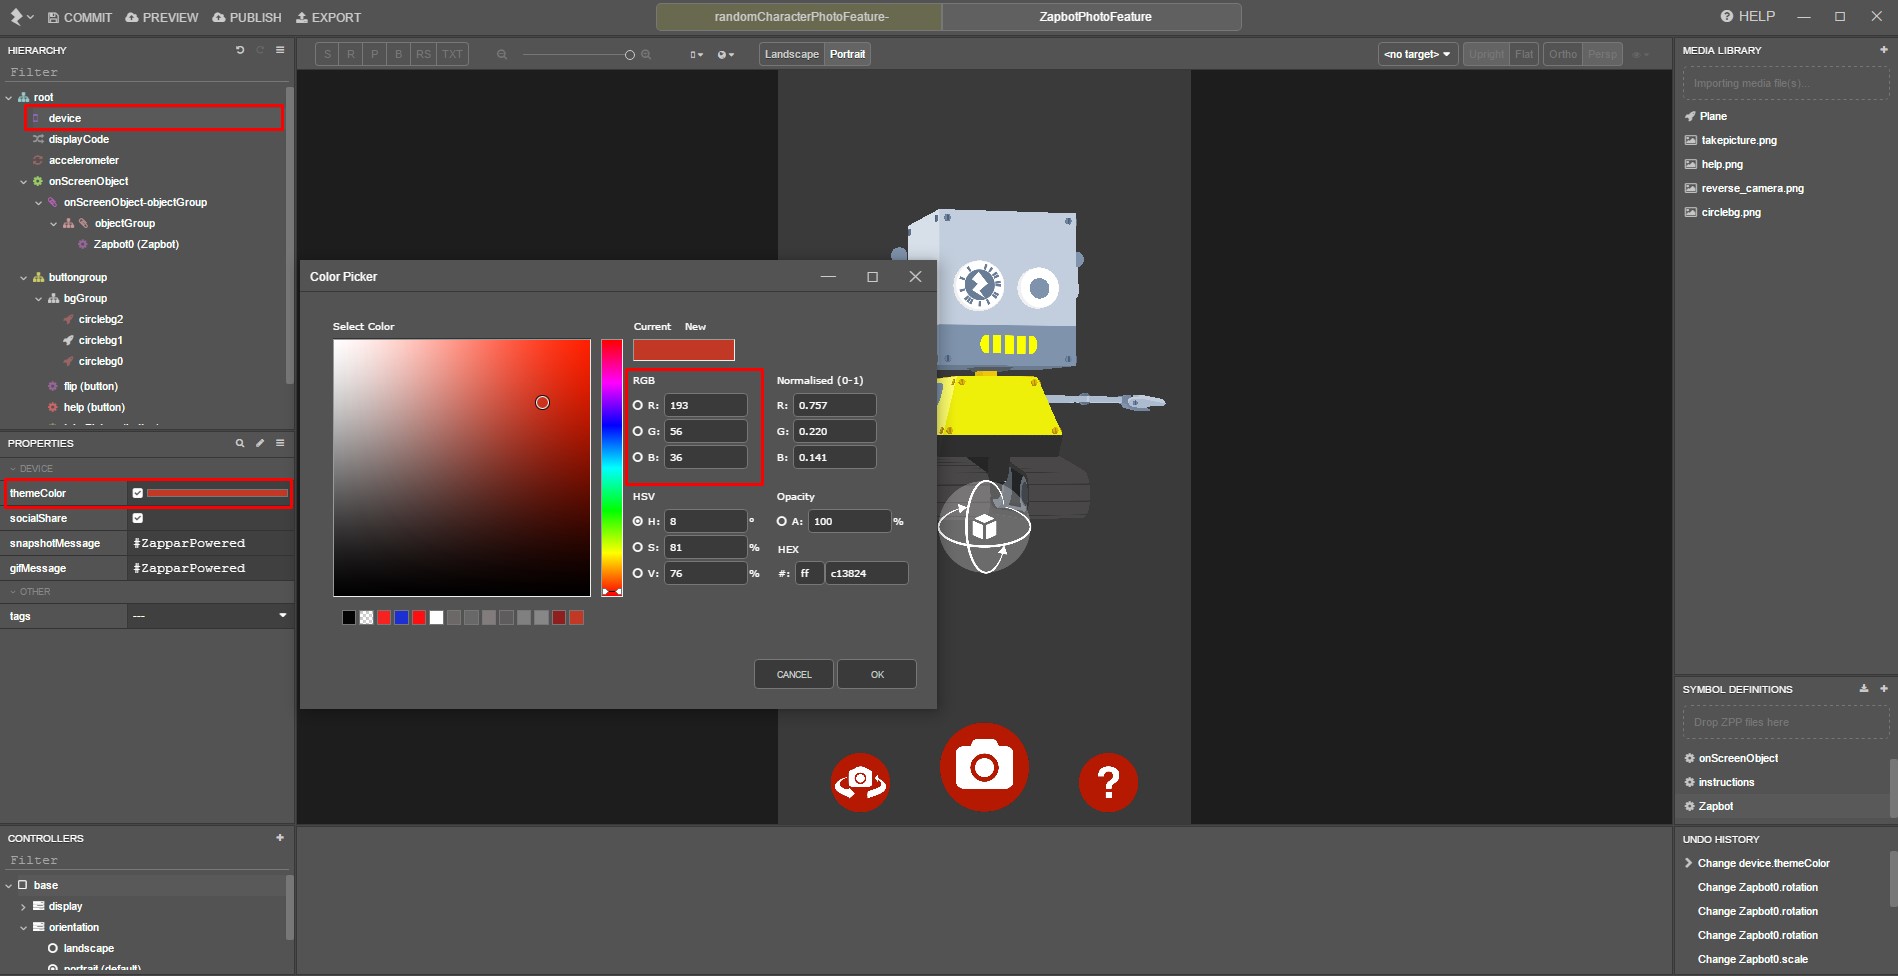
13) Changing the experience’s theme color
We’ll also change the color of the Zappar app’s UI during our experience.
Find the ‘device’ node in the hierarchy and make sure its ‘themeColor’ box is checked.
Change its color property to RGB values (193, 56, 36).
Part 4: Managing the screen symbols
In this step we’ll be adding functionality that will let a user head back to the parent symbol from within the photo feature screen symbol.
14) Adding a back button to the Zapbot photo feature
While still in the ‘ZapbotPhotoFeature’ symbol, import the ‘backArrow’ image file from your downloads folder to your media library.
Select the root node in the hierarchy, right click and select ‘New > Group’.
Rename the group to ‘backGroup’.
In the ‘Properties’ panel, change its ‘relativeTo’ property to ‘Z.screenLeft’.
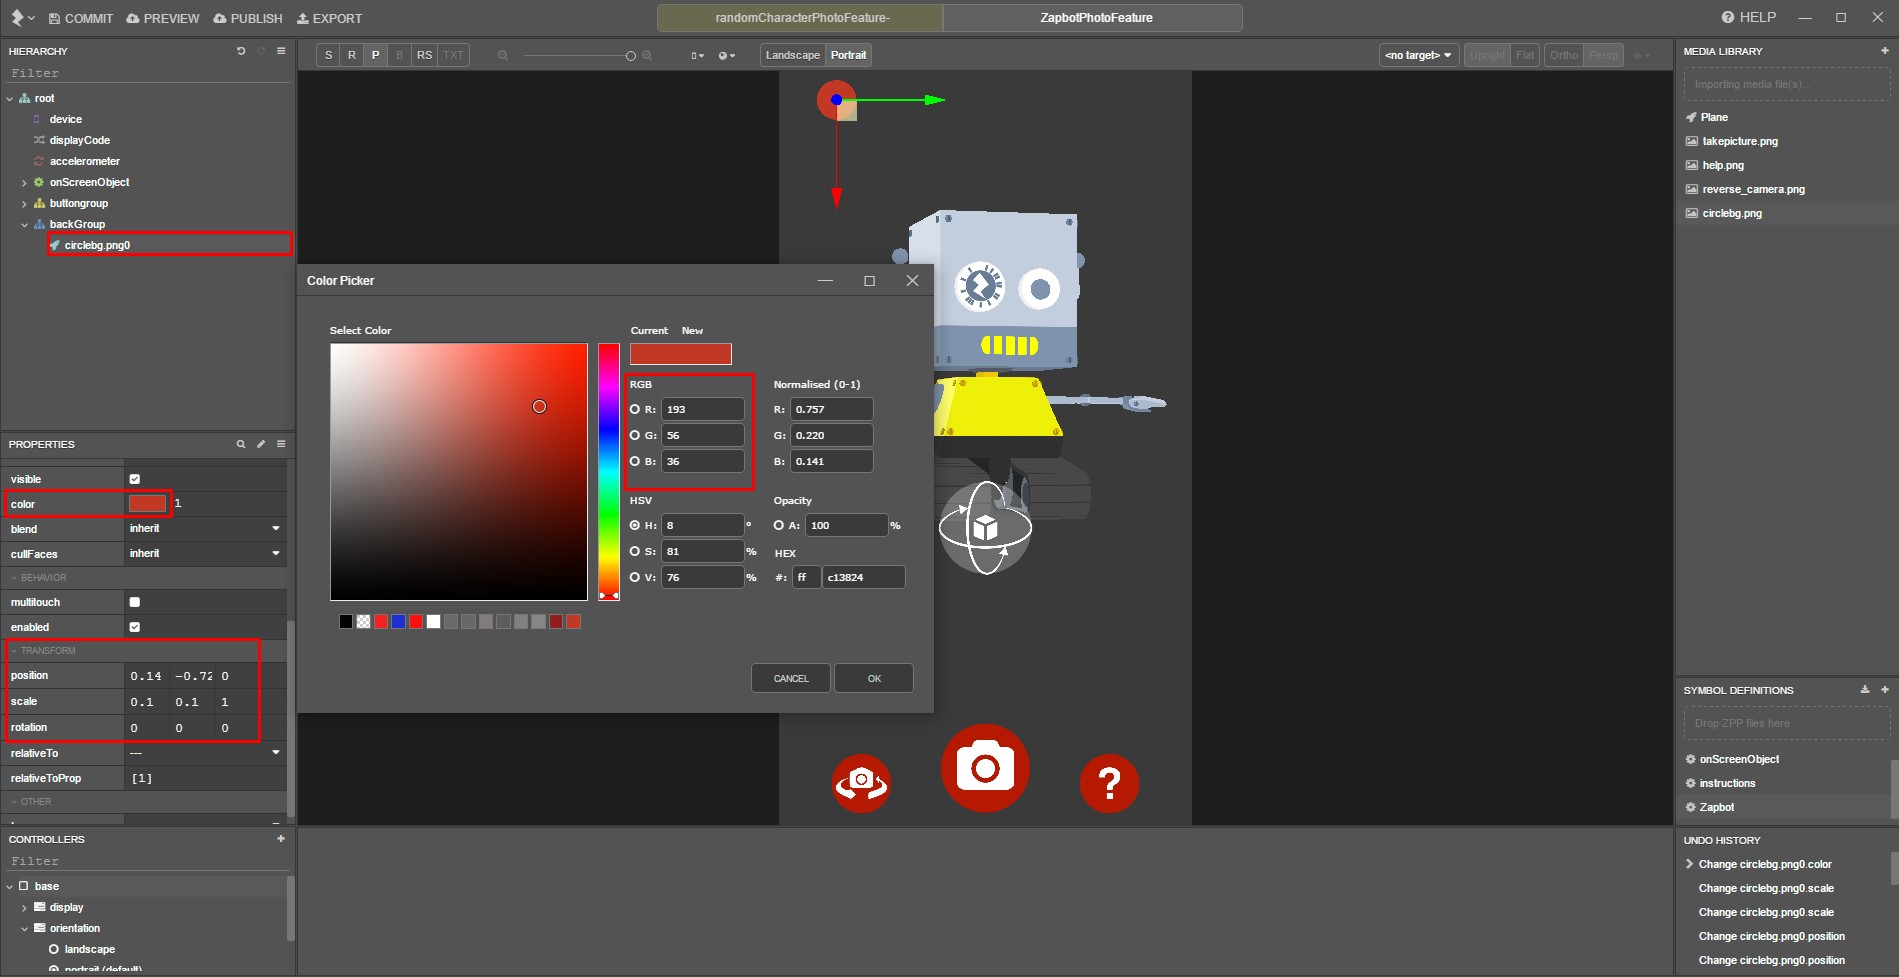
The photo feature template already contains an image called ‘circlebg.png’ in the Media Library, which we’ll be reusing for our own button.
Drag this file into ‘backGroup’.
Change the node’s transfoms to:
| position | 0.14 | -0.72 | 0 | |
| scale | 0.1 | 0.1 | 1 | |
| rotation | 0 | 0 | 0 |
Select the color box in the node’s ‘color’ property and change the RGB values to [193, 56, 36].
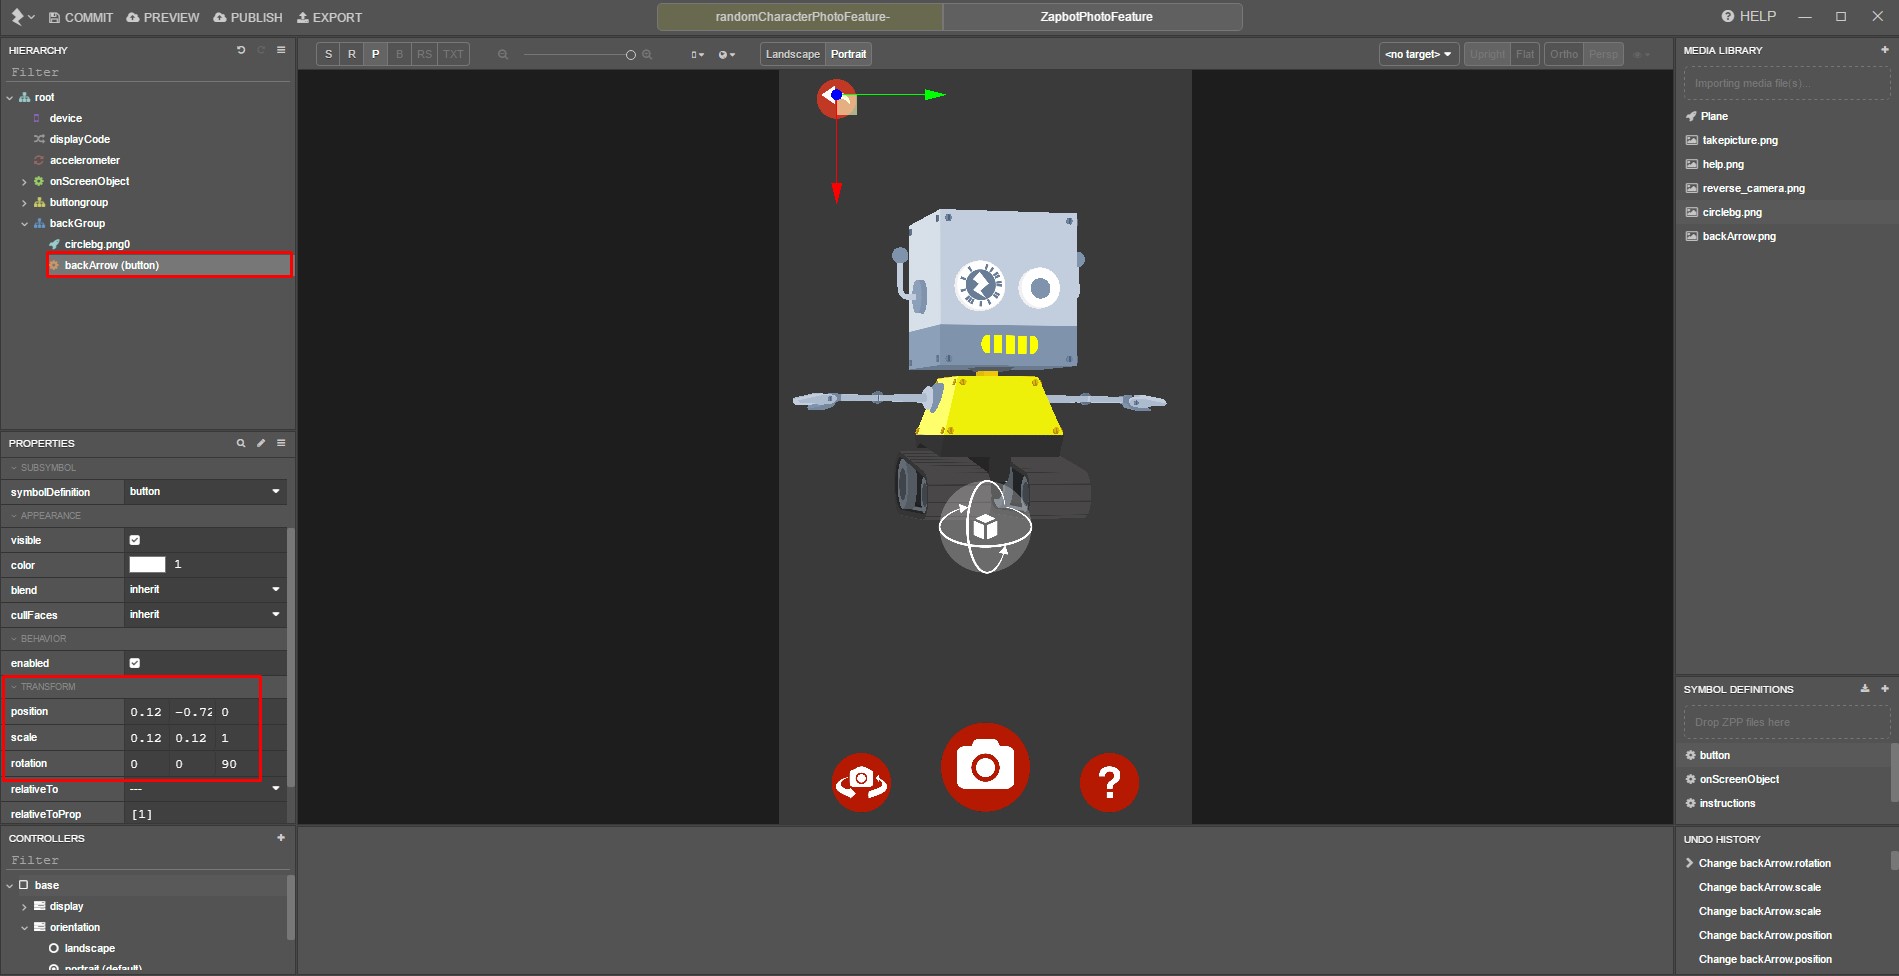
The photo feature template also contains an existing ‘button’ symbol which we can use.
Drag the ‘button’ subsymbol from your ‘Symbol Definitions’ panel into ‘backGroup’, beneath the ‘circlebg.png0’ node.
Rename this new instance of the button subsymbol to ‘backArrow’.
Change both its ‘NormalIcon’ and ‘DepressedIcon’ properties to ‘backArrow.png’.
Set the ‘backArrow’ node’s transforms to:
| position | 0.12 | -0.72 | 0 | |
| scale | 0.12 | 0.12 | 1 | |
| rotation | 0 | 0 | 90 |
15) Adding the script to the button
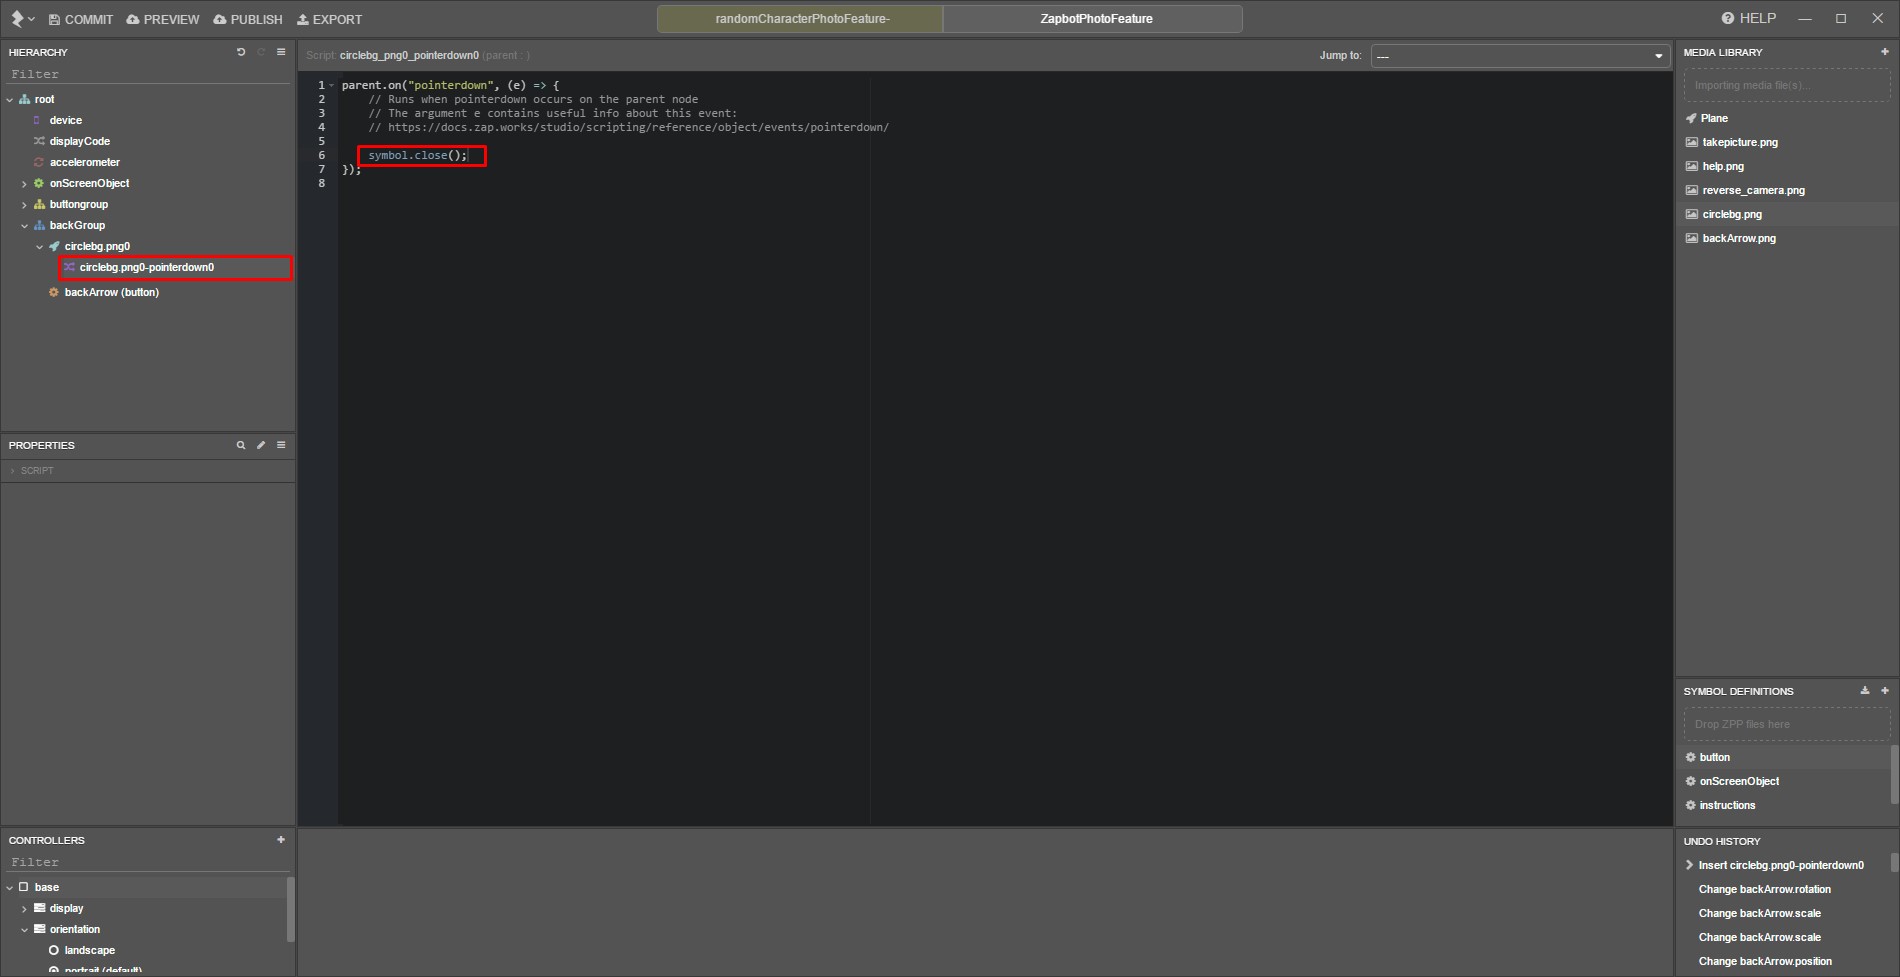
Right click the ‘circlebg.png0’ node and select ‘New > Script > pointerdown’.
We only need to add a single line of code within the pointerdown function:
symbol.close();
16) Making our new button disappear when a snapshot is taken
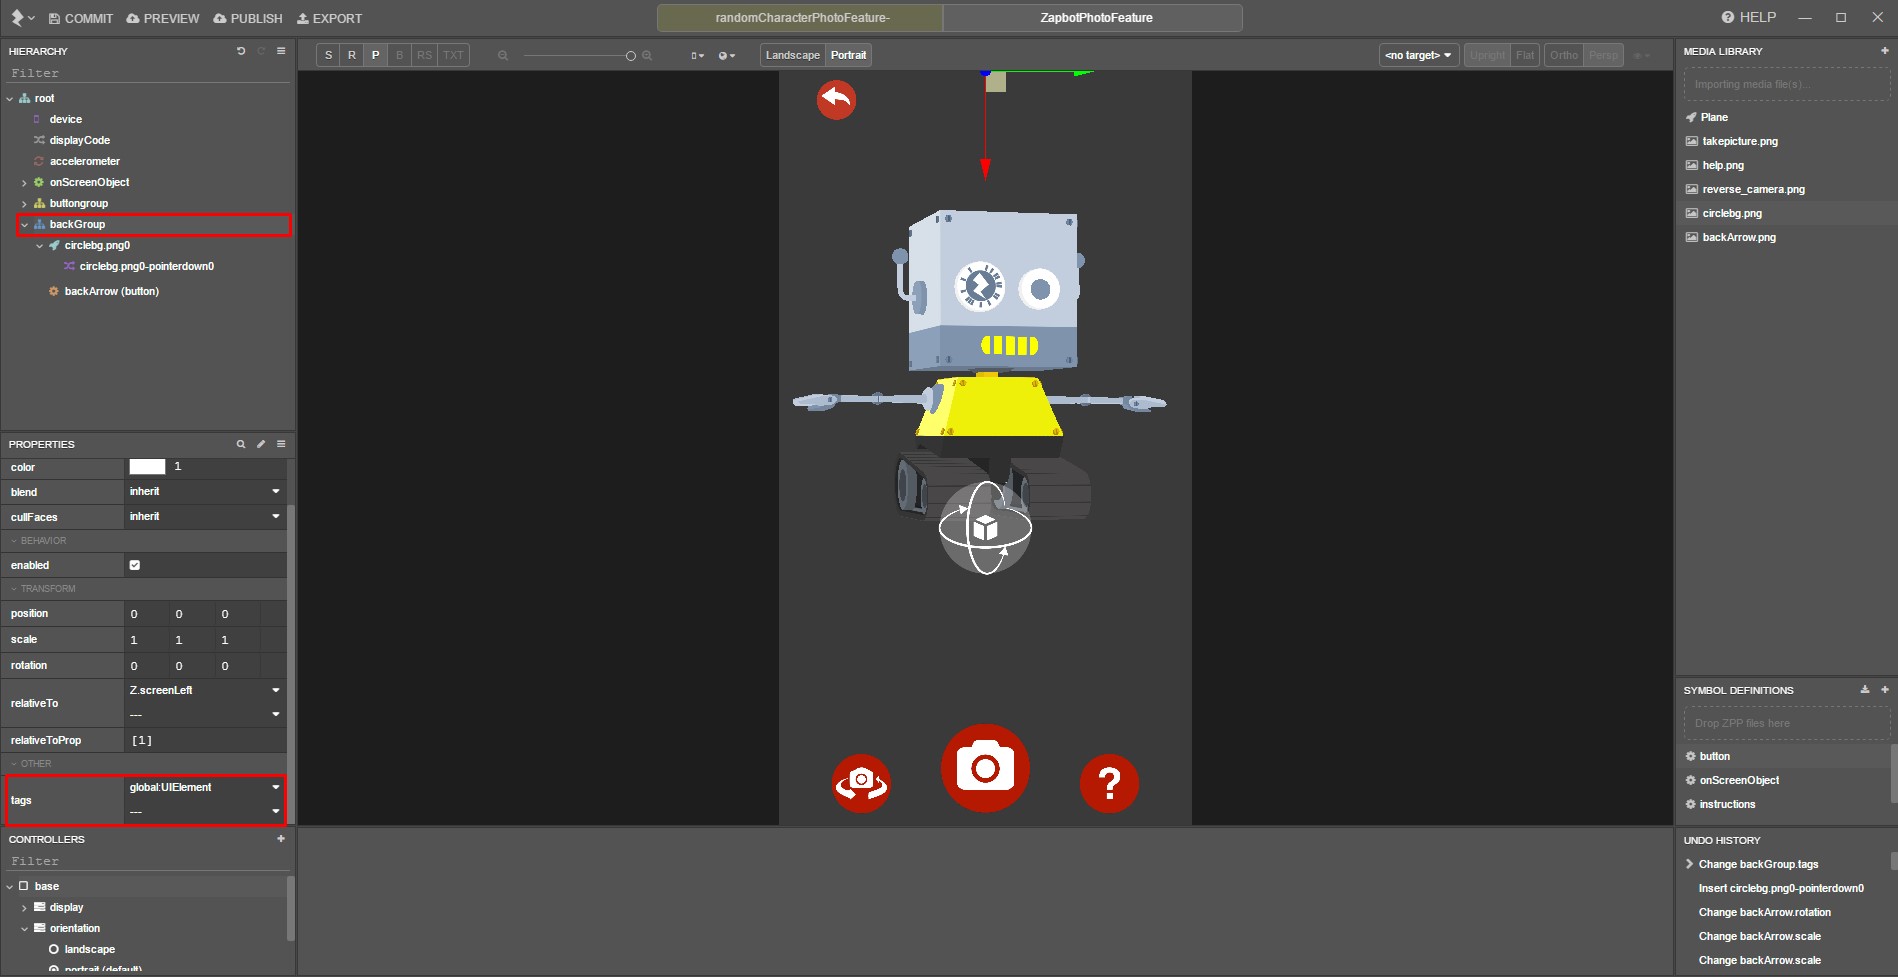
Tags are string identifiers that can be added to nodes to easily perform common functions on multiple nodes.
The photo feature template already contains a tag called ‘global:UIElement’.
There’s an existing function within the template that calls the .hide() function on all nodes with this tag, when a photo is taken.
Since we also want our button to disappear when the user takes a photo we’ll be adding the tag to our button.
Select the ‘backGroup’ node in the hierarchy and change its ‘tag’ property from ‘- - -’ to ‘global:UIElement’.
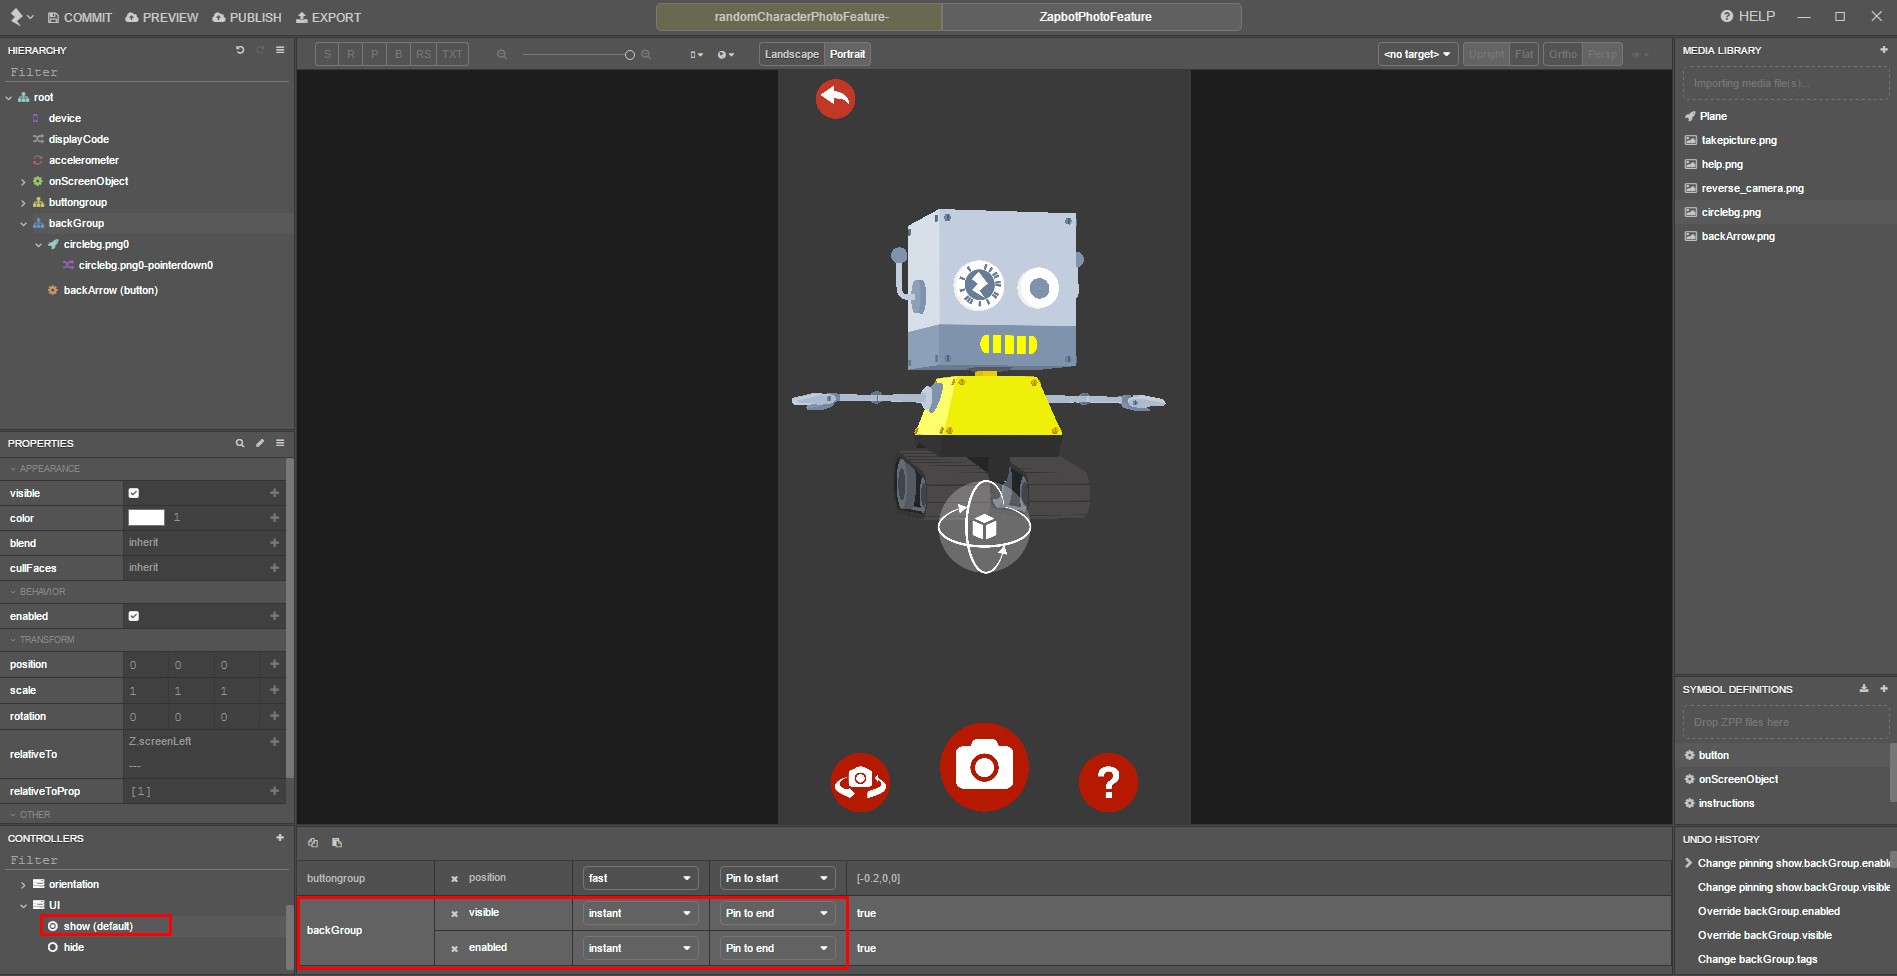
Click on the ‘show’ state within the ‘UI’ controller in the ‘Controllers’ panel, and then select the ‘backGroup’ node in the hierarchy.
Click the ’+’ symbol next to the group’s ‘visible’ and ‘enabled’ properties to add them to the controller.
We want the button to appear towards the end of the transition between the show and hide states, so make sure both its properties are set to ‘Instant’ and ‘Pin to end’.
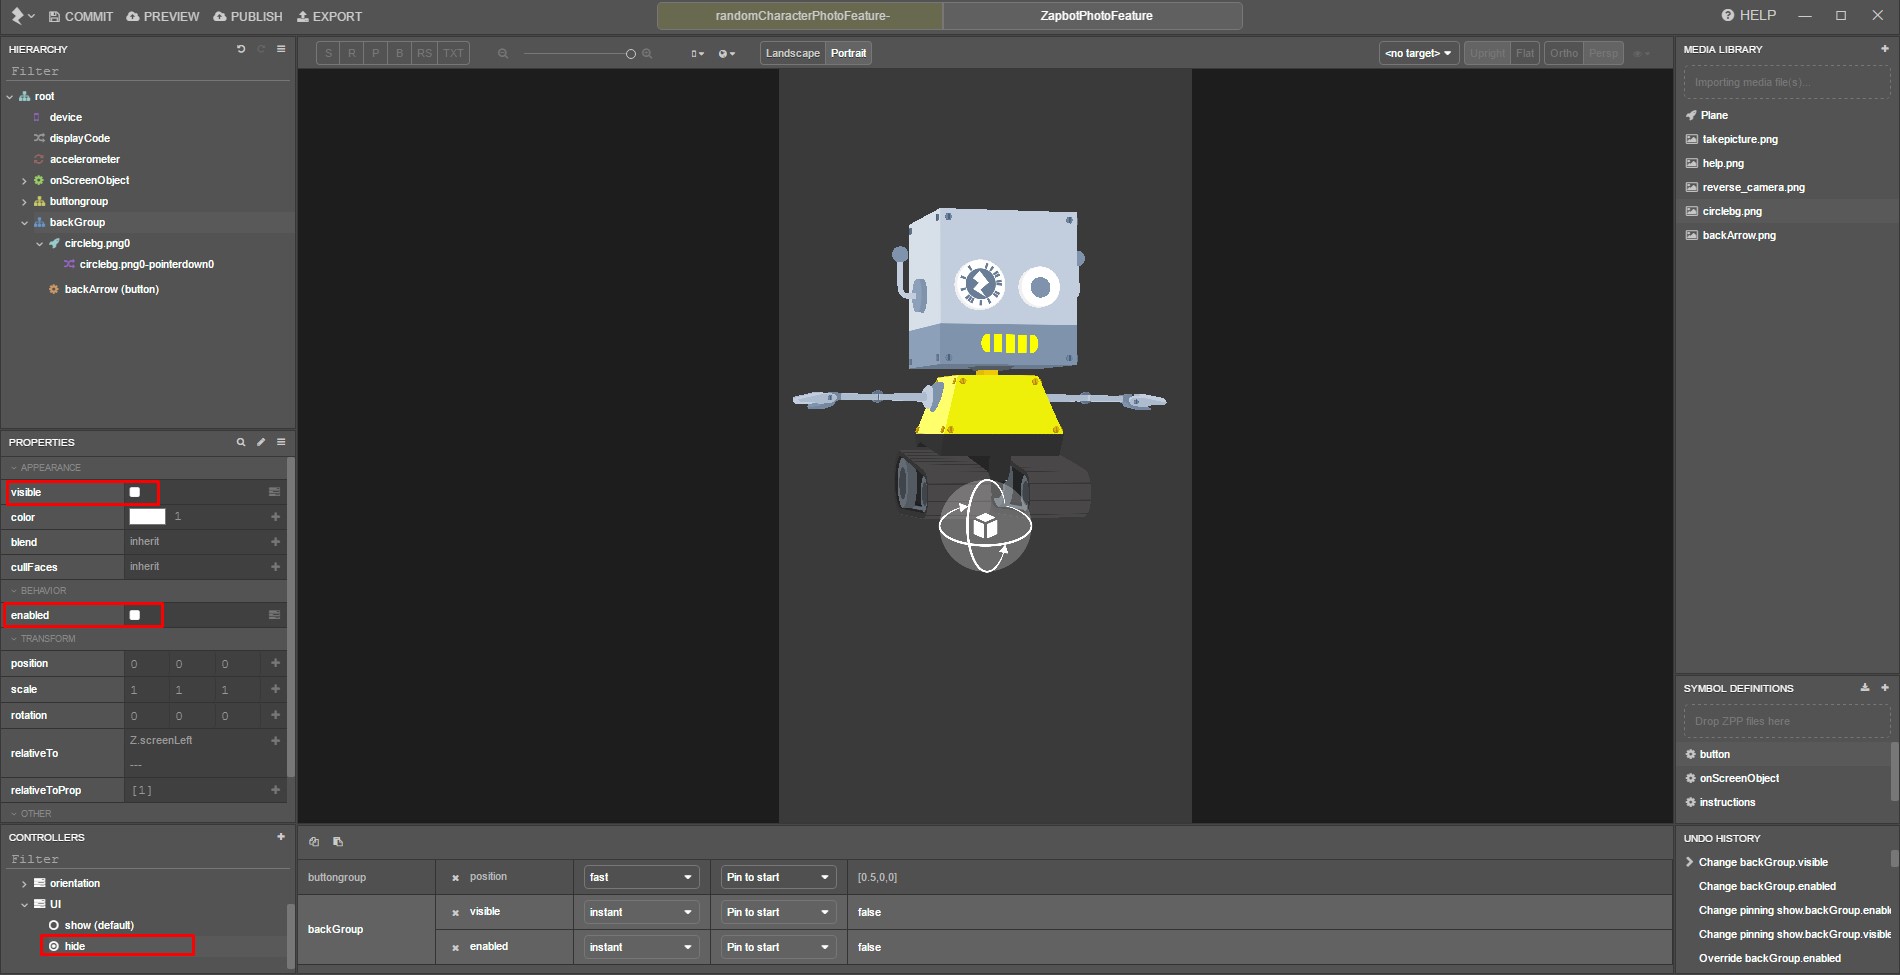
Select the ‘hide’ state and within the group’s properties and uncheck the ‘visible’ and ‘enabled’ properties.
17) Adding a reference to our Zapbot photo feature in the script
Head back to the parent symbol by clicking on it in the breadcrumb bar above the 3D view.
In the hierarchy select the ‘randomizationButton_pointerdown0’ script we created in Part 1.
Hit ‘Enter’ at the top of the script a few times to make room for the symbol reference we’ll be adding.
Create a reference to our ZapBot photo feature symbol by dragging it from the ‘Symbol Definitions’ panel into the top of our script and selecting ‘Construct symbol’.
18) Displaying our parent symbol when a photo feature symbol is closed
Add the following block of code after the pointerdown function.
ZapbotPhotoFeature.on("close", () => { // Runs when the ZapbotPhotoFeature symbol is closed // Show the current symbol, the parent symbol symbol.show();});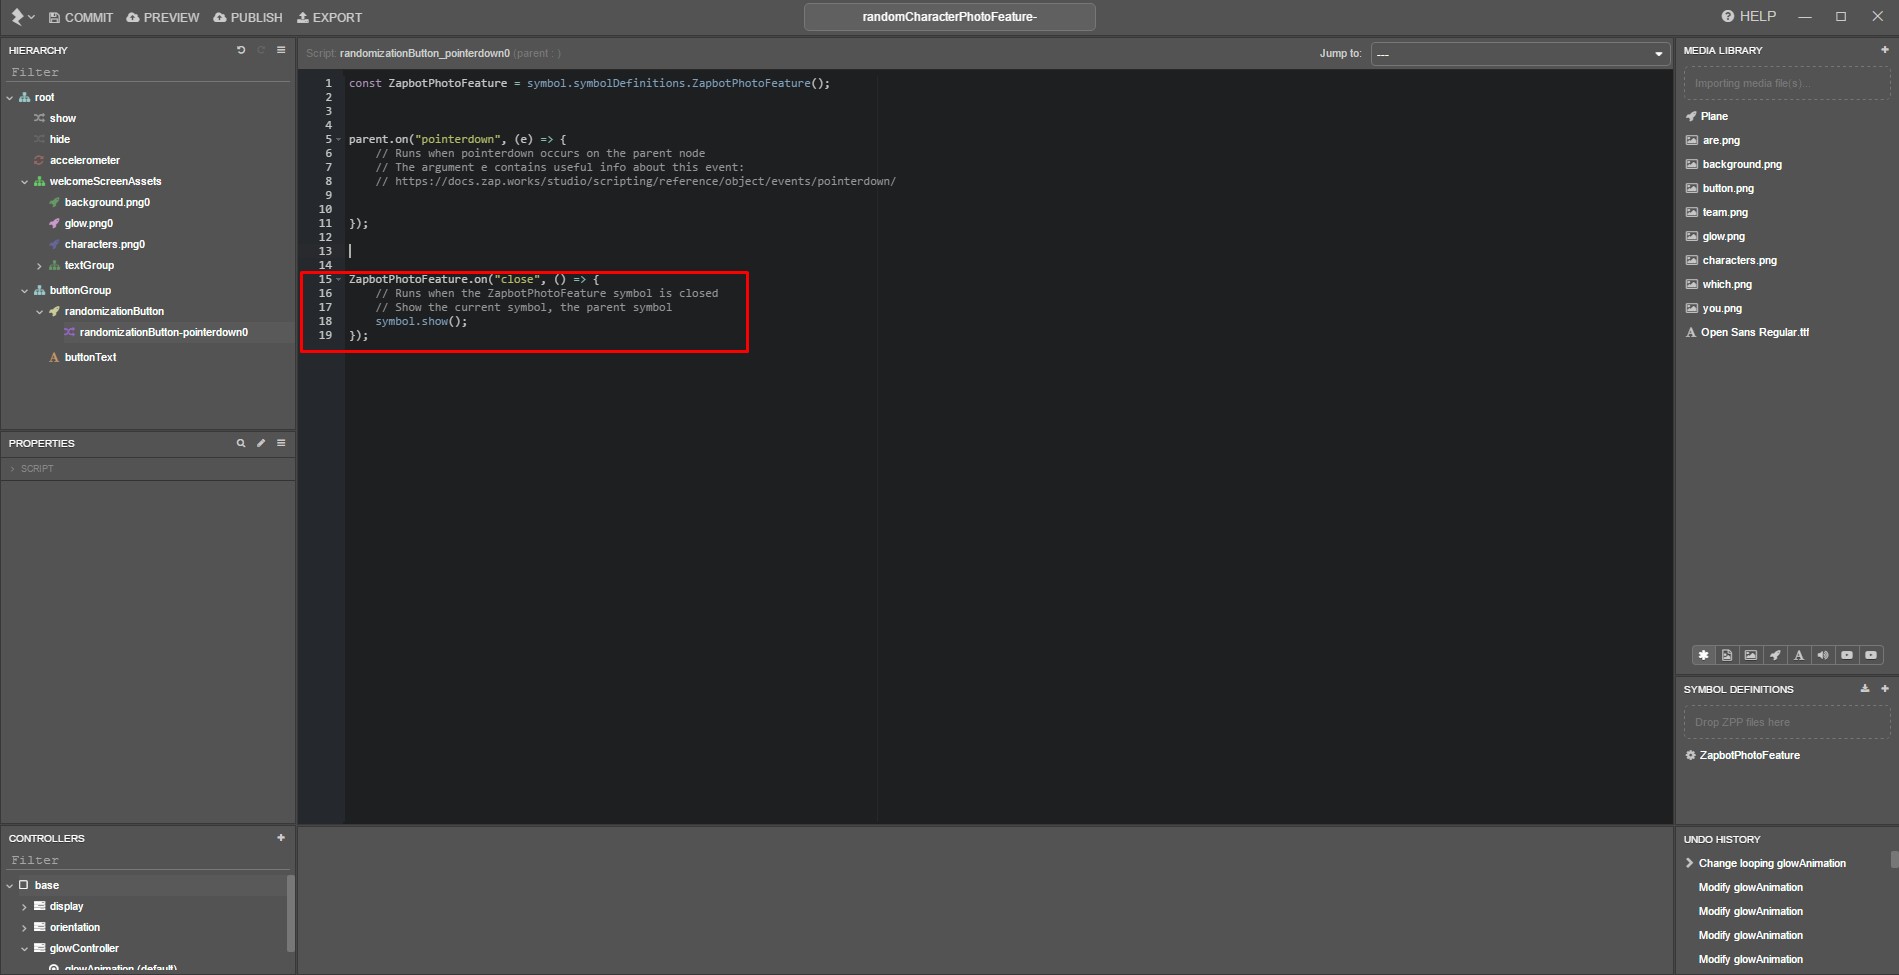
The first line of code will listen out for when the close event is emitted by the ZapbotPhotoFeature symbol reference we created in the previous step, which happens automatically through the script we set up in step 15.
If the event is fired on the symbol, the displayParentSymbol function will run and call show() on our parent symbol.
Part 5: Preparing the other photo feature symbols
Now that the ZapBot photo feature has been set up, we can use it to create our other two photo feature symbols.
19) Preparing the Zappar Bunny photo feature
While in the parent symbol, right click on the ‘ZapbotPhotoFeature’ symbol in the ‘Symbol Definitions’ panel, and select ‘Duplicate’.
Name the new symbol ‘BunnyPhotoFeature’, and double-click to enter it.
Right click and delete the ‘Zapbot0 (Zapbot)’ node within the ‘onScreenObject >onScreenObject-objectGroup > objectGroup’ group in the hierarchy.
Scroll down the ‘Symbol Definitions’ panel and find the ‘Zapbot’ symbol, then right-click it and select ‘Delete’.
Import the ‘Zbunnypose03.pod’ file from ‘3D Models > Zappar Bunny’ inside the assets download folder by dragging the file into your ‘Media Library’.
You can click and drag the model’s textures files from the folder into the texture pop-up, to assign them automatically.
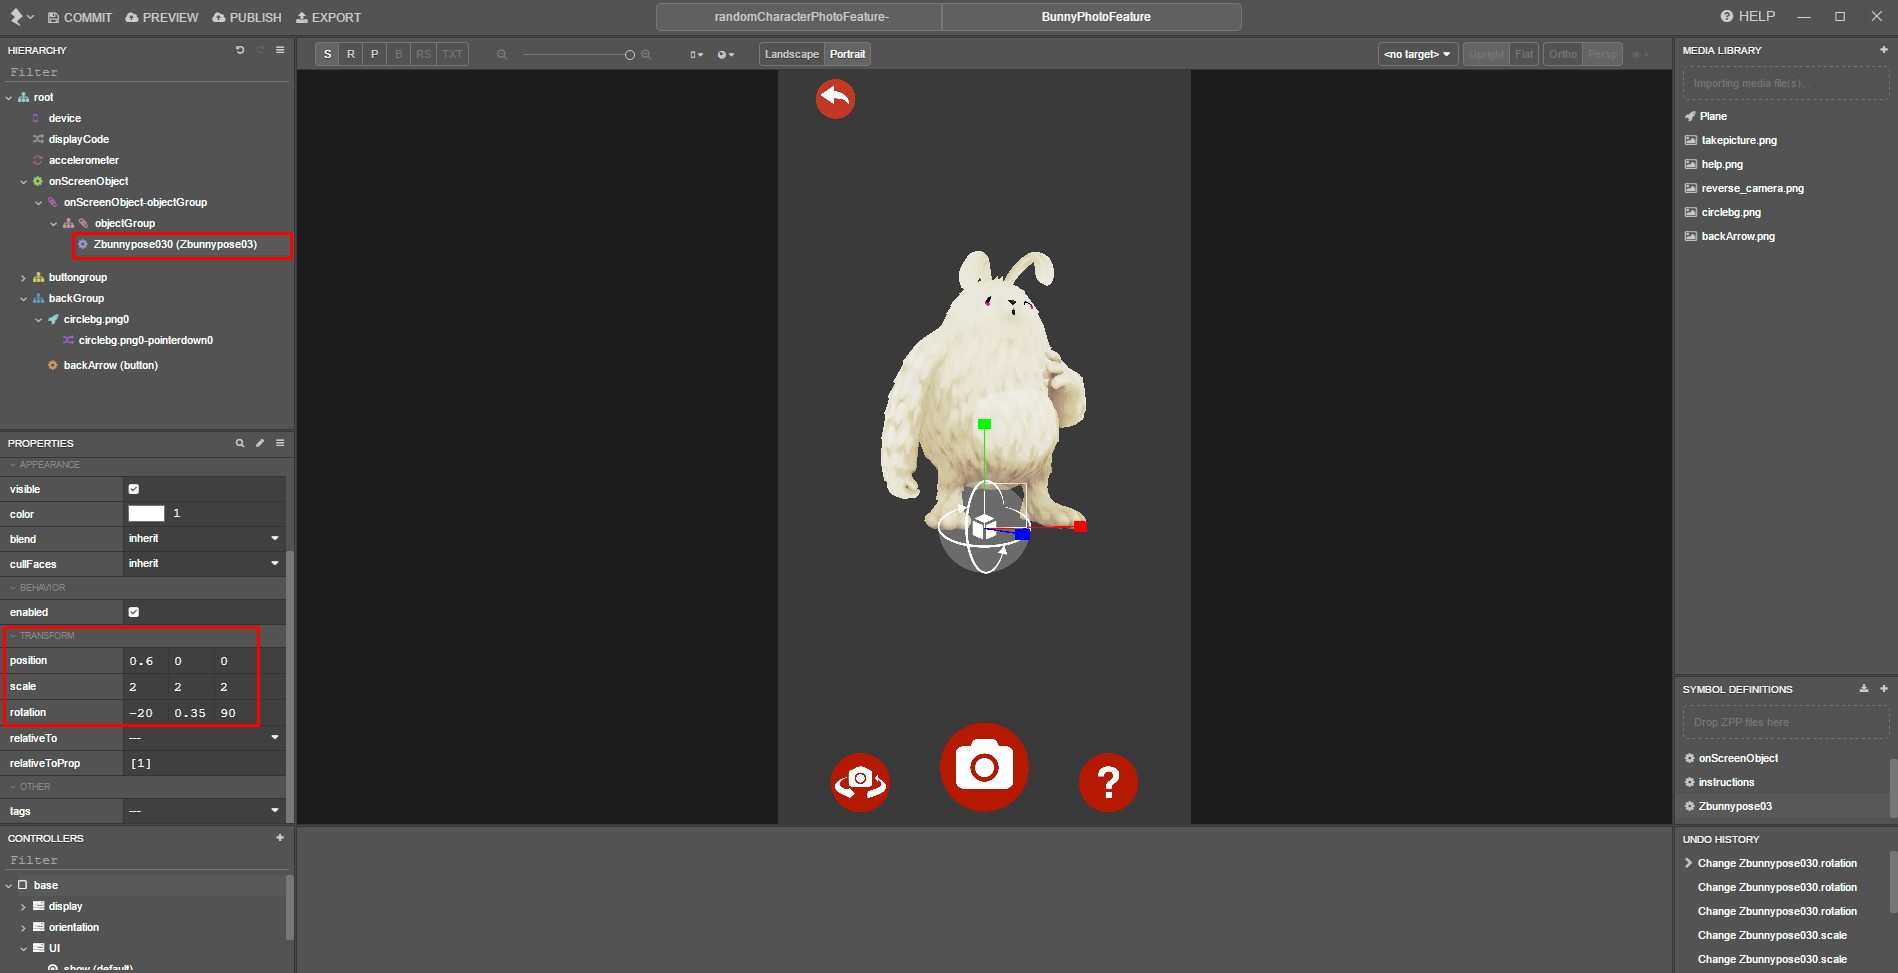
Drag the resulting symbol from your ‘Symbol Definitions’ into the hierarchy, within the ‘onScreenObject >onScreenObject-objectGroup > objectGroup’ group in the hierarchy.
Set the model’s transforms to:
| position | 0.6 | 0 | 0 | |
| scale | 4 | 4 | 4 | |
| rotation | -20 | 0.35 | 90 |
Due to changes in the 3D import process, the scale applied to the model in the image below is now outdated, please use the values provided above.
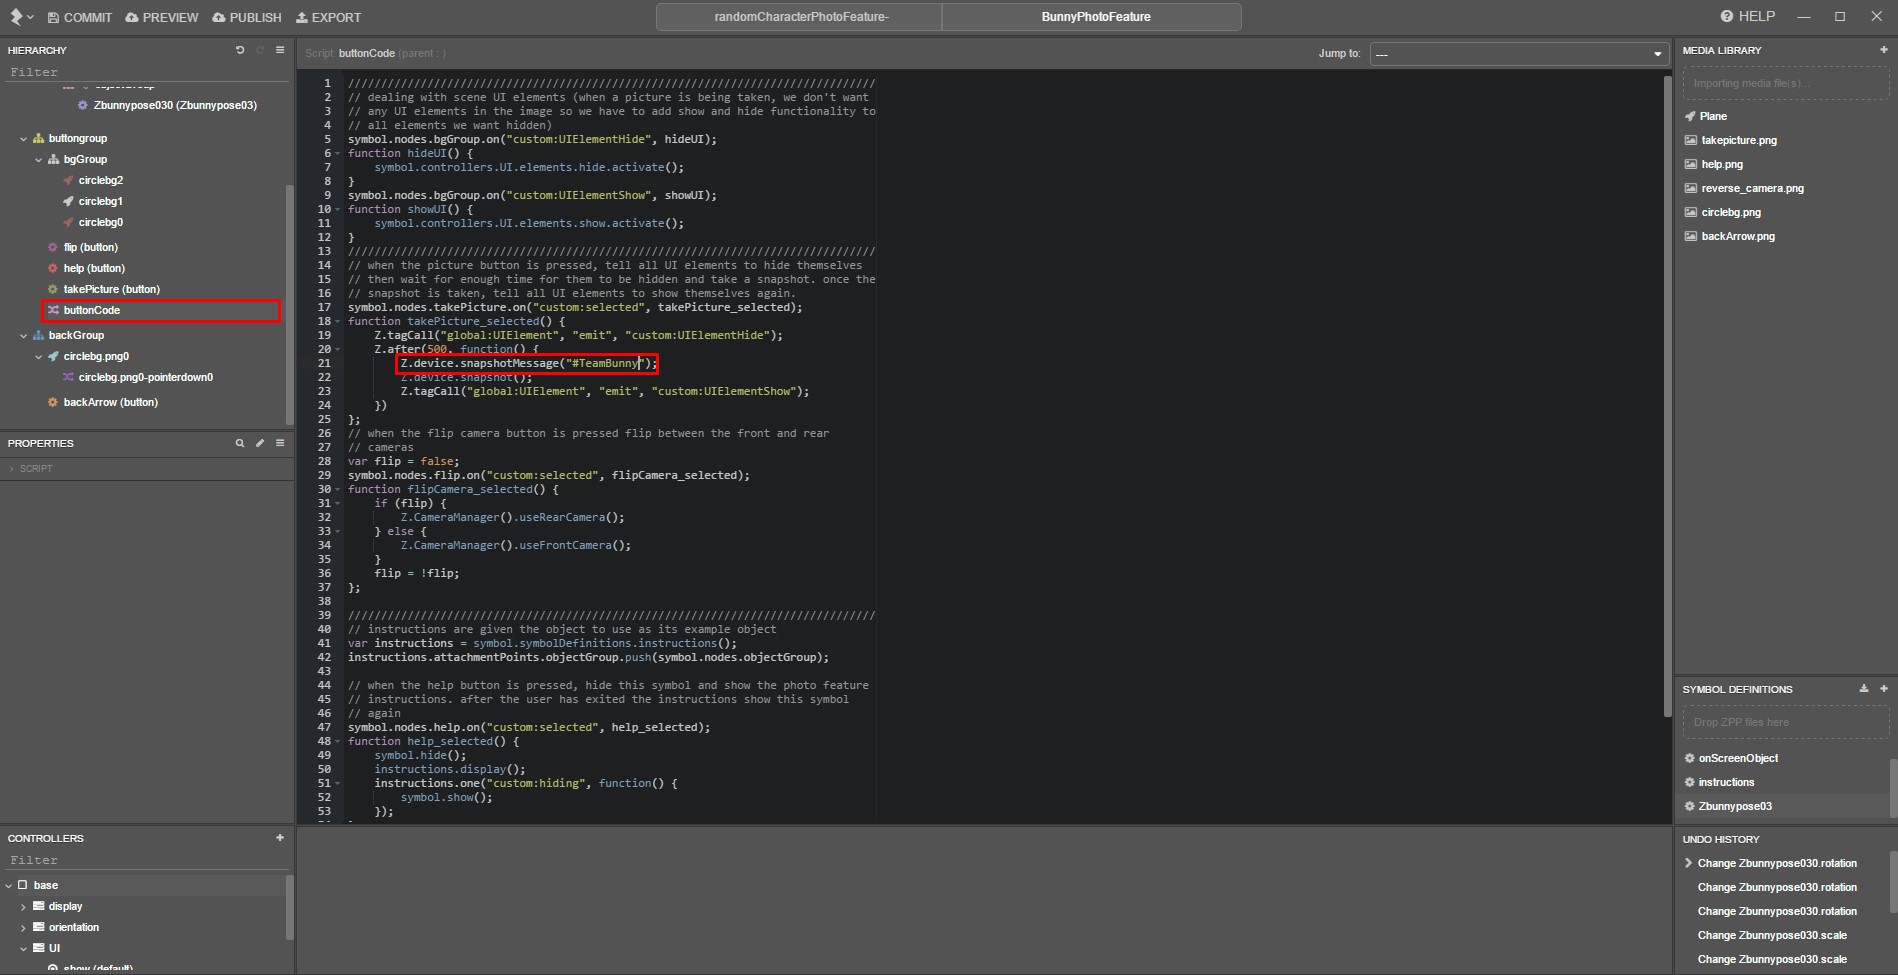
Find the ‘buttonCode’ script in the hierarchy, under ‘buttonGroup’.
On line 21, replace the #TeamZapbot part of the snapshot message code with #TeamBunny, so that it looks like this:
Z.device.snapshotMessage("#TeamBunny");
Return to the parent symbol.
Find the ‘randomizationButton_pointerdown0’ script within the hierarchy and create a reference to the Zappar bunny photo feature by dragging the symbol from the symbol definitions into the script, underneath our ‘ZapbotPhotoFeature’ reference.
Add an .on ("close") event handler for the BunnyPhotoFeature underneath the one we created previously for Zapbot.
BunnyPhotoFeature.on("close", () => { // Runs when the BunnyPhotoFeature symbol is closed // Show the current symbol, the parent symbol symbol.show();});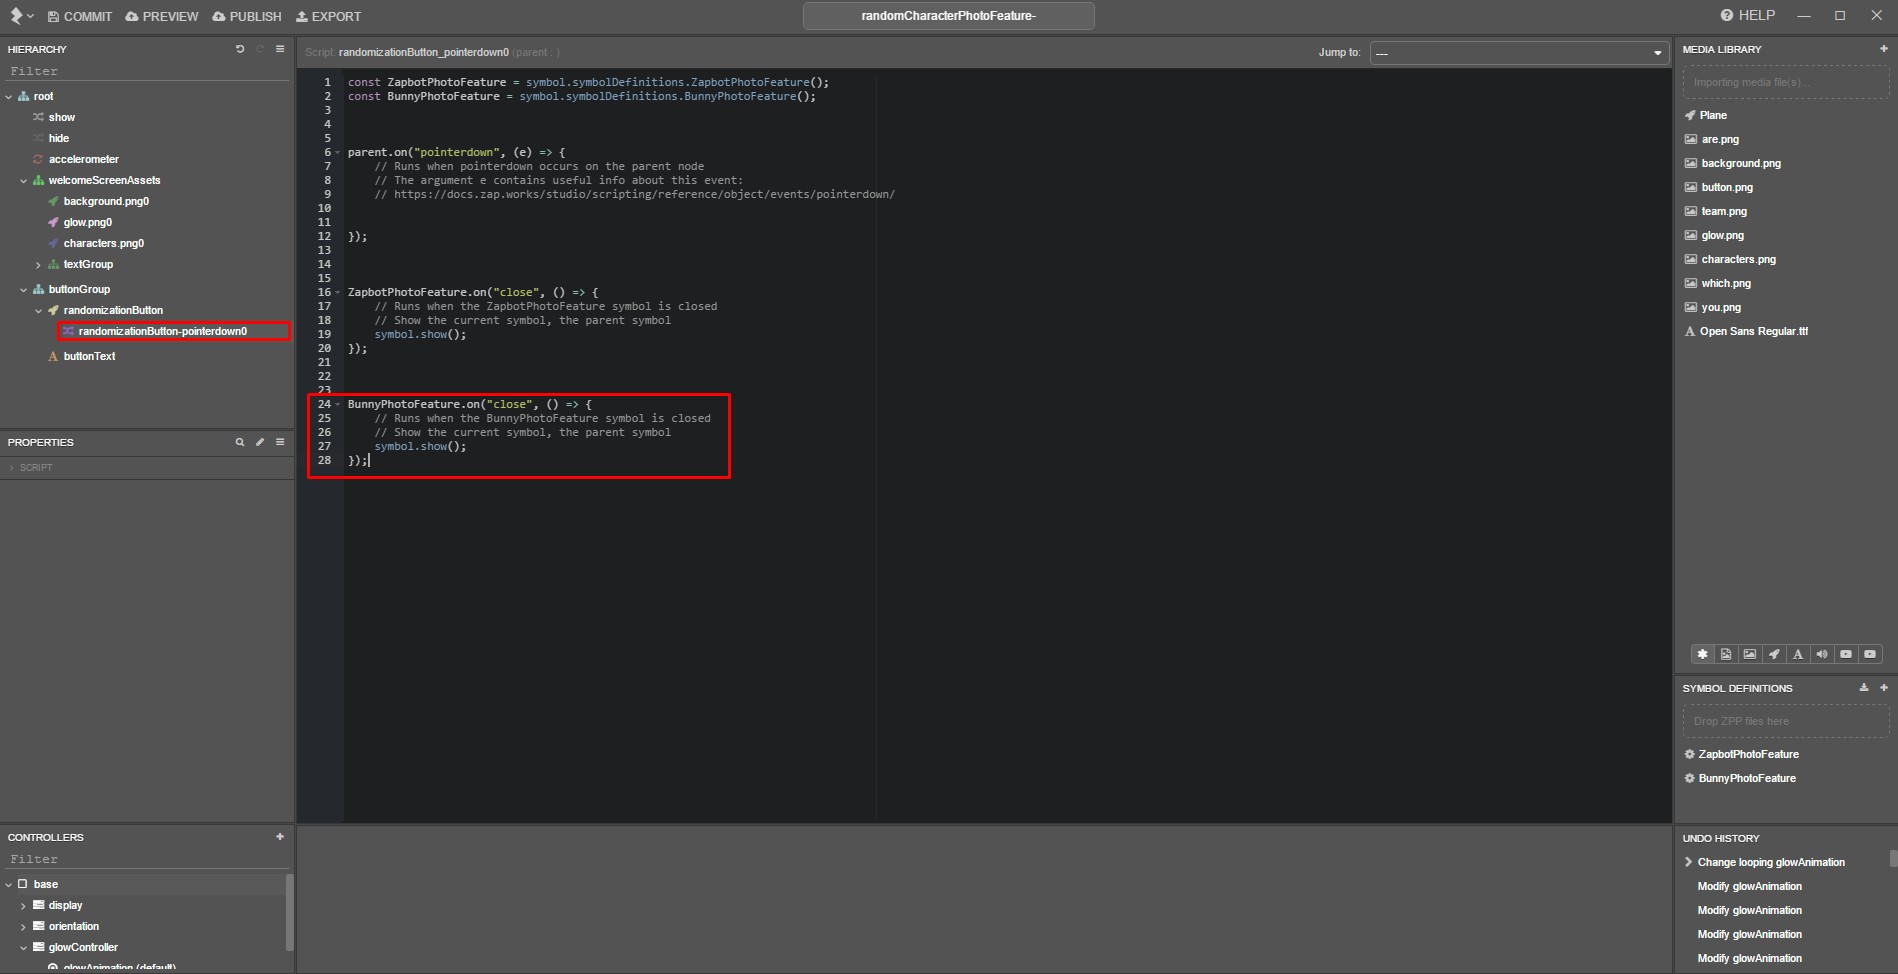
Our Zappar Bunny photo feature is now set up.
20) Preparing the Dave the Dino photo feature
While in the parent symbol, right click on the ‘ZapbotPhotoFeature’ symbol in the ‘Symbol Definitions’ panel, and select ‘Duplicate’.
Name the new symbol ‘DinoPhotoFeature’, and double-click to enter it.
Right click and delete the ‘Zapbot0 (Zapbot)’ node within the ‘onScreenObject >onScreenObject-objectGroup > objectGroup’ group in the hierarchy.
Scroll down the ‘Symbol Definitions’ panel and find the ‘Zapbot’ symbol, then right-click it and select ‘Delete’.
Import the ‘Dave_Dino.pod’ file from ‘3D Models > Dave the Dino’ inside the assets download folder by dragging the file into your ‘Media Library’.
You can click and drag the model’s textures files from the folder into the texture pop-up, to assign them automatically.
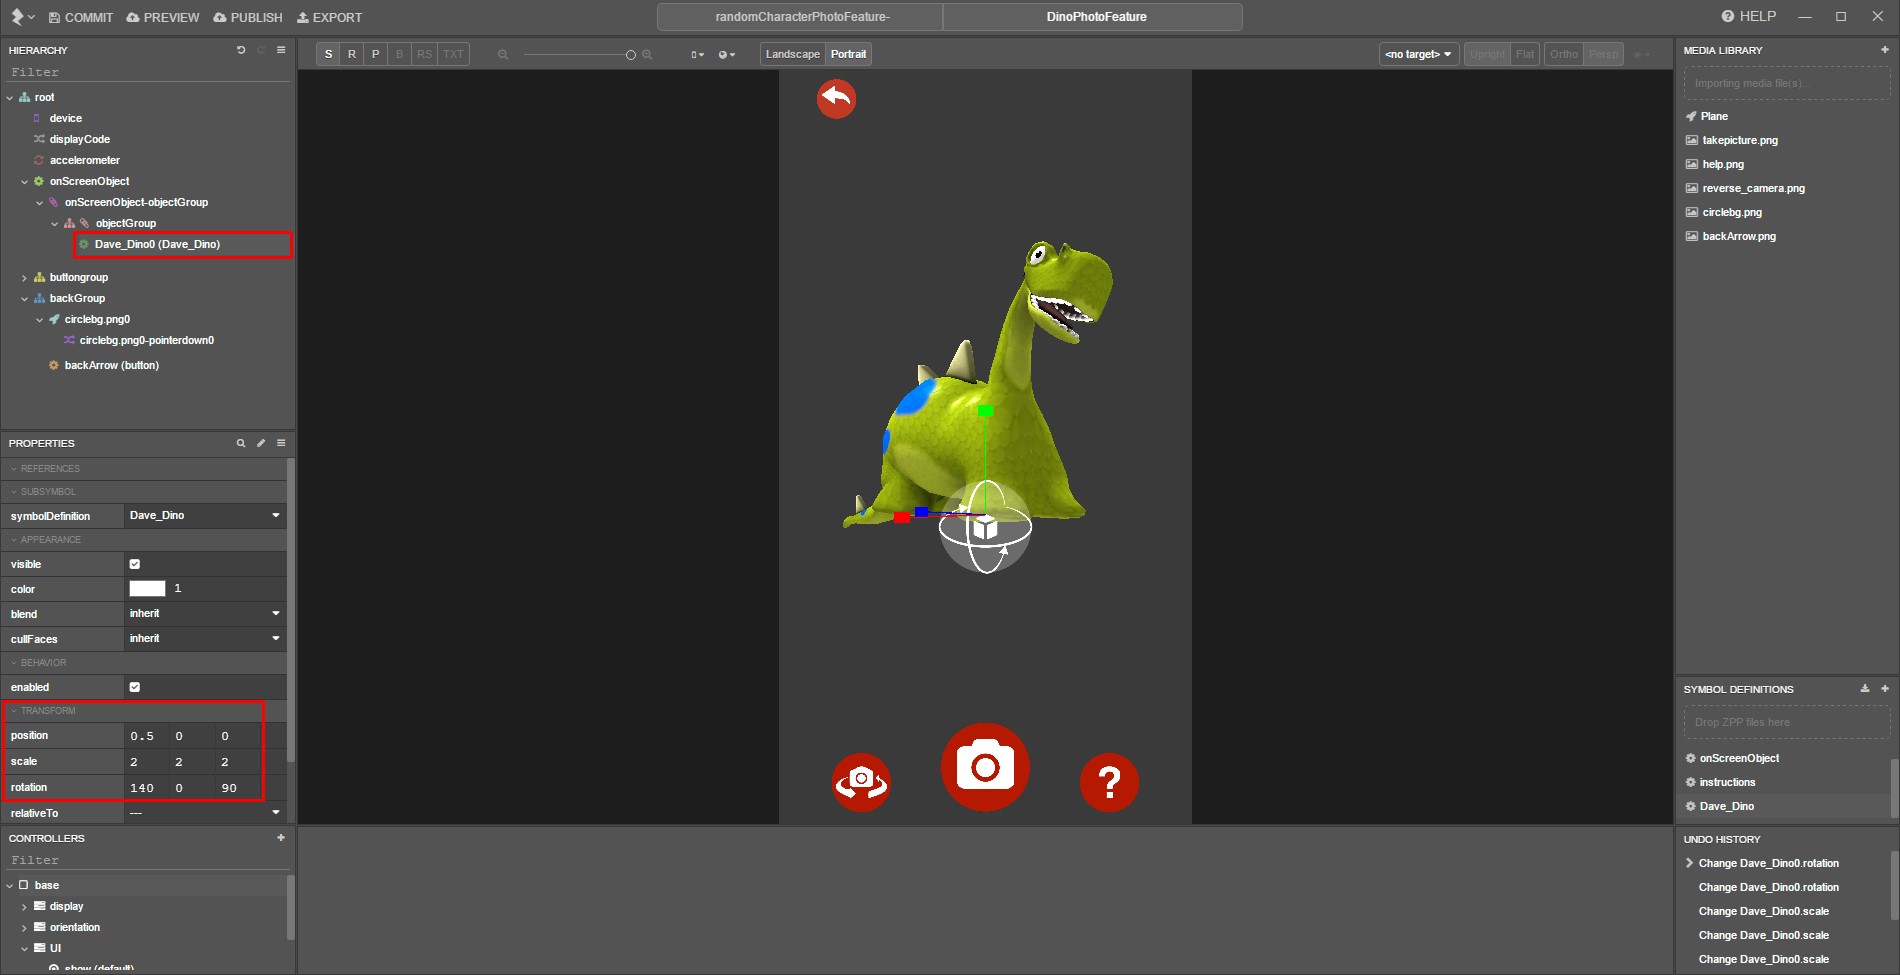
Drag the resulting symbol from your ‘Symbol Definitions’ into the hierarchy, within the ‘onScreenObject >onScreenObject-objectGroup > objectGroup’ group in the hierarchy.
Set the model’s transforms to:
| position | 0.5 | 0 | 0 | |
| scale | 5 | 5 | 5 | |
| rotation | 140 | 0 | 90 |
Due to changes in the 3D import process, the scale applied to the model in the image below is now outdated, please use the values provided above.
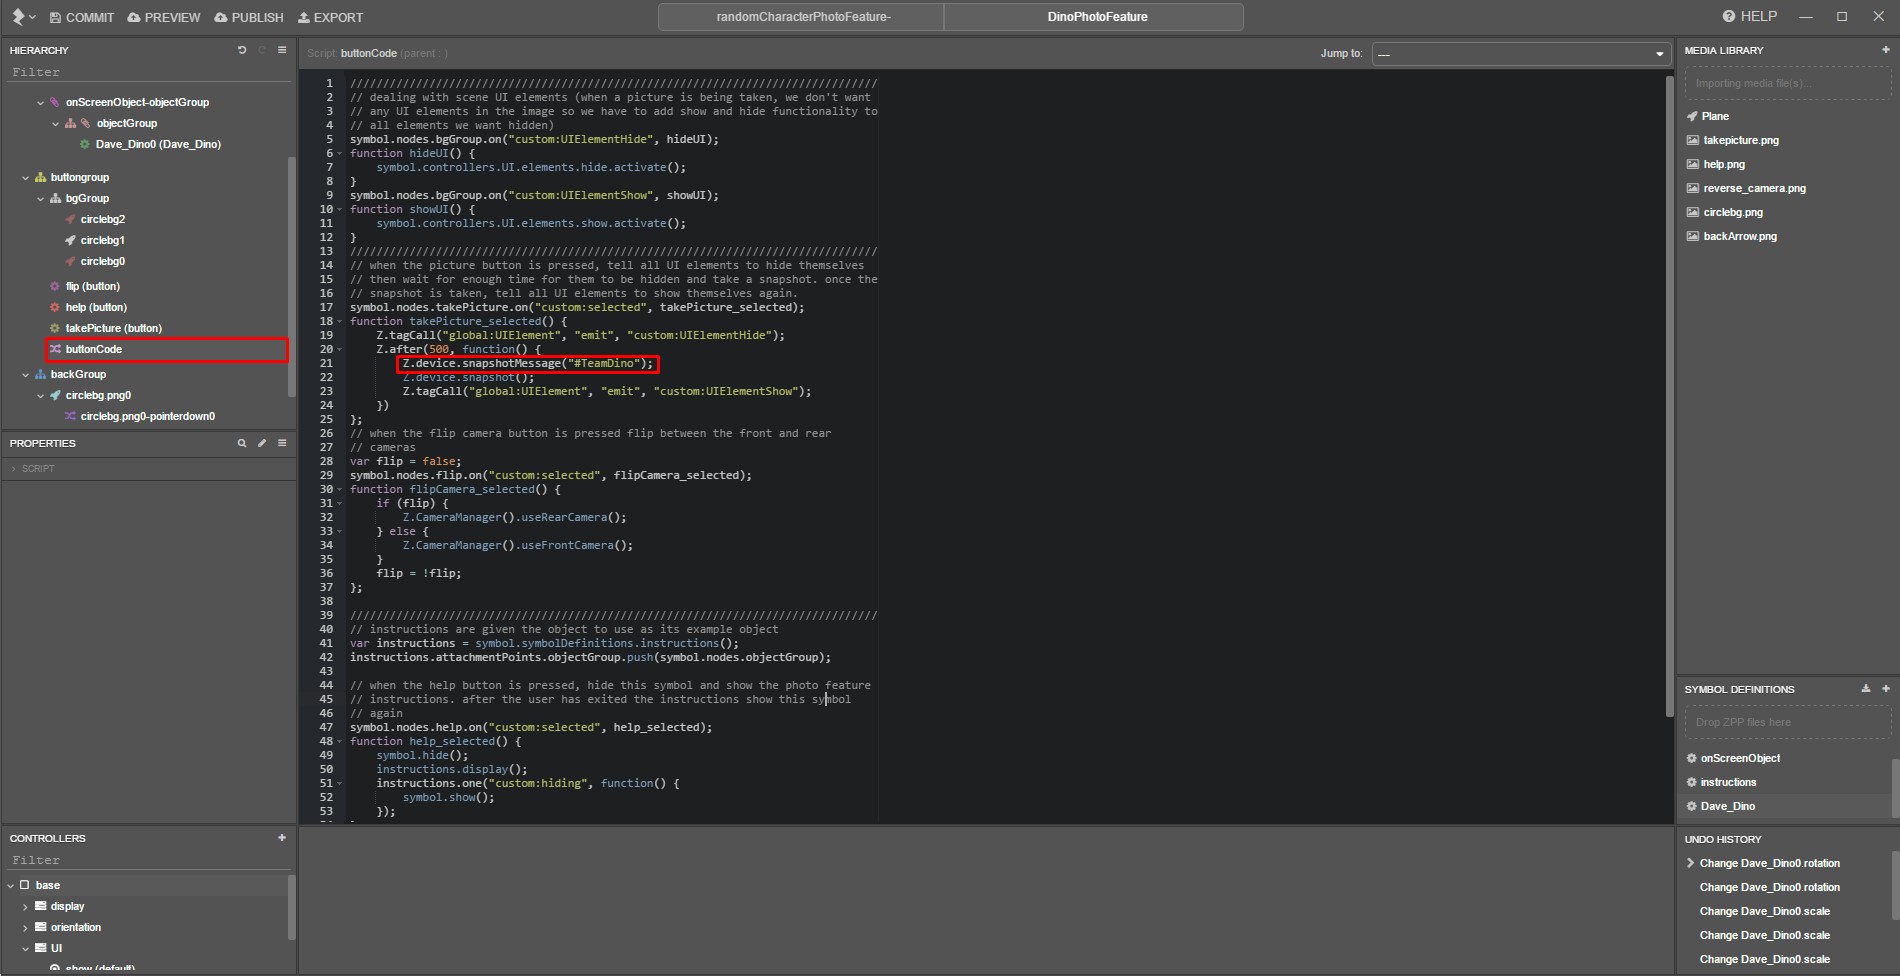
Find the ‘buttonCode’ script in the hierarchy, under ‘buttonGroup’.
On line 21, replace the #TeamZapbot part of the snapshot message code with #TeamDino, so that it looks like this:
Z.device.snapshotMessage("#TeamDino");
Return to the parent symbol.
Find the ‘randomizationButton_pointerdown0’ script within the hierarchy and create a reference to the Dino photo feature by dragging the symbol from the symbol definitions into the script, underneath our ‘BunnyPhotoFeature’ reference.
Add an .on ("close") event handler for the DinoPhotoFeature underneath the one we created previously for Zappar Bunny.
DinoPhotoFeature.on("close", () => { // Runs when the DinoPhotoFeature symbol is closed // Show the current symbol, the parent symbol symbol.show();});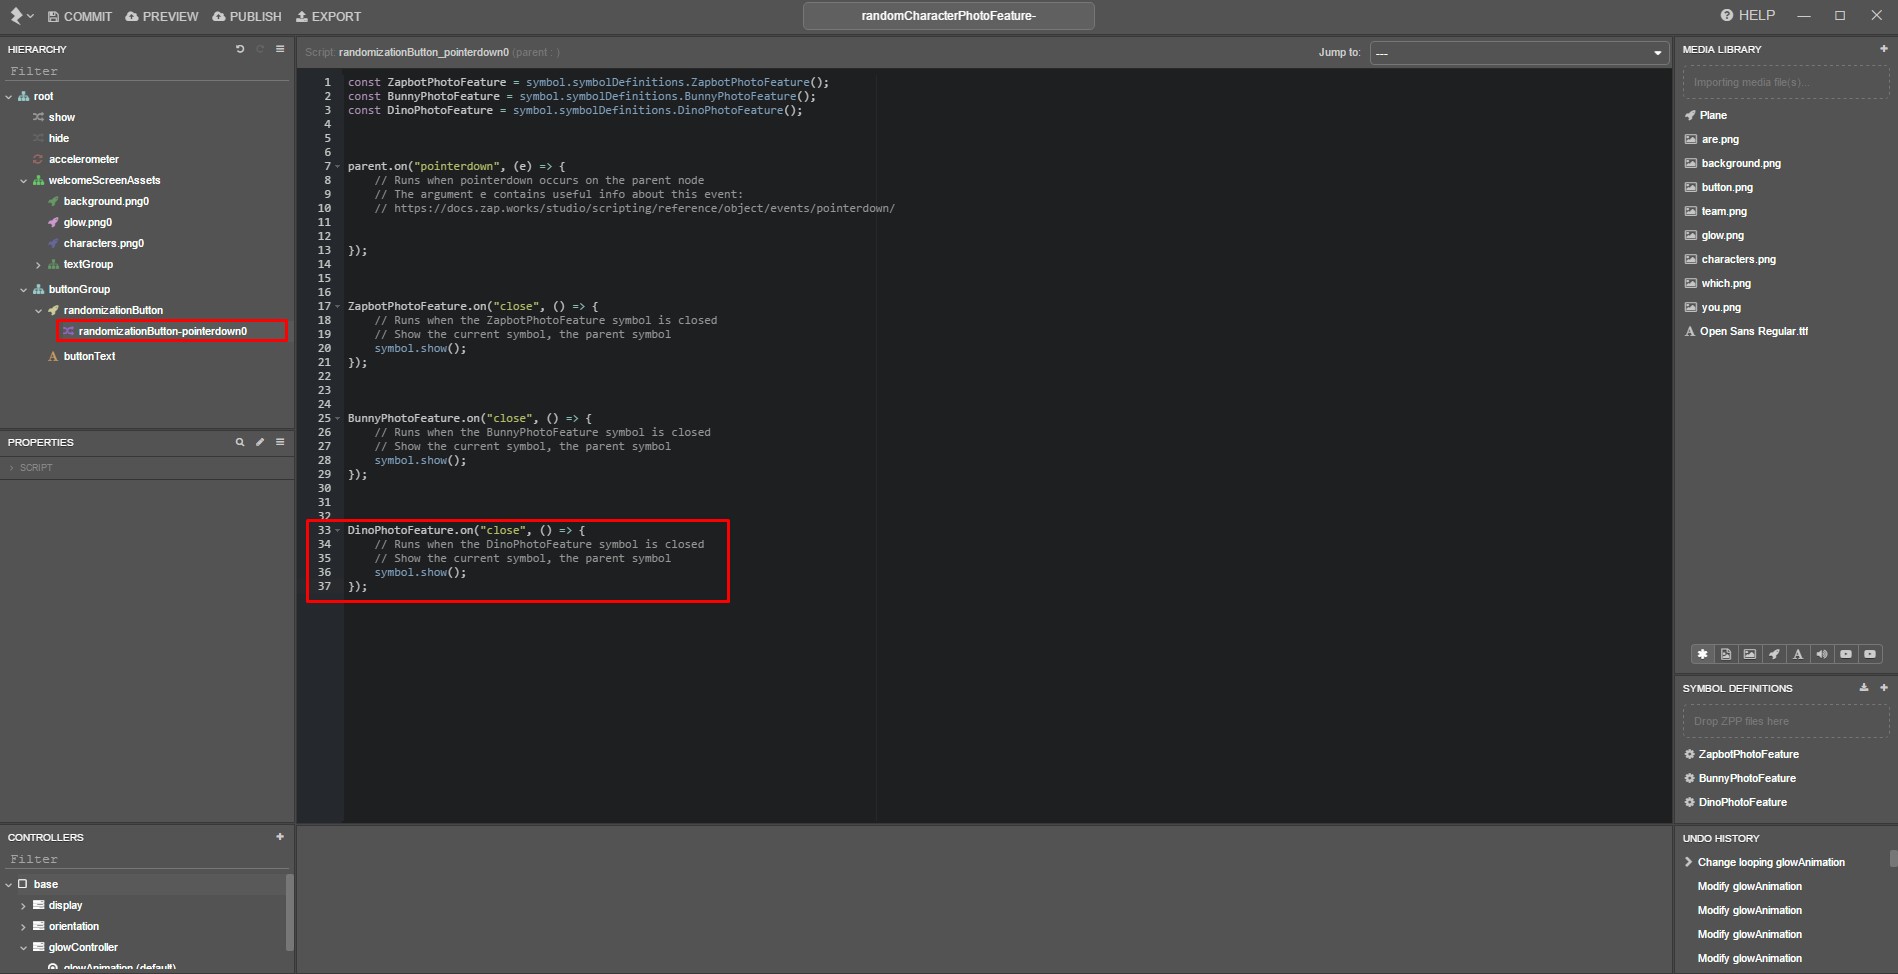
You now have the three photo feature symbols which we will display at random set up, so it’s time to add the randomization code itself.
Part 6: Adding the randomization script to our experience
In this part of the tutorial, we’ll be adding some variety to our experience by sending the user to a random team’s photo feature when they tap on a button.
We’ll also be making sure that they’re not sent to the same photo feature twice in a row, in case they press the button again.
We’ll be doing this by using a math function called Math.Random().
Studio’s scripting environment provides access to JavaScript’s Math library, which itself provides the ‘Math.random()’ function.
By default this function returns a random number between 0 (inclusive) and 1 (exclusive), but can be multiplied, and combined with another JavaScript Math library function, ‘Math.floor()’, to return a random number within any range.
The
Math.floor()function rounds a number down to it’s nearest integer.
21) Creating an array to hold our photo feature references
Using variables in our script allows us to store and modify values.
These values can be numbers, strings of text, arrays and much more, but we’ll be using an array.
Arrays are a special type of JavaScript object which can be used to store multiple values in a single variable. Arrays can also hold objects, so we’ll be using one to hold the photo feature references we created previously in our script.
Variables must be declared before they are used, so we’ll be adding our array at the top of the script, beneath the photo feature references we’d created previously.
The array’s elements are separated by commas, and are contained within a set of square brackets i.e. ‘[ ]’.
var photoFeatureArray = [ZapbotPhotoFeature, BunnyPhotoFeature, DinoPhotoFeature];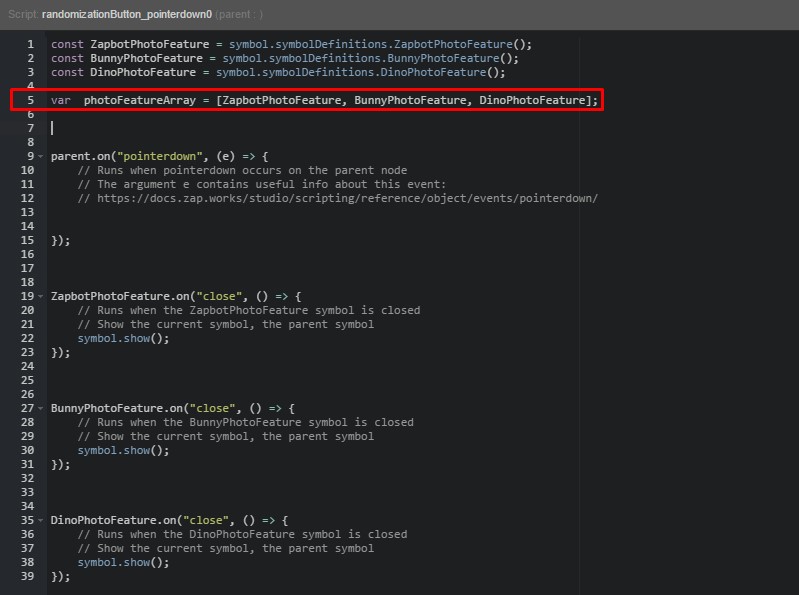
You can access an element in an array by specifying its index.
The first element in an array is found at index 0, the second element at index 1 and so on.
This concept of zero-based numbering is present in many mathematical and programming approaches, so you may have come across it before.
With this in mind, we know that the first photo feature in our array is at index 0, and the last photo feature is at index 2, which will be important for our next step.
22) Adding the randomization function
Next, we’ll create a new empty variable called randomNumber after the array but before the pointerdown function.
var randomNumber;
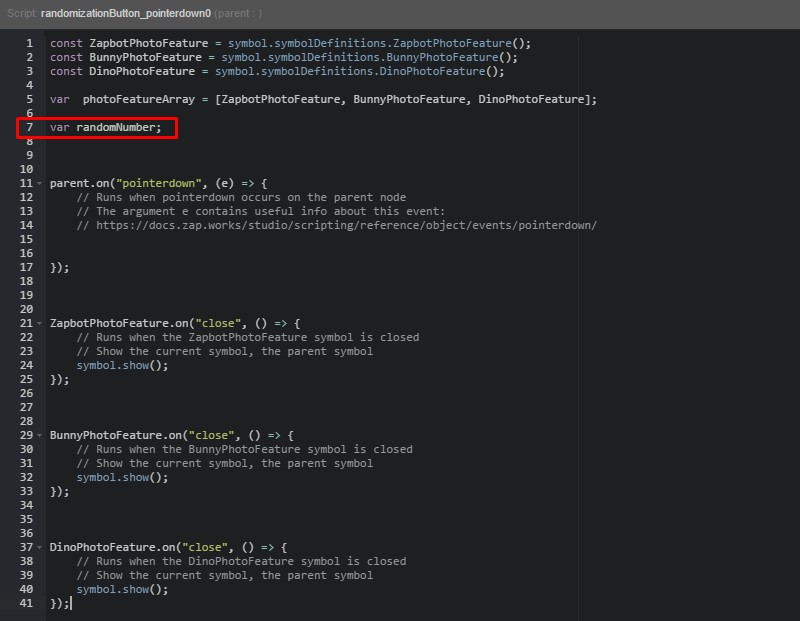
This variable will hold the randomized value we’ll be generating later on in the code, so it won’t be assigned a value until the ‘pointerdown’ function runs when the user taps on the button.
Within the pointerdown function itself, we will add the following line of code:
randomNumber = Math.floor(Math.random() * 3);
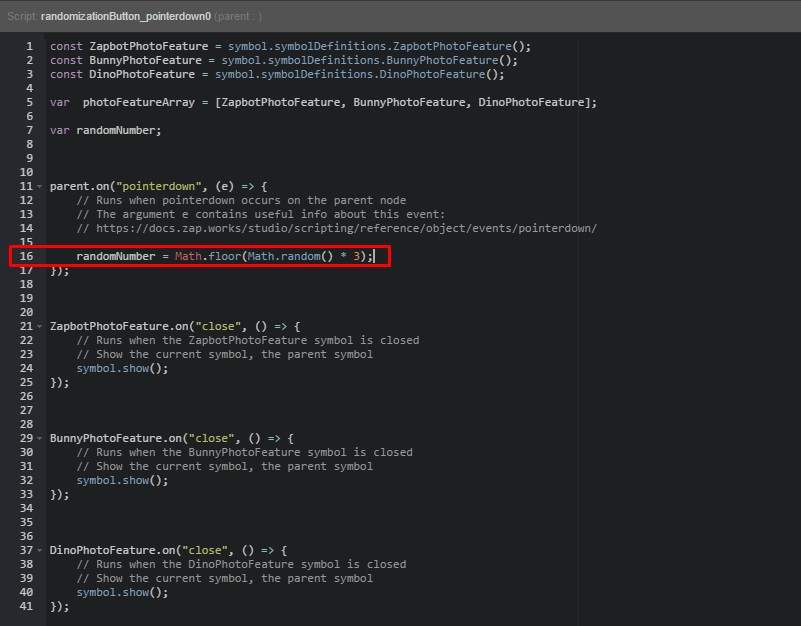
‘Math.random()’ returns a value between 0 and 1 by default, so we’re multiplying the result by 3, and then using ‘Math.floor()’ to round this down to its nearest whole value, giving a number between 0 and 2.
You’ll notice that the three possible results we’re generating with our code (0, 1 or 2) directly correlate with the index addresses of our photo feature array elements.
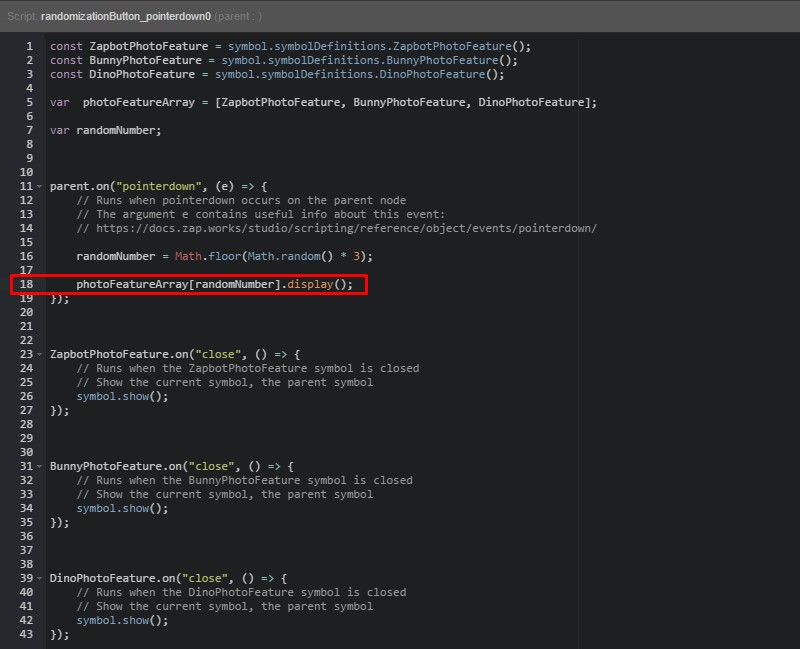
23) Displaying the photo feature and hiding our parent symbol
Now we just need to call .display() on the photo feature at the array index of the random number we generated.
photoFeatureArray[randomNumber].display();
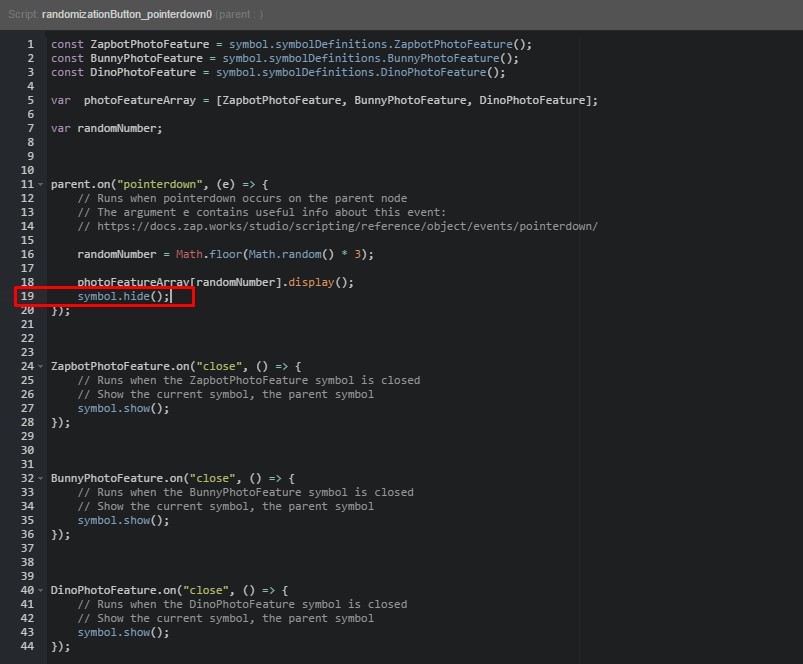
We also want to hide the parent symbol, so that it doesn’t interfere with our photo feature screen symbol.
symbol.hide();
24) Adding a ‘do…while’ loop
We want to make sure that our random number generator doesn’t give the same result twice in a row, which would send the user to the same photo feature consecutively.
This could result in quite a boring user experience, but we can add some variety by using a do/while loop in our code.
This type of loop executes the block of code specified within the do part of the loop (within the { }) at least once, and then checks if the condition stated in the while part is true.
If the condition is true it will repeat the loop and will continue to do so for as long as the condition is true.
A do/while loop follows this structure:
do { execute code;}while (thisCondition);We’ll be running the randomization code within the do part of our loop, and checking that our new result is different to the previous one within the condition.
Before we add the loop we’ll first need to create a new variable, which we’ll declare at the top of our script beneath our randomNumber variable.
var previousNumber;
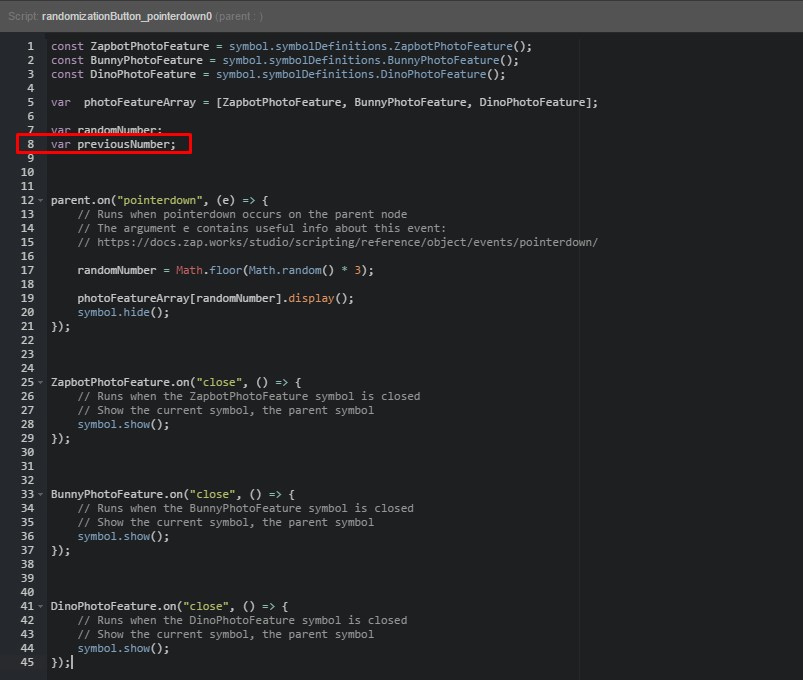
We’ll be using this variable later to store the last value returned by the randomization code.
We’ll be setting up our do/while loop to run the randomization code at least once, before checking whether the result is equal to the one generated in the previous iteration of the loop and if so, to keep running the randomization code until this isn’t the case.
Remove the Math.random() code from its previous location in the script, as we’ll be moving it within the do part of our do/while loop.
Add the following code within the pointerdown function, before the .display() and .hide() functions.
do { randomNumber = Math.floor(Math.random() * 3);}
At this point you’ll get an error in the script (red underline). This is because the do/while loop is currently incomplete, but we’ll be adding that next so you can ignore the error for now.
Within the condition we will add a check that compares our randomNumber and previousNumber variables, which hold the new and previous values returned by the randomization code, respectively.
while (randomNumber == previousNumber);
The complete do/while loop should look like this:
do { randomNumber = Math.floor(Math.random() * 3);}while (randomNumber == previousNumber);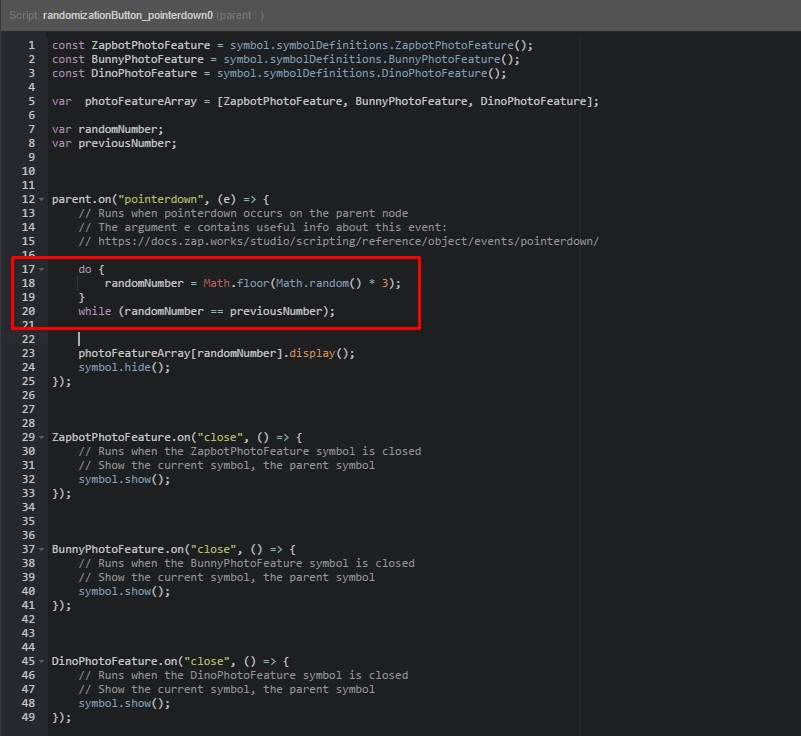
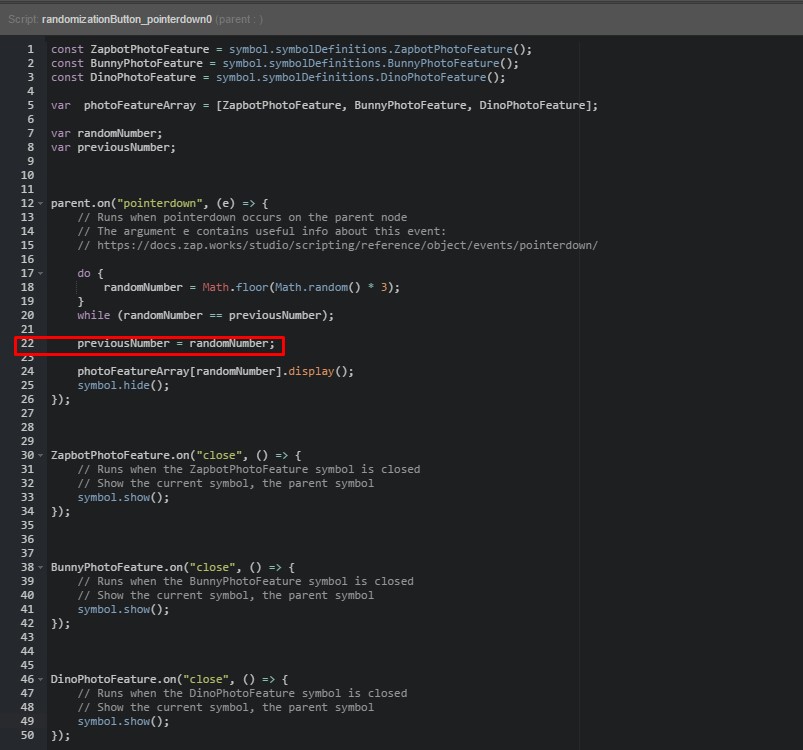
Now that our do/while loop is set up, we’ll tell our previousNumber variable to store the value held by the randomNumber variable, so that the next time the pointerdown code is run we’ll know what the previous result was.
We’ll place this code after the loop, but before the .display() and .hide() functions.
previousNumber = randomNumber;
Congratulations!
That’s it, you’ve completed all the steps in this tutorial and used Studio’s scripting functionality to create a randomized experience.
You can preview the experience by clicking the ‘Preview’ button in the top left of ZapWorks Studio and scanning the temporary zapcode generated.
Hopefully, you’ve also learned a few best practice methods when working with Studio.
You are well on your way to mastering ZapWorks Studio. Nice!
Suggested Next Steps
Section titled “Suggested Next Steps”Why don’t you try adding your own models to the photo features.
You could even go a step further and add extra photo feature options for the user to be sent to at random!