3D Photo Feature
Studio is being deprecated, please head over to the documentation page for Mattercraft, our most advanced 3D tool for the web, where you can find the most recent information and tutorials.

Difficulty Level: Easy
Coding Knowledge Required: Absolute Beginner
Time to Complete: 30 minutes
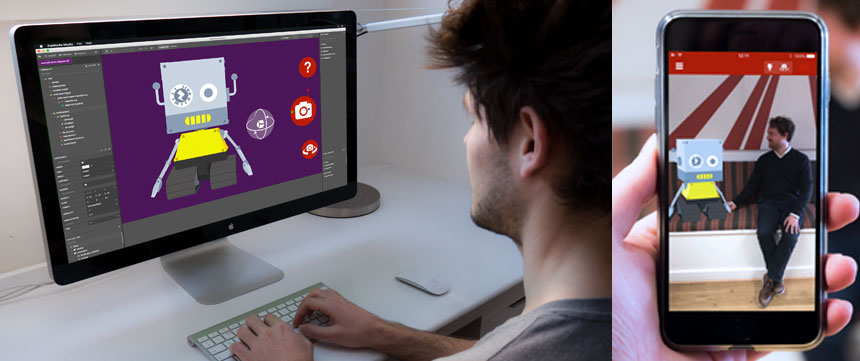
In this step by step guide we’ll be creating a 3D photo feature using ZapWorks Studio. A photo feature is an interactive experience where the user can position, scale and rotate an object on screen, and have it appear in the real world ready for a shareable picture or selfie. Photo features are a great way of rewarding users for scanning and engaging with your AR content. Try it out for yourself by scanning the zapcode above.
Like anything worth doing, ZapWorks Studio requires patience and time in order to reach the full potential of what you can achieve with it. This tutorial is designed as an introduction to Studio, in which we assume no prior knowledge. By the time that you have completed it, you should be more familiar with the UI of Studio, and have a greater understanding of some of the concepts that power the augmented reality experiences.
You will also have built something that is pretty cool, which we hope will inspire you to dive even further into the wonderful world of AR.
If you get stuck, please refer to our extensive Documentation or check out the Forum, a handy way to ask questions of other ZapWorks users. You can also take a look at the completed project.
Step by Step
Section titled “Step by Step”1. Create a new Studio Zapcode
Enter your my.zap.works account and click the ‘Make a New Zapcode’ button in the top left. Give your code a name, and choose between either a circle or lozenge style and select ‘Studio’ as your tool. Widgets and Designer codes will not work for this tutorial.
2. Create a new project in ZapWorks Studio
Open ZapWorks Studio (download here) and create a ‘New Project’.
Choose to start with a ‘Blank’ template and give your project a name, e.g. “3d photo feature” and click ‘Create’.
3. Create your 3D Photo Feature Symbol
Now you have created your project, you will want to add some content to it.
On the bottom right hand side of the screen is the Symbol Definitions panel, where all subsymbols are kept. Click the plus (+) icon and select the ‘Photo feature 3D’ component.
Select ‘Create’ to add the photo feature. This will now appear in your list of Symbol Definitions.
Subsymbols are reusable ZapWorks Studio components and can be used to define functionality that is to be used more than once.
4. Move your subsymbol to the Hierarchy
Now that you have your 3D Photo Feature Symbol, you will want to create an instance of it.
4.1) Create an instance of the 3D photo feature
To create an instance, drag the file from the Symbol Definitions panel into the Hierarchy, located on the left hand side of your screen. Specifically, drop the file into the ‘root’ node, and the 3D photo feature will appear on your screen.
The Hierarchy is a tree of nodes that make up an experience. The root node is the topmost node within the Hierarchy and the base from which all other nodes are joined.
4.2) Expose the object group attachment point
Next, right click on the 3D photo feature instance and select ‘New > AttachmentPoint > objectGroup’.
This will expose a special group from within the subsymbol for use in your current symbol. This exposed group is where in step (7) of this tutorial you will place your 3D model.
5. Download and Unzip the 3D model of ZapBot
3D models can be quite tricky to get the hang of. We have created a 3D model of ZapBot to help you get started.
6. Import your 3D model into ZapWorks Studio
With your ZapBot model downloaded, it’s a simple process to import into ZapWorks Studio.
6.1) Importing the 3D model
Enter the ZapBot folder that you downloaded in step (5). It should be named ‘example_pod’.
Select the ‘Zapbot.pod’ file and drag it into the Media Library import box located in the top right corner of ZapWorks Studio.
This will present you with a window asking for you to name your 3D symbol. Once you have, select ‘OK’.
6.2) Importing the textures
Step (6.1) will have created a new symbol in your ‘Symbol Definitions’ panel. You will be presented with a number of settings to make sure your model is imported correctly.
The first tab lists the ‘Textures’ that need to be imported for the model to be displayed correctly. These will be the remaining 3 files in your unzipped folder.
- Zapbot_Body_Texture.png
- Zapbot_Head_Texture.png
- Zapbot_Mouth_Texture.png
Drag each of the textures into corresponding boxes. Alternatively, you may select all 3 and drag into the top ‘Drop All Textures to import here’ box. Once you have added the textures, click finish in the bottom right of the dialog box.
7. Adding your 3D Model into the hierarchy
Now that we have added ZapBot, it is time to add him to the scene.
In step (4.2) you exposed the Attachment Point group of ‘photofeature3D0(photofeature3D)’. Now, drag your 3D model from the Symbol Definitions panel to the exposed group node.
8. Positioning your 3D Model
The 3D model should now appear within the 3D view, the area in the center of the interface that acts as a visual representation of the AR experience.
You now need to position Zapbot in the right place. Using the Scale (S), Rotation (R) and Position (P) buttons at the top of the Studio place ZapBot onto the hotspot in the middle of the screen.
How you position ZapBot here will affect how he appears on the users mobile screen. Try to get it as close to the video as you can.
This UI takes some getting used to, so don’t get frustrated if you can’t get it perfect straight away.
9. Previewing your 3D photo feature
At this stage the experience can be previewed on a device. If you do not have it already, download the Zappar App on Android or iOS to preview on your smartphone / tablet.
You can preview your Zap by clicking the ‘Preview’ button in to top left of your ZapWorks Studio.
You will be asked to authenticate your ZapWorks account.
Once you have downloaded the app, scan the code. You should see ZapBot on screen.
If ZapBot is not where you would like him to be, go back into Studio to reposition him.
10. Publishing your experience to your ZapCode
When you are happy with how your 3D selfie feature works, hit ‘Publish’ in the top left corner to publish it to your previously created zapcode.
Choose the ZapCode that you created in Step 0.
The code must be a Studio Code in order to be published to.
11. Sharing your Code
Head over to your ZapWorks dashboard, where you will find your recently published code. You can now download the zapcode, and add it to an image, poster, business card or where you like.
Share the code around the world and get your friends and family to take a photo with ZapBot — don’t forget to share your selfies with us!
Further Reading
Section titled “Further Reading”To learn more about the concepts covered in this tutorial, please see the following pages:
- 3D Photo Feature Symbol - More information on the template and additional customization.
- 3D Models - How to export and import your own 3D models for use within ZapWorks Studio.
- Zapcode Publishing - Detailed information on the publishing process.