Cognitive3D
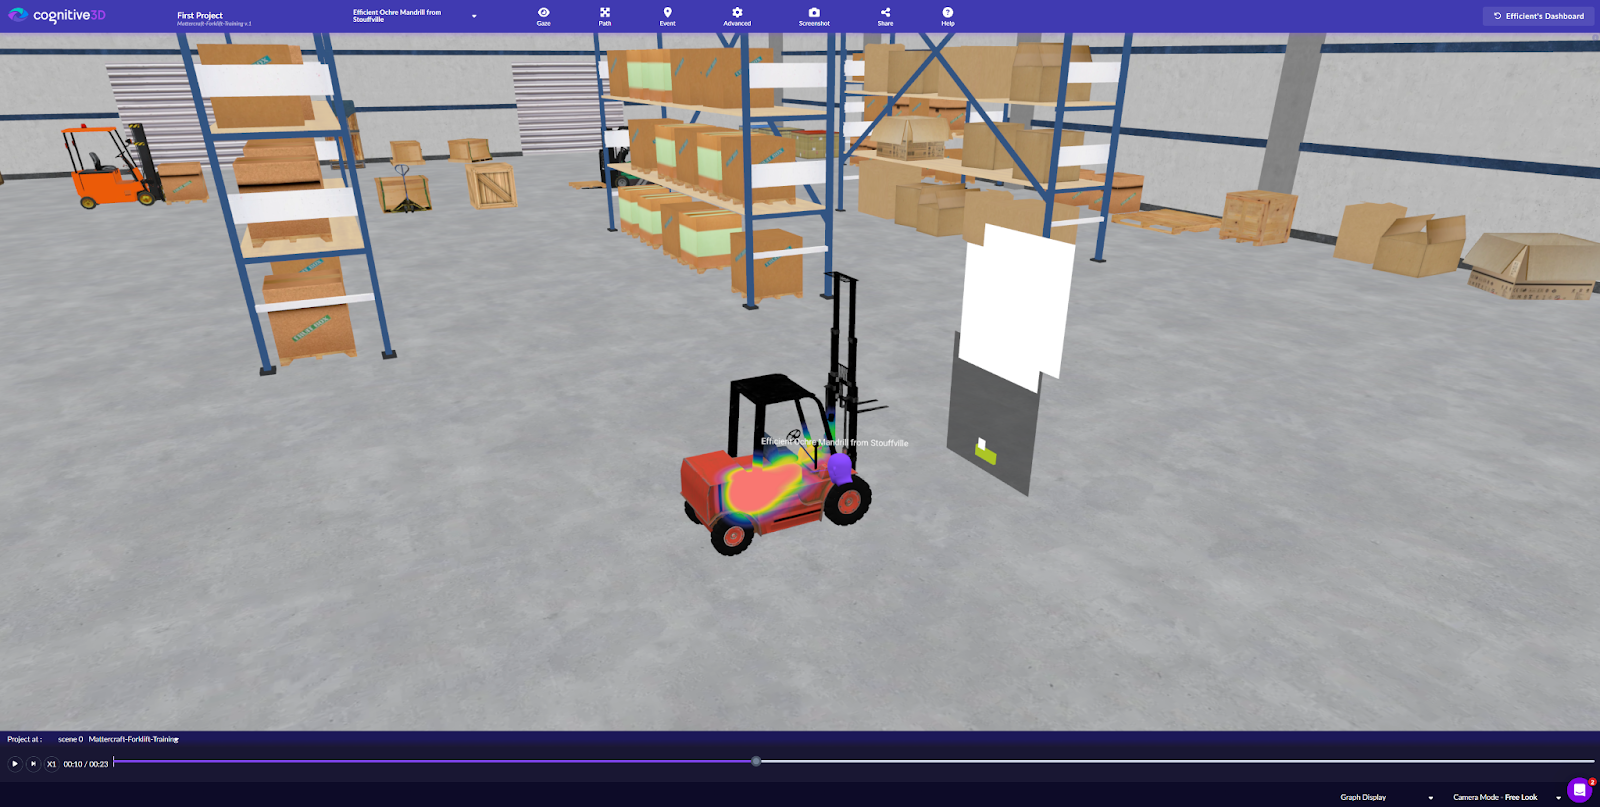
You can integrate Cognitive3D into your Mattercraft project to capture session replays, heatmaps, and spatial analytics for your WebXR experiences.
To complete this setup, you will need a Cognitive3D account and two API keys — the Application Key and the Developer Key. You can sign up and find both keys via the Cognitive3D dashboard. Use
Ctrl/Cmd + Kto open the search menu and search for Manage Developer Key.
- Application Key — used inside your Mattercraft project to send session data to Cognitive3D
- Developer Key — used when uploading scene and dynamic object assets to the Cognitive3D platform
Step 1: Install the Cognitive3D WebXR SDK
Section titled “Step 1: Install the Cognitive3D WebXR SDK”- Open the Dependencies Browser by clicking Add-ons and Dependencies in the project editor
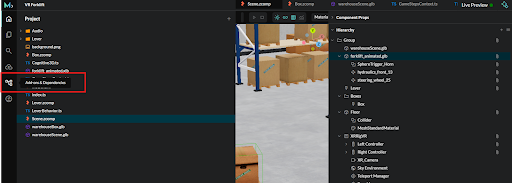
- Click Browse and ensure you are in the Recommended tab

- Find the Cognitive3D package and click on it to open the information dialog
- Click the Install button to instantly install it to your project
If you can’t find the Cognitive3D package in the Recommended tab, switch to the From NPM tab and search for
@cognitive3d/three-mattercraft.
Step 2: Add the Cognitive3D behavior to your scene
Section titled “Step 2: Add the Cognitive3D behavior to your scene”- Open your scene file (
scene.zcomp) and select an object in the Hierarchy - In the Behavior tab, click the (+) button and search for
Cognitive3D, then add the behavior
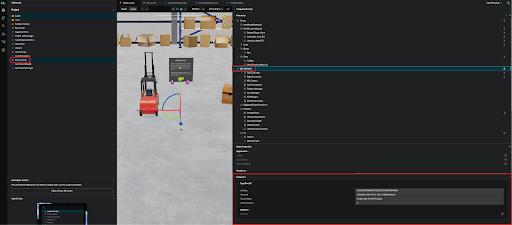
This behavior acts as the manager for the Cognitive3D integration. It should exist once in your scene and holds the following configuration:
| Field | Description |
|---|---|
| API Key | Your Cognitive3D Application Key (not the Developer Key) |
| Scene ID | The ID of your scene on the Cognitive3D dashboard |
| Scene Name | The name of your scene |
| Scene Version | The version number of your uploaded scene |
| App Version | Your application’s version string (default: 1.0) |
| Enable Export | Toggle to enable scene and dynamic object export at runtime (see Step 4) |
| Enable Debug | Toggle to enable verbose debug logging in the browser console |
When first setting up, you will only have your Application Key. The Scene ID, name and version are generated after you upload your scene to the Cognitive3D dashboard (see Step 5).
Step 3: Mark dynamic objects
Section titled “Step 3: Mark dynamic objects”Cognitive3D distinguishes between static scene geometry and dynamic objects — objects that move, or objects whose heatmap data you want to capture. Dynamic objects are marked by attaching a Cognitive3DDynamicObject behavior to them.
Where you attach the behavior depends on whether the object is a zcomponent or not. You can identify a zcomponent by the lightning bolt icon next to it in the Hierarchy.
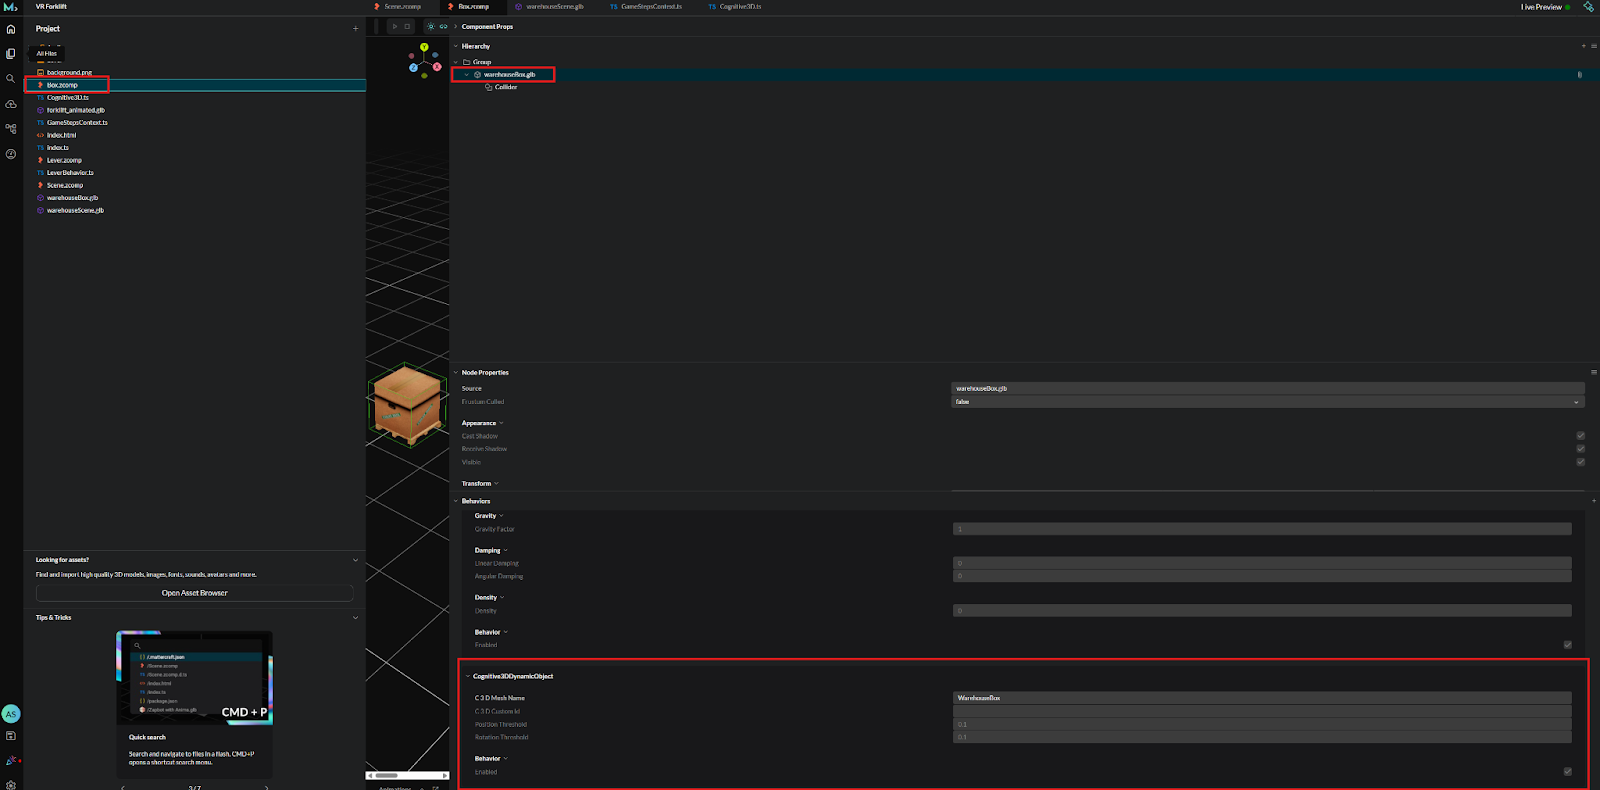
Dynamic objects on zcomponents
Section titled “Dynamic objects on zcomponents”For zcomponents (objects with the lightning bolt icon), open the zcomponent definition in the Project window and attach the Cognitive3DDynamicObject behavior to the object inside it — not to the zcomponent instance in the scene hierarchy. Enter a matching C3D Mesh Name (e.g. WarehouseBox).
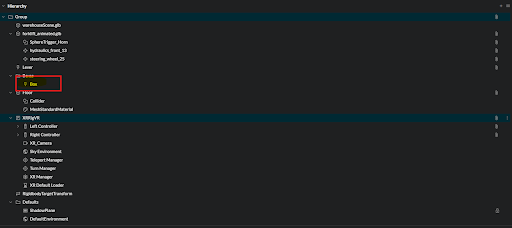
Dynamic objects on standard scene objects
Section titled “Dynamic objects on standard scene objects”For standard scene objects (no lightning bolt), attach the Cognitive3DDynamicObject behavior directly to the object in the scene hierarchy. Enter a matching C3D Mesh Name (e.g. Forklift).
Dynamic objects on attachment points (children of GLB files)
Section titled “Dynamic objects on attachment points (children of GLB files)”Cognitive3D does not support animations, but you can still track the transforms of individual components within an animated object (e.g. a moving part on a forklift).
- Right-click in the Hierarchy and select New > AttachmentPoint
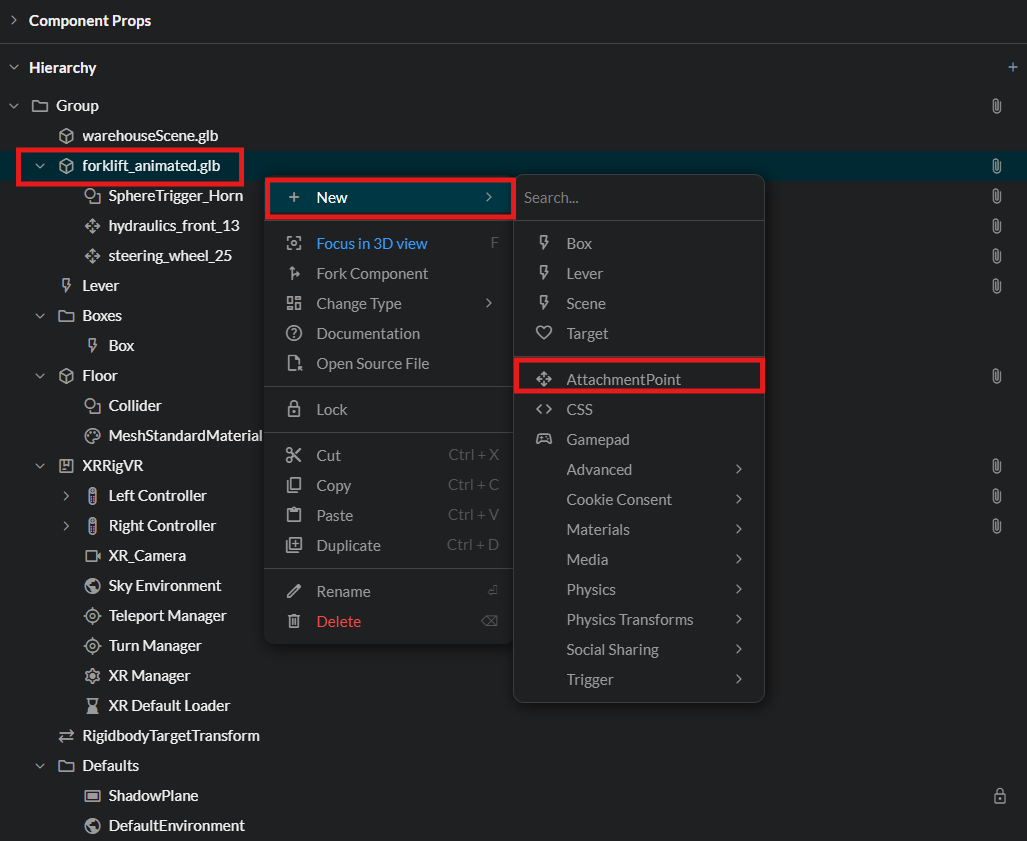
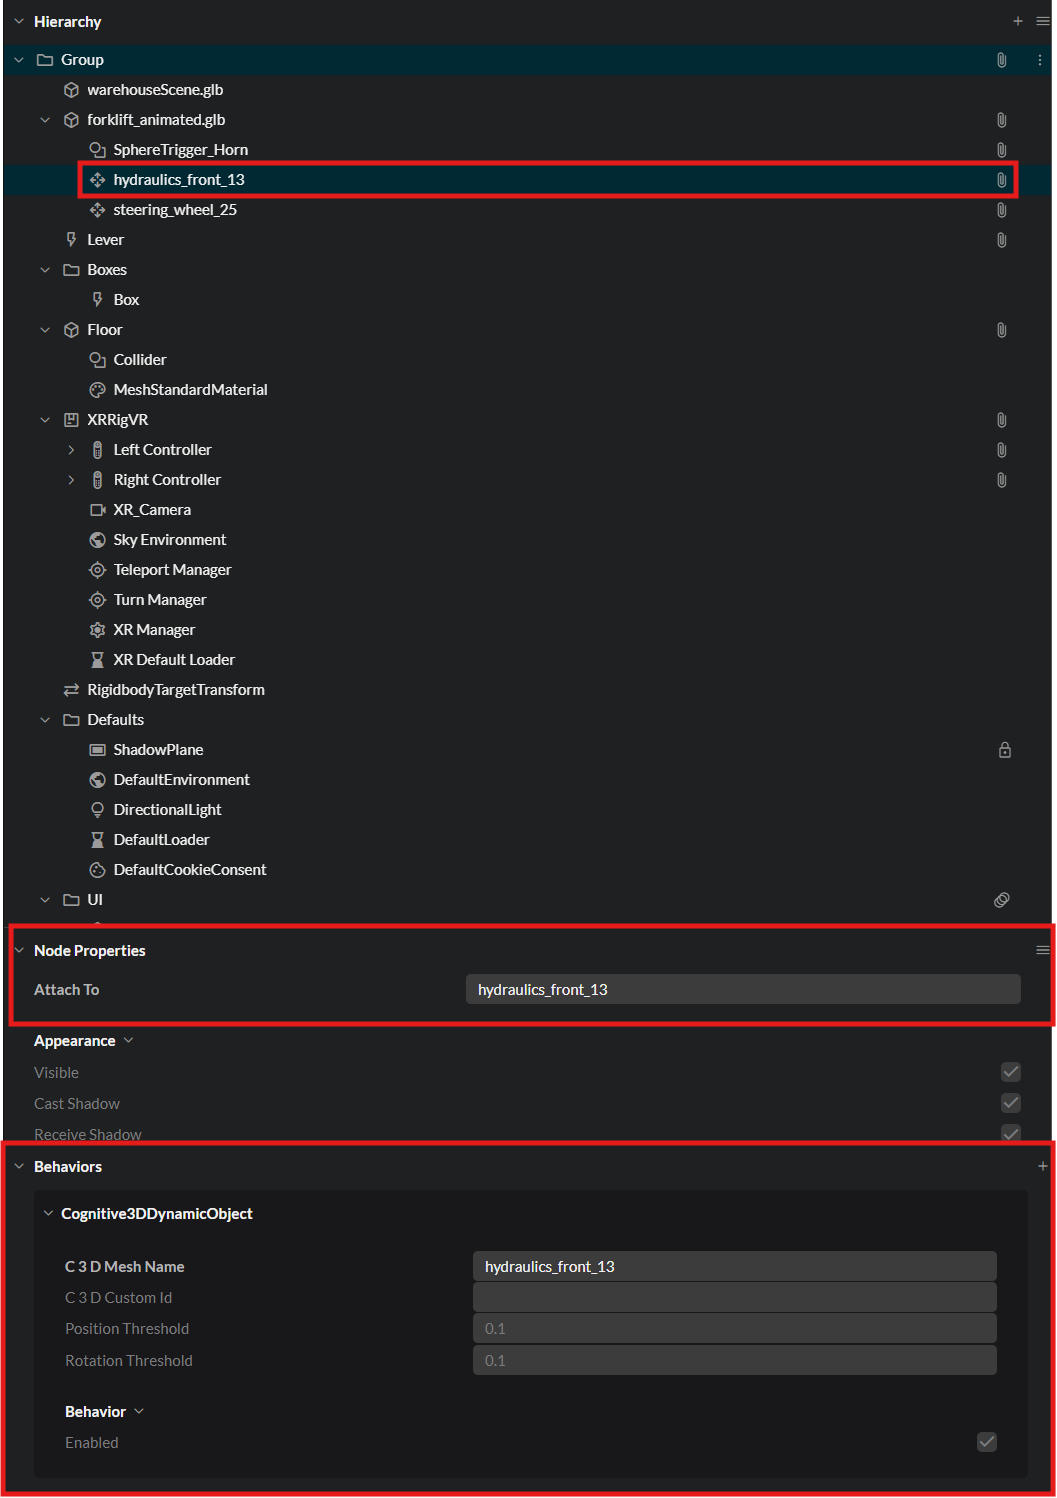
- Inside the AttachmentPoint node, set the child object’s name to the component you want to track (e.g.
hydraulics_front_13) - Attach a
Cognitive3DDynamicObjectbehavior to this AttachmentPoint
Dynamic object properties
Section titled “Dynamic object properties”Each Cognitive3DDynamicObject behavior has the following properties:
| Property | Description |
|---|---|
| C3DMeshName | Must match the mesh name uploaded to the Cognitive3D dashboard. This tells Cognitive3D which mesh the object represents. |
| C3DCustomID | A unique identifier for this object instance. Leave blank to auto-generate, or set manually (e.g. 1, 2, 3 for multiple boxes sharing the same mesh). |
| Position Threshold | Minimum position change (in units) before a snapshot is sent. Default: 0.1 |
| Rotation Threshold | Minimum rotation change (in degrees) before a snapshot is sent. Default: 0.1 |
Increasing the transform thresholds will slightly improve performance, but will reduce the accuracy of session replays in the Cognitive3D dashboard.
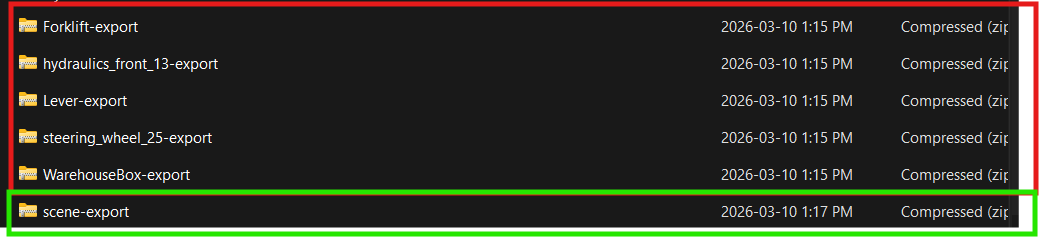
Step 4: Export your scene and dynamic objects
Section titled “Step 4: Export your scene and dynamic objects”Once all dynamic objects are marked, export your scene data using Live Preview:
- On the Cognitive3D manager behavior, enable the Enable Export toggle and save
- Open your project in the simulator via Open In Simulator
- Press
Shift + Eto export the scene - Press
Shift + Dto export the dynamic objects
The exported files are saved as compressed .zip archives to your Downloads folder.
Before uploading, you can preview your dynamic objects by dragging and dropping the
.zipfiles onto the glTF Viewer.
Upload them to the Cognitive3D Upload Tool using your Developer Key.
The scene
.zipcan be uploaded directly. The dynamic objects.zipmust be unzipped first — upload the extracted files to the uploader.
Disable the Enable Export toggle and save after exporting. Leaving it enabled during normal use is unnecessary.
Step 5: Enter your Cognitive3D scene data
Section titled “Step 5: Enter your Cognitive3D scene data”Once your scene is set up on the Cognitive3D website:
- Return to the Cognitive3D manager behavior in your scene
- Enter your Scene ID, Scene Name and Scene Version alongside your Application Key
Session data will not be recorded during Live Preview. Cognitive3D will begin capturing data once your experience is published.
Events and Sensors
Section titled “Events and Sensors”Within your behavior scripts and game logic files, you can record custom events and sensor data using Cognitive3DContext.
First, import the context:
import { Cognitive3DContext } from "@cognitive3d/three-mattercraft";Then retrieve the context once in your constructor or started() method:
const ctx = this.contextManager.getExisting(Cognitive3DContext);Sensors
Section titled “Sensors”Sensors record a named value over time (e.g. speed, rotation, temperature):
ctx?.recordSensor("lever.rotation", 45); // value can be a number or booleanCustom events
Section titled “Custom events”Events record something that happened at a specific moment, with an optional 3D position and custom properties:
ctx?.sendEvent("StepCompleted", [0, 1, 0], { step: 1 });Making changes to your Cognitive3D project
Section titled “Making changes to your Cognitive3D project”As your experience evolves, you may add new scene geometry or dynamic objects. When this happens, re-export and re-upload the updated scene and dynamic object data using the Cognitive3D Upload Tool with your Developer Key.
After uploading new scene data to an existing Cognitive3D project, update the Scene Version field in the Cognitive3D manager behavior in Mattercraft to match the latest version shown in your Cognitive3D dashboard and republish.