Face Tracking
The Zappar Face Tracking Target lets the user attach 2D and 3D digital content to a face found in the camera view. It’s ideal for building face filter experiences, such as “virtual tryons” (AR hats, jewelry, glasses, etc).
The Zappar Multi Face Tracking Target is the main controller for all face tracked experiences. Users can add any number of Face Tracking Anchors as a child, which can be thought of as an individual face in the camera feed (more information below).
To further enrich the tracking experience, Zappar provides a Face Mesh and Face Landmarks component.
- Face Mesh: Updates the Unity mesh and tracks to shape and expressions of a user’s face.
- Face Landmarks: Track any particular facial feature like - left/right eye, nose tip/bridge/base, etc.
Both the Face Mesh and Face Landmarks require a Face Tracking Anchor and should be parented under the respective anchor for correct pose update.
Using the Multi Face Tracking Target
Section titled “Using the Multi Face Tracking Target”- Use menu option
Zappar/Face Tracker/Face Tracking Targetto place a Zappar Multi Face Tracking Target into your Hierarchy. - Once the Multi Face Tracking Target is placed in your Hierarchy you will need to add tracking Anchors for this target. Use the
Add New AnchorandRemove Last Anchorbutton on the Zappar Multi Face Tracking Target to add/remove new anchors.
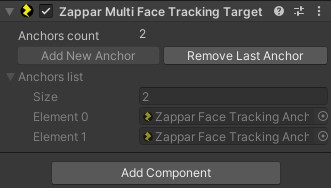
You can have multiple face tracking anchors, the total number of anchors is defined from
Concurrent Face Trackersunder the UAR settings, we recommend keeping this to a nominal value depending upon your usecase and device performance.
- The default Zappar Face Tracking Anchor will contain two full head models which will act as reference (in editor) and depth mask for users face. Place your content as a child of the Zappar Face Tracking Anchor object for it to be tracked from the center of the user’s head.
Using the Face Mesh
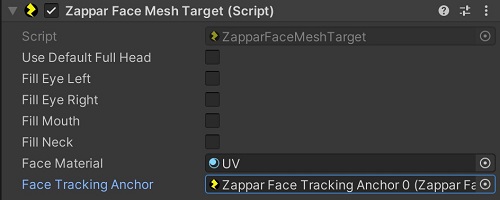
Section titled “Using the Face Mesh”The Zappar Face Mesh GameObject provides a 3D mesh that fits with the user’s face as their expression changes and their head moves. It exposes a Face Material parameter that can be set to any valid material (a UV map is provided that aids in development).
- Use the Zappar menu option
Zappar/Face Tracker/Face Meshto place Zappar Face Mesh into your Hierarchy. - Drag the Zappar Face Mesh on top of the Zappar Face Tracking Anchor in your Hierarchy.
- Select the Zappar Face Mesh in the Hierarchy.
- Update the
Face Tracking Anchorproperty to the Face Tracker in your scene. - Import and assign an image to the
Face Materialproperty.
The Zappar Face Mesh requires a Zappar Face Tracking Anchor instance as its “Face Tracker” property (in the inspector). The Zappar Face Mesh can appear anywhere in the scene Hierarchy, however you should place it as a child of the referenced anchor object if you wish for the mesh to appear correctly attached to the face.
You can also update the other Face Mesh properties depending on your use-case. Each of the Fill options determine whether or not the relevant portion of the mesh is ‘filled’ when it is rendered.
Using Face Landmarks
Section titled “Using Face Landmarks”The Zappar Multi Face Tracking Target also supports facial landmarks, for example - left/right eye, nose tip/bridge/base, etc.
- Use the menu option
Zappar/Face Tracker/Face Landmarkto place a Zappar Face Landmark GameObject into your Hierarchy. - Define a specific landmark via the
Landmark Nameproperty. The specified landmark is tracked in 3D space and respective game object’s transform is updated in scene.
The Zappar Face Landmark requires a Zappar Face Tracking Anchor instance as its “Face Tracker” property (in the inspector). The Zappar Face Landmark can appear anywhere in the scene Hierarchy, however you should place it as a child of the referenced anchor object if you wish for the mesh to appear correctly attached to the face.

Please refer to the Advanced Usage article for further details.