Face Tracking
Face Tracking detects and tracks the user’s face. With Zappar’s Face Tracking library, you can attach 3D objects to the face itself, or render a 3D mesh that fits to, and deforms with, the face as the user moves and changes their expression. You could build face-filter experiences to allow users to try on different virtual sunglasses, for example, or to simulate face paint.
Before setting up face tracking, you must first add or replace any existing camera you have in your scene. Find out more here.
To place content on or around a user’s face, create a new FaceTracker object when your page loads:
let faceTracker = new ZapparThree.FaceTracker();Model File
Section titled “Model File”The face tracking algorithm requires a model file of data in order to operate - you can call loadDefaultModel() to load the one that’s included by default with the library. The function returns a promise that resolves when the model has been loaded successfully.
let faceTracker = new ZapparThree.FaceTracker();faceTracker.loadDefaultModel().then(() => { // The model has been loaded successfully});Alternatively, the library provides a THREE Loader for loading a tracker and model file:
let faceTracker = new ZapparThree.FaceTrackerLoader().load();If you are using the included LoadingManager, make sure to pass this in to the FaceTrackerLoader:
let faceTracker = new ZapparThree.FaceTrackerLoader(manager).load();Face Anchors
Section titled “Face Anchors”Each FaceTracker exposes anchors for faces detected and tracked in the camera view. By default, a maximum of one (1) face is tracked at a time, however, you can change this using the maxFaces parameter:
faceTracker.maxFaces = 2;Note that setting a value of two (2) or more faces may impact the performance and frame rate of the library. We recommend sticking with the default value of one, unless your use case requires tracking multiple faces.
Anchors have the following parameters: Anchors have the following parameters:
| Parameter | Description |
|---|---|
id | a string that’s unique for this anchor |
visible | a boolean indicating if this anchor is visible in the current camera frame |
identity and expression | Float32Arrays containing data used for rendering a face-fitting mesh (see below) |
onVisible | Event handler that emits when the anchor becomes visible. This event is emitted during your call to camera.updateFrame(renderer) |
onNotVisible | Event handler that emits when the anchor disappears in the camera view. This event is emitted during your call to camera.updateFrame(renderer) |
You can access the anchors of a tracker using its anchors parameter - it’s a JavaScript Map keyed with the IDs of the anchors. Trackers will reuse existing non-visible anchors for new faces that appear and thus there are never more than maxFaces anchors handled by a given tracker. Each tracker also exposes a JavaScript Set of anchors visible in the current camera frame as its visible parameter.
Attaching 3D content to a face
Section titled “Attaching 3D content to a face”To attach 3D content (e.g. three.js objects or models) to a FaceTracker or a FaceAnchor, the library provides FaceAnchorGroup. This is a three.js Group that will follow the supplied anchor (or, in the case of a supplied FaceTracker, the anchor most recently visible in that tracker) in the 3D view:
let faceAnchorGroup = new ZapparThee.FaceAnchorGroup(camera, faceTracker);scene.add(faceAnchorGroup);
// Add in any 3D objects you'd like to track to this facefaceAnchorGroup.add(myModel);
The group provides a coordinate system that has its origin at the center of the head, with a positive X axis to the right, the positive Y axis towards the top and the positive Z axis coming forward out of the user’s head.
Note that users typically expect to see a mirrored view of any user-facing camera feed. Please see the camera article for more information on mirroring the camera.
Events
Section titled “Events”In addition to using the anchors and visible parameters, FaceTrackers expose event handlers that you can use to be notified of changes in the anchors or their visibility. The events are emitted during your call to camera.updateFrame(renderer).
| Event | Description |
|---|---|
onNewAnchor | emitted when a new anchor is created by the tracker |
onVisible | emitted when an anchor becomes visible in a camera frame |
onNotVisible | emitted when an anchor goes from being visible in the previous camera frame, to being not visible in the current frame |
Here is an example of using these events:
faceTracker.onNewAnchor.bind(anchor => {    console.log("New anchor has appeared:", anchor.id);
    // You may like to create a new FaceAnchorGroup here for this anchor, and add it to your scene});
faceTracker.onVisible.bind(anchor => {    console.log("Anchor is visible:", anchor.id);});
faceTracker.onNotVisible.bind(anchor => {    console.log("Anchor is not visible:", anchor.id);});
Face Landmarks
Section titled “Face Landmarks”In addition to tracking the center of the head, you can use FaceLandmarkGroup to track content from various points on the user’s face. These landmarks will remain accurate, even as the user’s expression changes.
To track a landmark, construct a new FaceLandmarkGroup object, passing your camera, face tracker, and the name of the landmark you’d like to track:
let faceLandmarkGroup = new ZapparThree.FaceLandmarkGroup(camera, faceTracker, ZapparThree.FaceLandmarkName.CHIN);scene.add(faceLandmarkGroup);
// Add in any 3D objects you'd like to track to this facefaceLandmarkGroup.add(myModel);
The following landmarks are available:
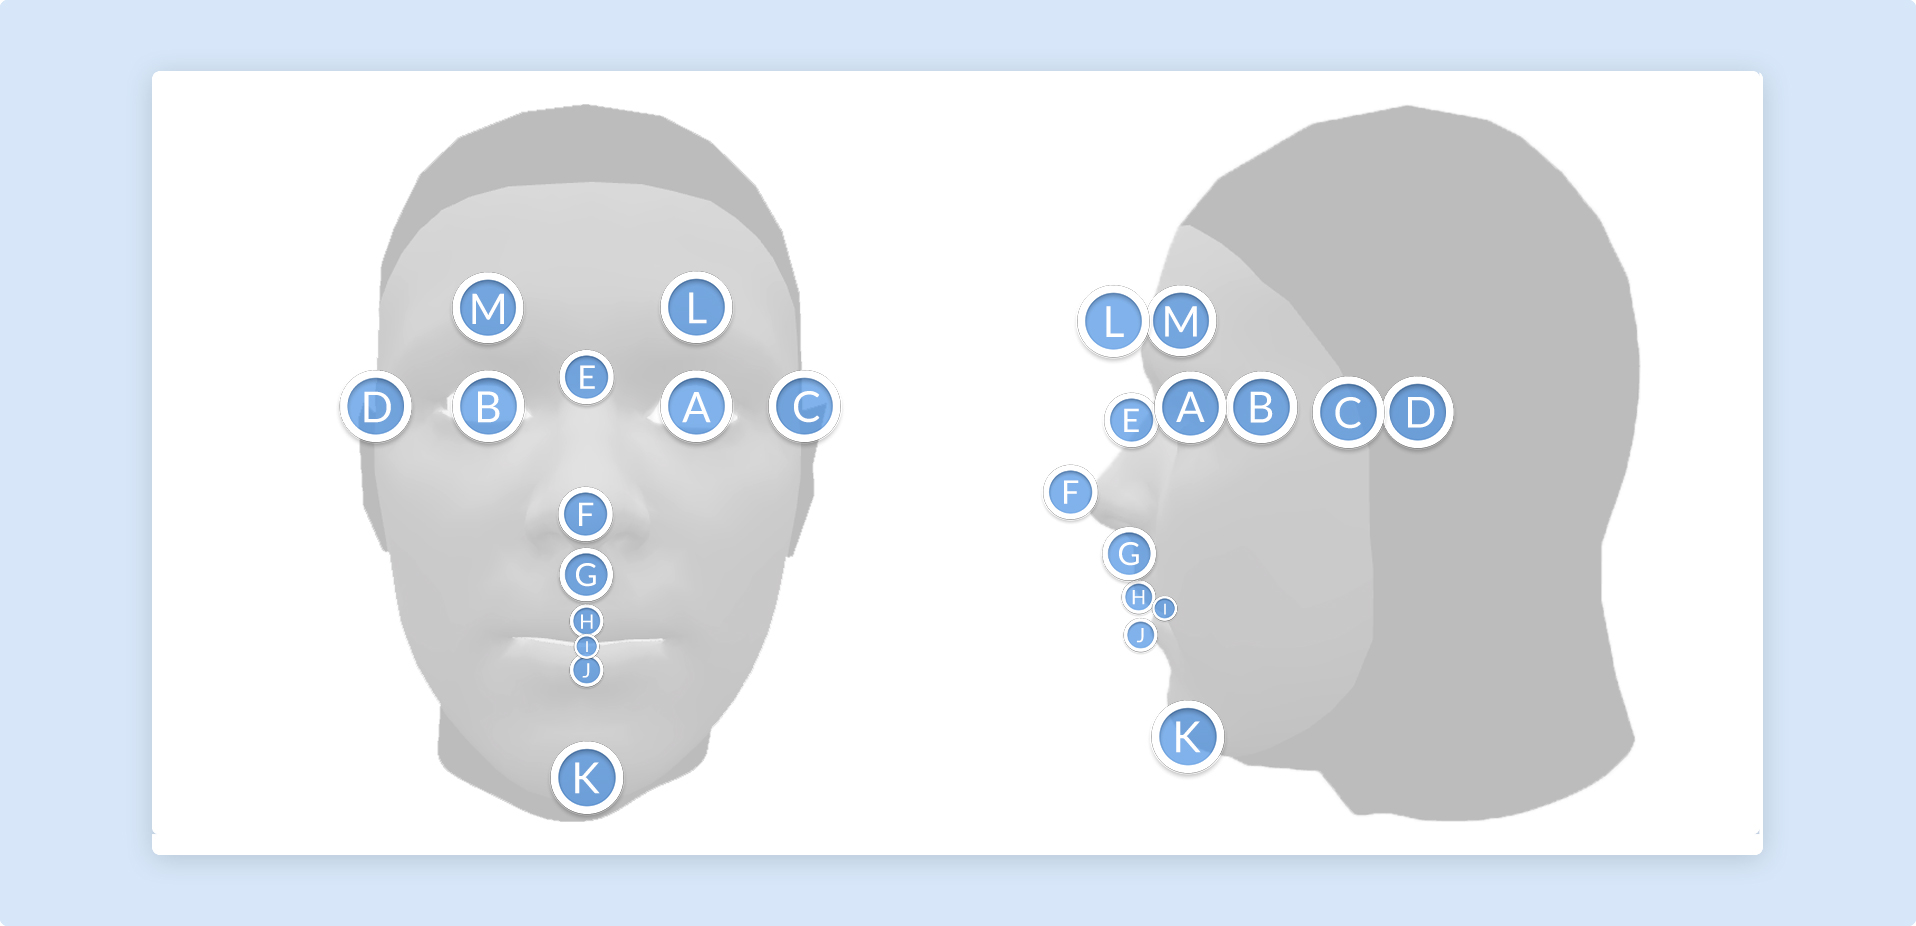
| Face Landmark | Diagram ID |
|---|---|
| EYE_LEFT | A |
| EYE_RIGHT | B |
| EAR_LEFT | C |
| EAR_RIGHT | D |
| NOSE_BRIDGE | E |
| NOSE_TIP | F |
| NODE_BASE | G |
| LIP_TOP | H |
| MOUTH_CENTER | I |
| LIP_BOTTOM | J |
| CHIN | K |
| EYEBROW_LEFT | L |
| EYEBROW_RIGHT | M |
Note that ‘left’ and ‘right’ here are from the user’s perspective.
Face Mesh
Section titled “Face Mesh”In addition to tracking the center of the face using FaceTracker, the Zappar library provides a face mesh that will fit to the face and deform as the user’s expression changes. This can be used to apply a texture to the user’s skin, much like face paint, or to mask out the back of 3D models so the user’s head is not occluded where it shouldn’t be.
To use the face mesh, first construct a new FaceMesh object and load its data file. The loadDefaultFace function returns a promise that resolves when the data file has been loaded successfully. It’s recommended to display a loading screen to the user while this is taking place.
let faceMesh = new ZapparThree.FaceMesh();faceMesh.loadDefaultFace().then(() => { // Face mesh loaded});Alternatively the library provides a THREE Loader for loading face mesh and data file:
let faceMesh = new ZapparThree.FaceMeshLoader().loadFace();If you’re using the included LoadingManager then make sure to pass it into the FaceMeshLoader:
let faceMesh = new ZapparThree.FaceMeshLoader(manager).loadFace();While the faceMesh object lets you access the raw vertex, UV, normal and indices data for the face mesh, you may wish to use the library’s FaceBufferGeometry object which wraps the data as a three.js BufferGeometry for use in a three.js Mesh. This three.js Mesh object must still be added to a FaceAnchorGroup to appear in the correct place on-screen:
let faceBufferGeometry = new ZapparThree.FaceBufferGeometry(faceMesh);
let faceMeshMesh = new THREE.Mesh(faceBufferGeometry,    new THREE.MeshStandardMaterial({        map: myFaceTexture, transparent: true}));
faceAnchorGroup.add(faceMeshMesh);
Each frame, after camera.updateFrame(renderer), call one of the following functions to update the face mesh to the most recent identity and expression output from a face anchor:
// Update directly from a FaceAnchorGroupfaceBufferGeometry.updateFromFaceAnchorGroup(faceAnchorGroup);
// Update from a face anchorfaceBufferGeometry.updateFromFaceAnchor(myFaceAnchor);
There are two meshes included with the three.js library, detailed below.
Default Mesh: The default mesh covers the user’s face, from the chin at the bottom to the forehead, and from the sideburns on each side. There are optional parameters that determine if the mouth and eyes are filled or not:
loadDefaultFace(fillMouth?: boolean, fillEyeLeft?: boolean, fillEyeRight?: boolean)Full Head Simplified Mesh: The full head simplified mesh covers the whole of the user’s head, including a portion of the neck. This mesh is ideal for drawing into the depth buffer in order to mask out the back of 3D models placed on the user’s head (see the Head Masking section below). There are optional parameters that determine if the mouth, eyes and neck are filled or not:
loadDefaultFullHeadSimplified(fillMouth?: boolean, fillEyeLeft?: boolean, fillEyeRight?: boolean, fillNeck?: boolean)Head Masking
Section titled “Head Masking”When placing a 3D model around the user’s head, such as a helmet, it’s important to make sure the user’s face is not obscured by the back of the model in the camera view. To this end, the library provides ZapparThree.HeadMaskMesh, a THREE.Mesh that fits the user’s head and fills the depth buffer, ensuring that the camera image shows instead of any 3D elements behind it in the scene.
To use it, construct the object using a ZapparThree.HeadMaskMeshLoader and add it to your face anchor group:
let mask = new ZapparThree.HeadMaskMeshLoader().load();faceAnchorGroup.add(mask);If you’re using the included LoadingManager then make sure to pass it in to the HeadMaskMeshLoader:
let mask = new ZapparThree.HeadMaskMeshLoader(manager).load();faceAnchorGroup.add(mask);Then, in each frame after camera.updateFrame(renderer), call one of the following functions to update the head mesh to the most recent identity and expression output from a face anchor:
// Update directly from a FaceAnchorGroupmask.updateFromFaceAnchorGroup(faceAnchorGroup);
// Update from a face anchormask.updateFromFaceAnchor(myFaceAnchor);
Behind the scenes, the
HeadMaskMeshworks using a full-headZapparThree.FaceMeshwith the mouth, eyes, and neck filled in. ItsrenderOrderis set toNumber.MIN_SAFE_INTEGERto ensure it is rendered before any other objects in the scene, and its material’scolorWriteproperty is set to false so that it fills the depth buffer but not the color buffer.