Navigating the UI
Zapworks Designer is made up of a number of different panels, each of which are essential when developing experiences.
The image below showcases the main Designer UI elements, with the fundamental panels highlighted.
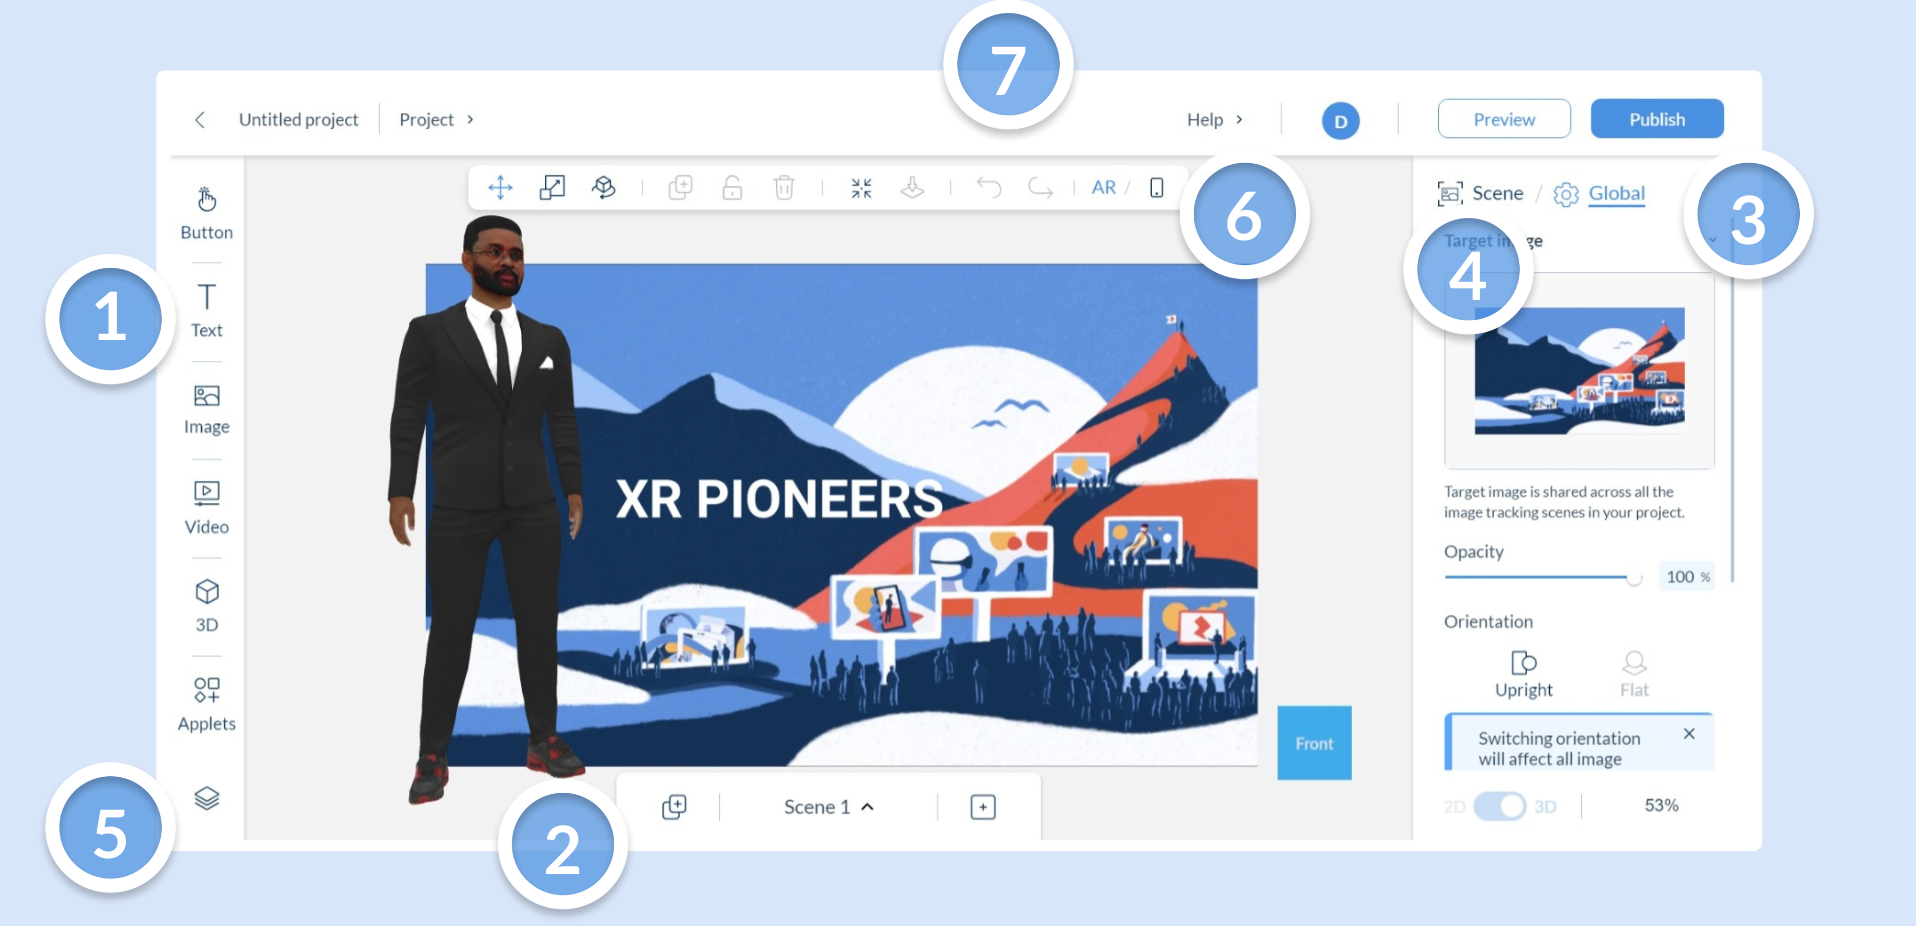
Continue reading the article to learn more about what each of these panels do.
Components Panel (1)
Section titled “Components Panel (1)”The components panel shows digital elements that you can add to your scene. Here you can find:
| Section | Description |
|---|---|
| Button | Select from a range of basic buttons to add to your scene. |
| Text | Choose from preset themed and hierarchy based text objects. |
| Image | Add an image from your media library to your scene, or upload a new image from your device. |
| Video | Add a video from your media library to your scene, or upload a new video from your device. |
| 3D | Import a 3D model into your project to create a three-dimensional experience. |
Scene Manager Panel (2)
Section titled “Scene Manager Panel (2)”The scene manager panel alters the properties of the scenes in your project. Here you can find:
| Section | Description |
|---|---|
| Scene Selector | Select which scene is currently displayed in the viewport. |
| Rename Scene | Change the name of your scene by selecting on your scene name, or via the burger menu, on the scene selection menu. |
| Add Scene | Adds another scene to your project. |
| Duplicate Scene | Duplicates the scene that is currently being viewed. |
You can find more information on editing your scenes here.
Global Properties (3)
Section titled “Global Properties (3)”The project properties section is for making changes to your overall project. Here you can find:
| Section | Description |
|---|---|
| Launch screen | Choose the Launch Screen design for your project. Use an existing Enhanced WebAR (fully custom) Launch Screen, or use the Launch Screen customizer. |
| Upload Target Image | Upload the image you wish for your project to be tracked to. |
| AR Web Embed | Embed your Zapworks Designer projects into a website. |
| Shadow Settings | Enable shadows for 3D components in your project . |
| Background Sound | Add some background sound that plays when a user views your experience. |
| Scene Properties | Edit the name and view the content of the scene. |
| Scene Transitions | Add a transition that plays when you move between scenes. |
| Photo UI | Toggle the camera controls for saving and sharing your scene. |
| Zoom | Determines how zoomed in or out the scene viewport is. |
| 2D-3D Switch | Change between a 2D and a 3D view. |
The project properties panel is responsive and can show different options based on what is selected in the scene.
Scene Properties (4)
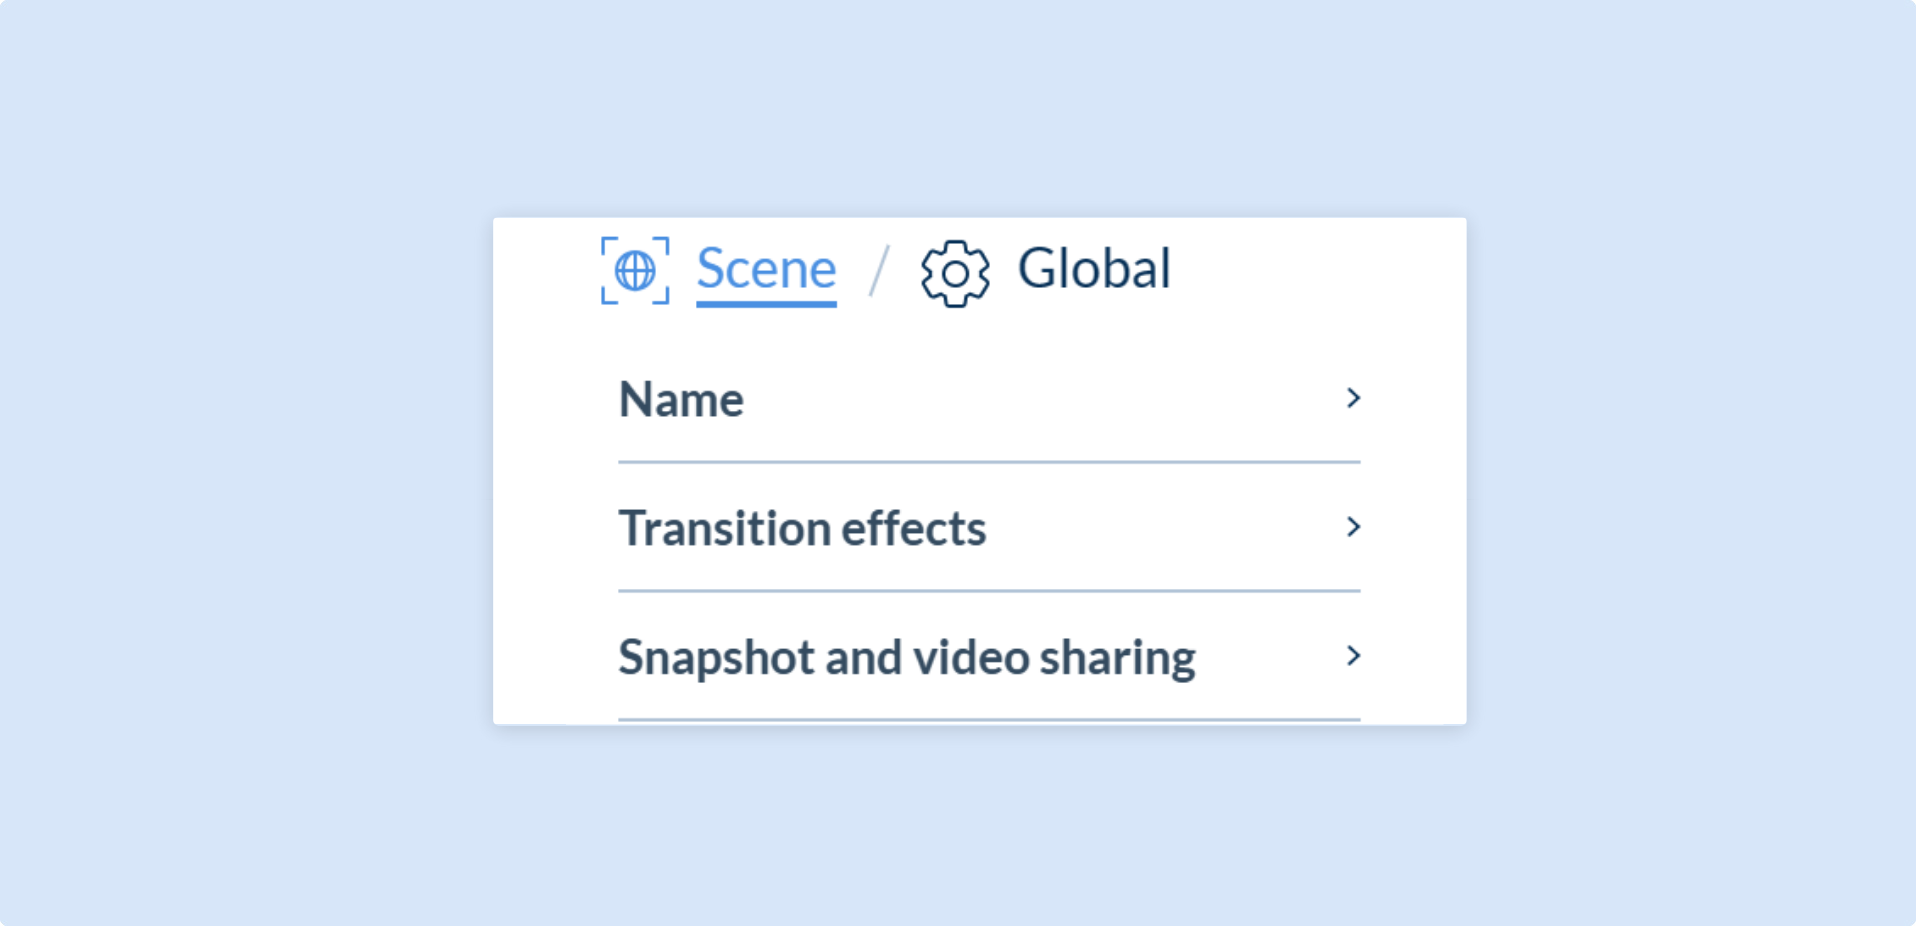
Section titled “Scene Properties (4)”The scene properties section is for making changes to the specific scene you’re on. Here you can find:
| Section | Description |
|---|---|
| Name | Edit the name of your current scene. |
| Transition effects | Add a transition that plays when you move between scenes. |
| Snapshot and video sharing | Toggle the camera controls for saving and sharing your scene. |
Scene Objects Panel (5)
Section titled “Scene Objects Panel (5)”When selected, the Scene Objects Panel shows a list of all the objects in your active scene. You can rename, lock and hide an object by hovering over its entry in the list.

Selecting an object from the list will also update the selection in the scene. This is great for quickly selecting objects that are overlaid by others.
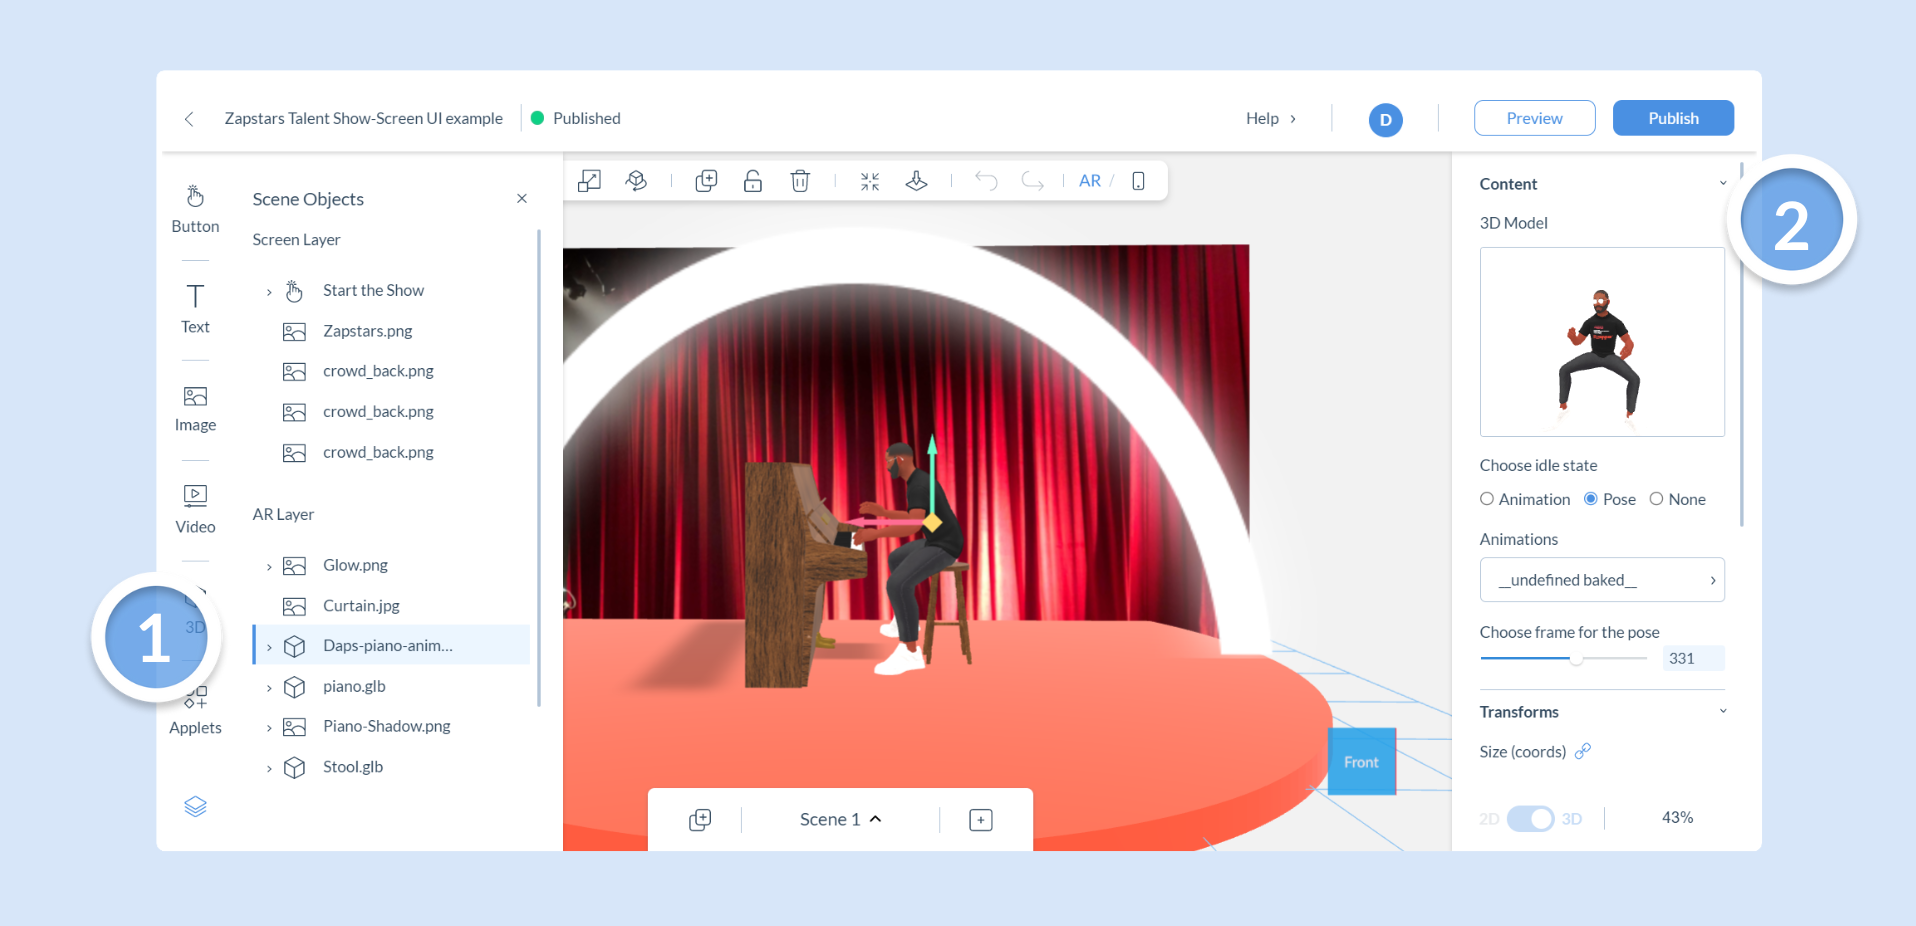
The order of the objects in the Scene Objects panel relates to the order in which the object is rendered. The order property of the first object in the list will be classed as “on top”. Click and drag objects to update the order.
In 3D mode, the Z axis position of an object takes priority unless the 2 entities are on the same Z position.
Context Bar (6)
Section titled “Context Bar (6)”The context bar allows you to manipulate components and switch between AR or Screen UI mode. Here you will find:
| Section | Description |
|---|---|
| Move | Move the selected component in the X, Y, or Z axis. |
| Scale | Scale the selected component in the X, Y, or Z axis. |
| Rotate | Rotate the selected component in the X, Y, or Z axis. |
| Duplicate | Duplicate the selected component. |
| Lock/Unlock | Lock or unlock the selected component from transform functions. |
| Delete | Delete selected component. |
| Recenter | Recenter your view on the canvas to default. |
| Undo/Redo | Undo or redo any changes you have made to your project. |
| AR/Screen UI Mode | Toggle between AR mode and Screen UI mode. |
Action Bar (7)
Section titled “Action Bar (7)”The Action Bar contains admin functions for your project. Here you can find:
| Section | Description |
|---|---|
| Rename | Rename the project on your workspace by double clicking on the current name. |
| Project | Replace the current project with a template. |
| Help | Open a drop-down menu with links to view shortcuts, see what’s new, find helpful documentation, and send feedback. |
| Collaborators | Shows the users that are currently editing the project. |
| Preview | Generates a temporary QR code to scan and view your current version. |
| Publish | Publishes your project so anyone with the project trigger to access your project. |