Curved Image Tracking
Curved Image Tracking can detect and track digital content to a curved image. This is great for building content that's augmented onto products such as soda cans and wine bottles.
Using Curved Image Tracking
When you create your Designer experience, you will be asked whether you want your first scene to be World, Image, or Face tracked.
Upon selecting Image Tracking, you'll see a target image window in the Project Properties panel with an Upload target image button. Once you click the button, a Choose image type modal will appear with a Flat and Curved option, select Curved.
You may only use one target image type in a project, however, you can combine a Flat or Curved image tracking scene with World or Face tracking scenes.
After you have selected Curved for your image tracked project, you will then see the Curved target image trainer modal.
Preparing Your Target Image
Preparing the target image with the appropriate physical dimensions and image resolution is important to successfully utilize Curved Image Tracking. This section provides guidance on how to get the best out of your curved target image.
The table below provides clarity on the terms that will be used.:
| Term | Description |
|---|---|
| Target image | An image used as a reference for tracking and overlaying Designer Components using the Curved Image Tracking feature. |
| Target image physical dimensions | The physical measurements (height and width) of the target image in millimeters (mm) or inches (in.) |
| Target image resolution | The pixel dimensions (width and height) of the target image that determine its clarity and level of detail. |
| Object dimensions | The physical measurements of the object which the target image will be applied to. In this case, the radius or circumference in millimeters (mm) or inches (in). |
| DPI or PPI | A measure of the image resolution, indicating the number of dots (print) or pixels per inch. A higher DPI or PPI results in a finer level of detail. |
Finding a target image's resolution by its physical dimensions
Most image editing software allow you to input the physical dimensions of your image in different units. The resolution in pixels should be automatically determined by that. You can also use an online converter to calculate the resolution in pixels, keeping in mind the most common DPI or PPI for print is 300.
To ensure that the target image resolution for printing will be appropriate for the intended area when applied to the object, only measure the application space in height and width; making sure to measure in millimeters (mm) or inches (in).
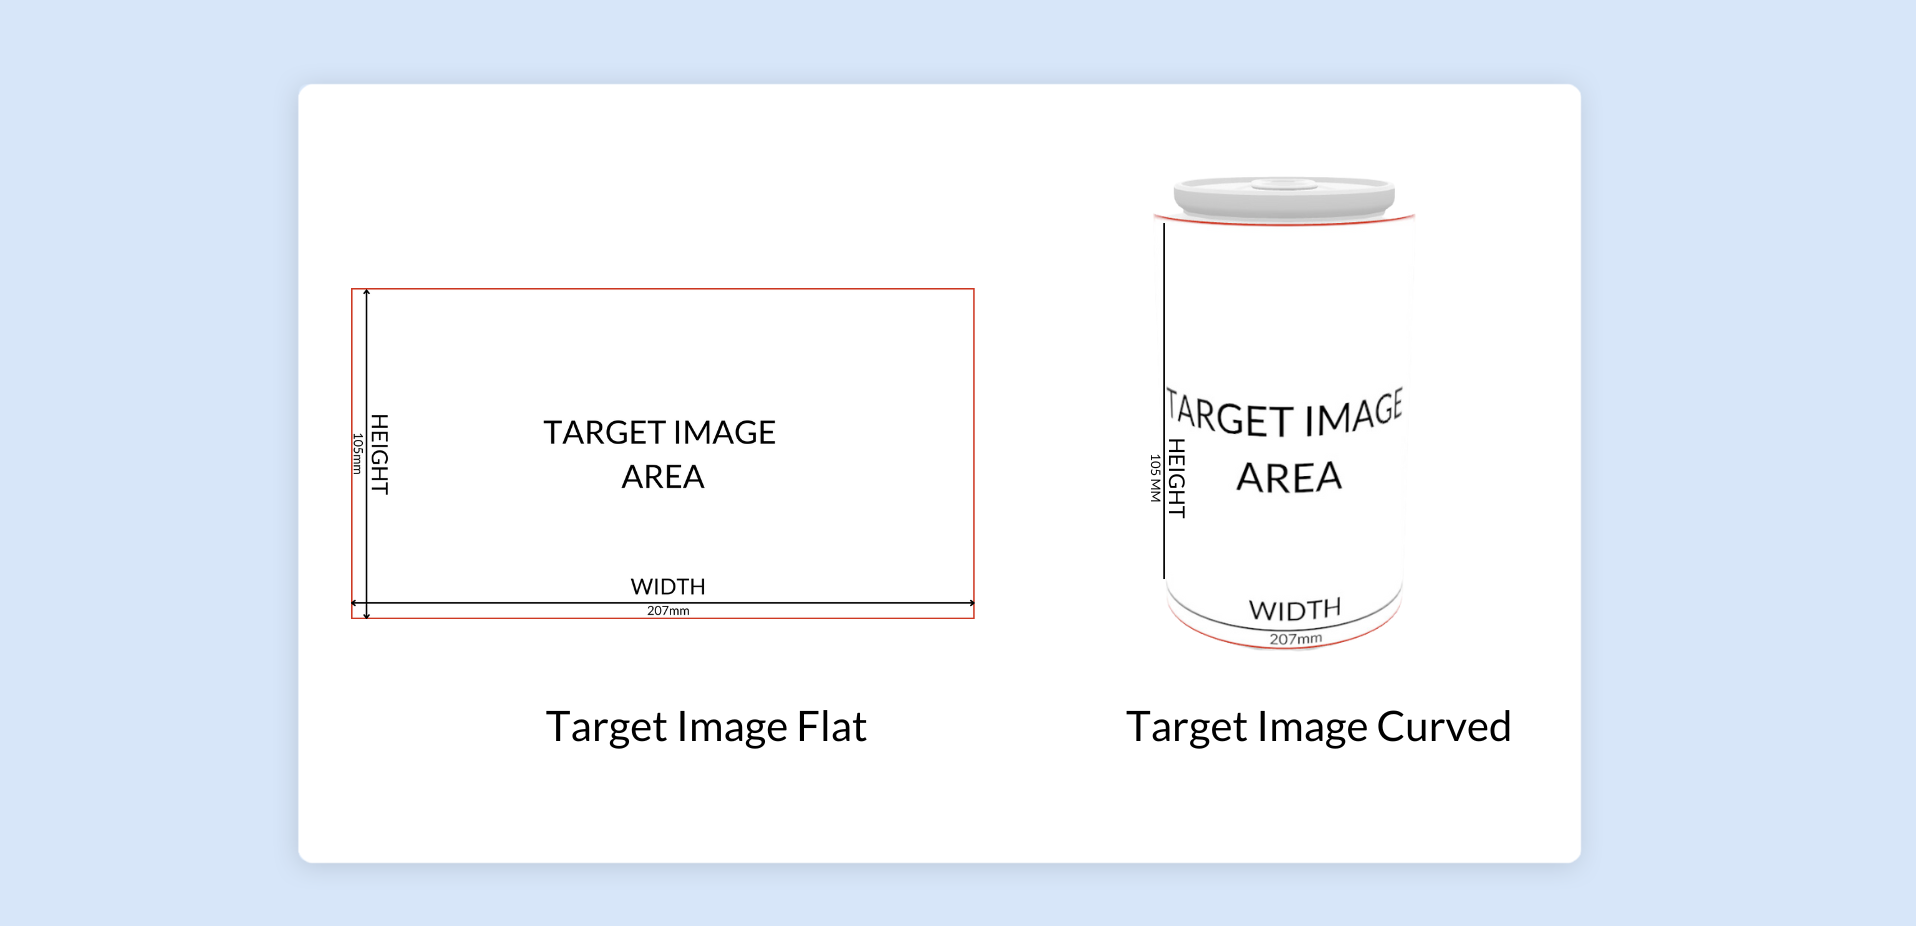
For a target image to fully wrap around the object, the width of that target image should be the circumference of the object.
Ensuring you get these measurements correct will allow you to easily create a curved target image that will track appropriately around the cylindrical object.
Target image resolution for developing with Designer
Designer accepts target image dimensions up to 2048 X 2048 pixels. Most image editing software will allow you to adjust either dimension to be 2048 pixels and should adjust the other accordingly. You can also change the DPI or PPI until the necessary dimension(s) is 2048 pixels or less.
This adjustment is for development purposes in Designer, please make sure to keep the full print resolution for your final physical target image.
Curved image trainer dimensions for a fully wrapped target image
When curving your target image, it is important to consider the key dimensions: height, width, and the radius or circumference of the object where you plan to place the image. Ensure that the dimensions of your target image align with the specific area where it will be attached to the object.
For example, let's consider a standard 330ml can with the dimensions 207mm (width) x 112mm (height). Suppose you have a target image that you want to fully wrap around the can, but only cover a certain height of the can's body. In this case, the target image's dimensions may be 207mm (width) x 45mm (height).
To ensure a seamless wrap of your components, such as a video around the can, you would enter 207mm for both the width and circumference in the Curved Image Trainer. Avoid using the height dimension of the target image in this scenario, as it does not match the true height of the object, which would result in a slightly incomplete wrap.
Ensure that the components you use in your experience have the appropriate aspect ratio and resolution to be curved correctly on the intended part of the target image.
Curved image trainer dimensions for a partially wrapped target image
Alternatively, let's consider wine bottles, with labels that are typically only at the front of the bottle. In this case, the target image dimensions only need to encompass the area where the label will be affixed, rather than wrapping around the entire bottle.
Consider a 750ml wine bottle with a circumference of 235mm and a wine bottle label (target image) with the dimensions 112mm (width) x 140mm (height).
In this scenario, since it's only partially wrapped, you could enter either the target image width or height dimension into the Curved target image trainer, as well as the wine bottle circumference of 235mm.
It is important to note that the target image should be sized to adequately showcase the Designer Components you will be adding to it, as it will only track to where target image is placed, not the whole object itself.
Additional Tips:
- Avoid stretching or distorting the target image during the preparation process.
- Try to maintain aspect ratio while resizing the target image and your Components to preserve the intended visual proportions.
- Consider utilizing high-resolution images to achieve crisp and detailed target images.
- Use websites such as dimensions.com to easily find dimensions for common objects.
In general, the same rules apply to curved images as they do flat images. High contrast , details, and minimal blank spaces will improve tracking stability. For target image best practices, read our What makes a Good Tracking Image documentation.
Creating Your Curved Target Image
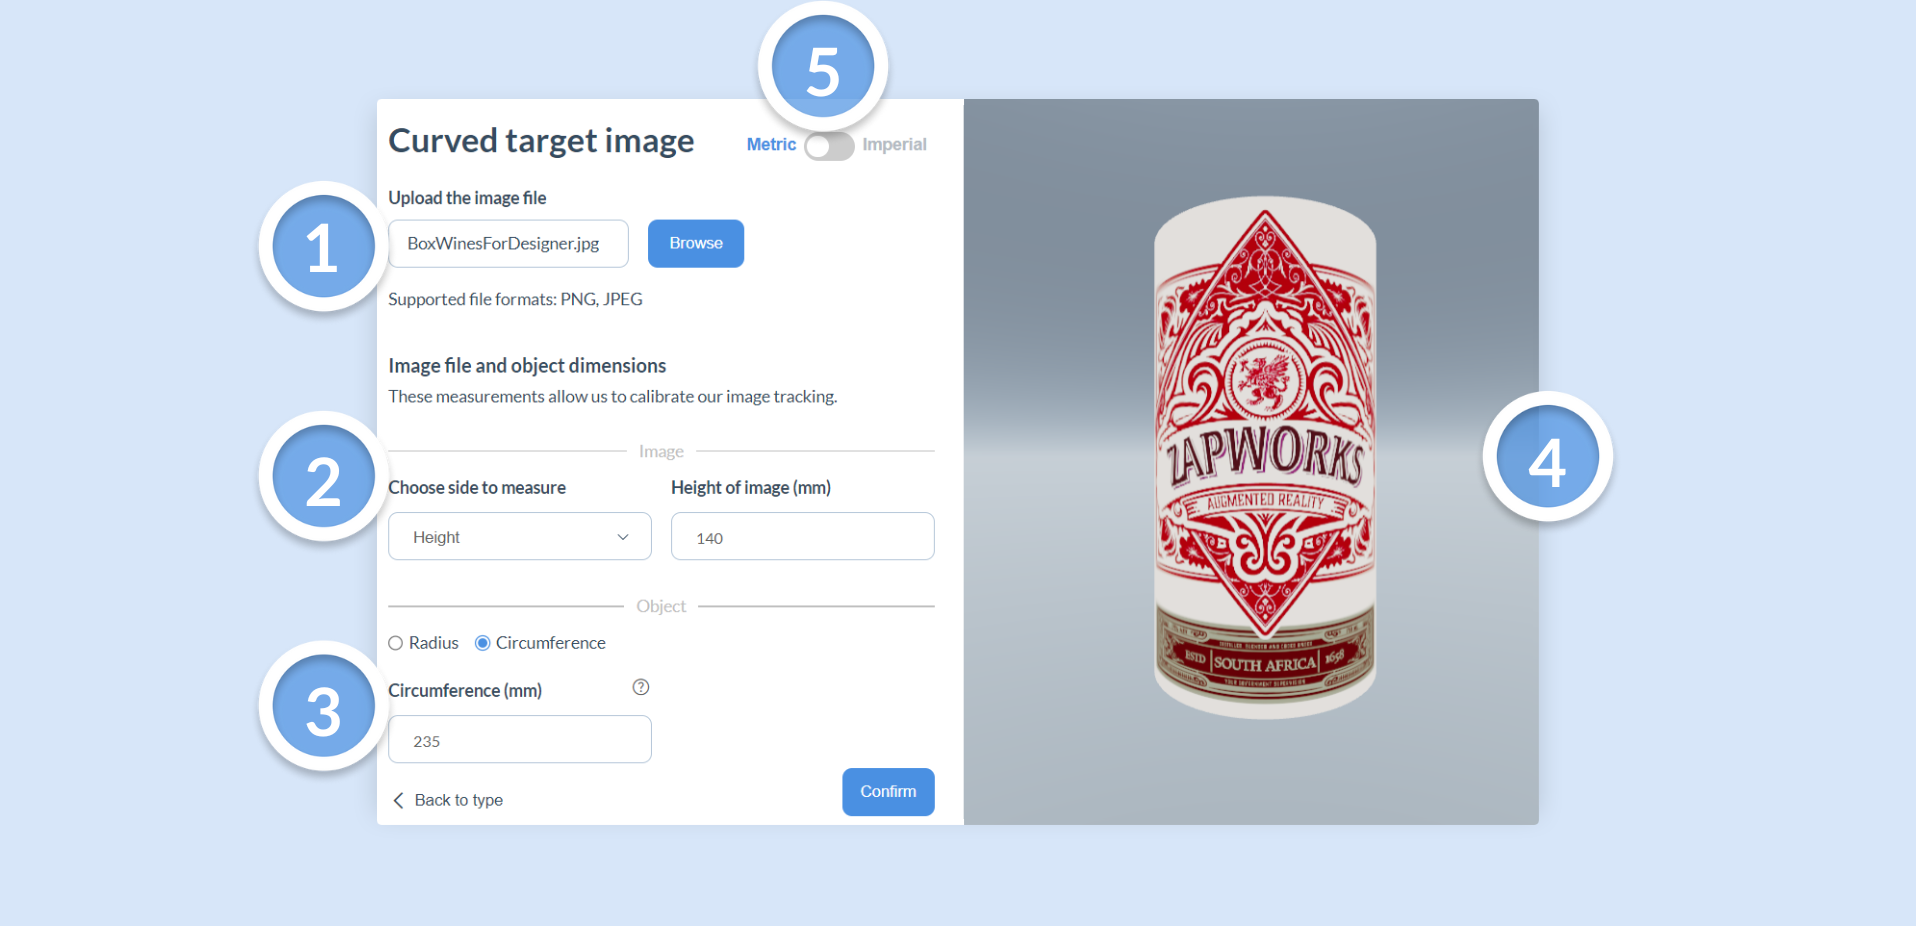
Once you have uploaded your target image, you can enter the dimensions for both the target image and the object it will be on. There is also an interactive Target image preview window that will show the curved target image with the associated dimensions.
| Section | Instruction |
|---|---|
| (1) Upload the image file | Click the Browse button to navigate your local files and select your target image. |
| (2) Image file dimensions | Choose which side of the image you want to measure. Select either Height or Width from the dropdown menu. Then enter the corresponding dimension of the image in the input box provided. |
| (3) Object dimensions | Specify which measurement you want to use for the dimension of the object: Radius or Circumference and enter the measurement in the input box. |
| (4) Curved target image preview window | As you change the dimensions, you will see your target image curving accordingly. Interact with this window by clicking and dragging the target image. |
| (5) Metric or Imperial toggle | Use this toggle to change the measurement units between millimeters (mm) and inches (in). |
Make sure you press Enter on your keyboard to confirm the dimensions.
Creating a Curved Image Tracking experience
Once your curved target image has been created, it will be visible in your scene, and you can start adding Components to it. To simplify development and aid in visualizing placement and scaling, we have included a Reference Object which you can find in the Project Properties panel.
The Reference Object property enables you to add some commonly used cylindrical products of various standard sizes to your scene, and you can adjust how it looks within your scene with its settings.
The reference object will not be visible in your experience, it is there as a guide during development.
| Property | Description |
|---|---|
| (1) Reference Object | Select a product to reference from the dropdown menu, such as a soda can or a wine bottle; available in standard sizes. |
| (2) Object Position | Use the slider to adjust the position of the reference object. Slide left to move it down and right to move it up. |
| (3) Opacity | Adjust the slider to control the visibility of the reference object in the scene. |
Object sizes may differ from country to country, so make sure you are measuring your specific object or getting the appropriate reference dimensions for it.
Adding Curved Components
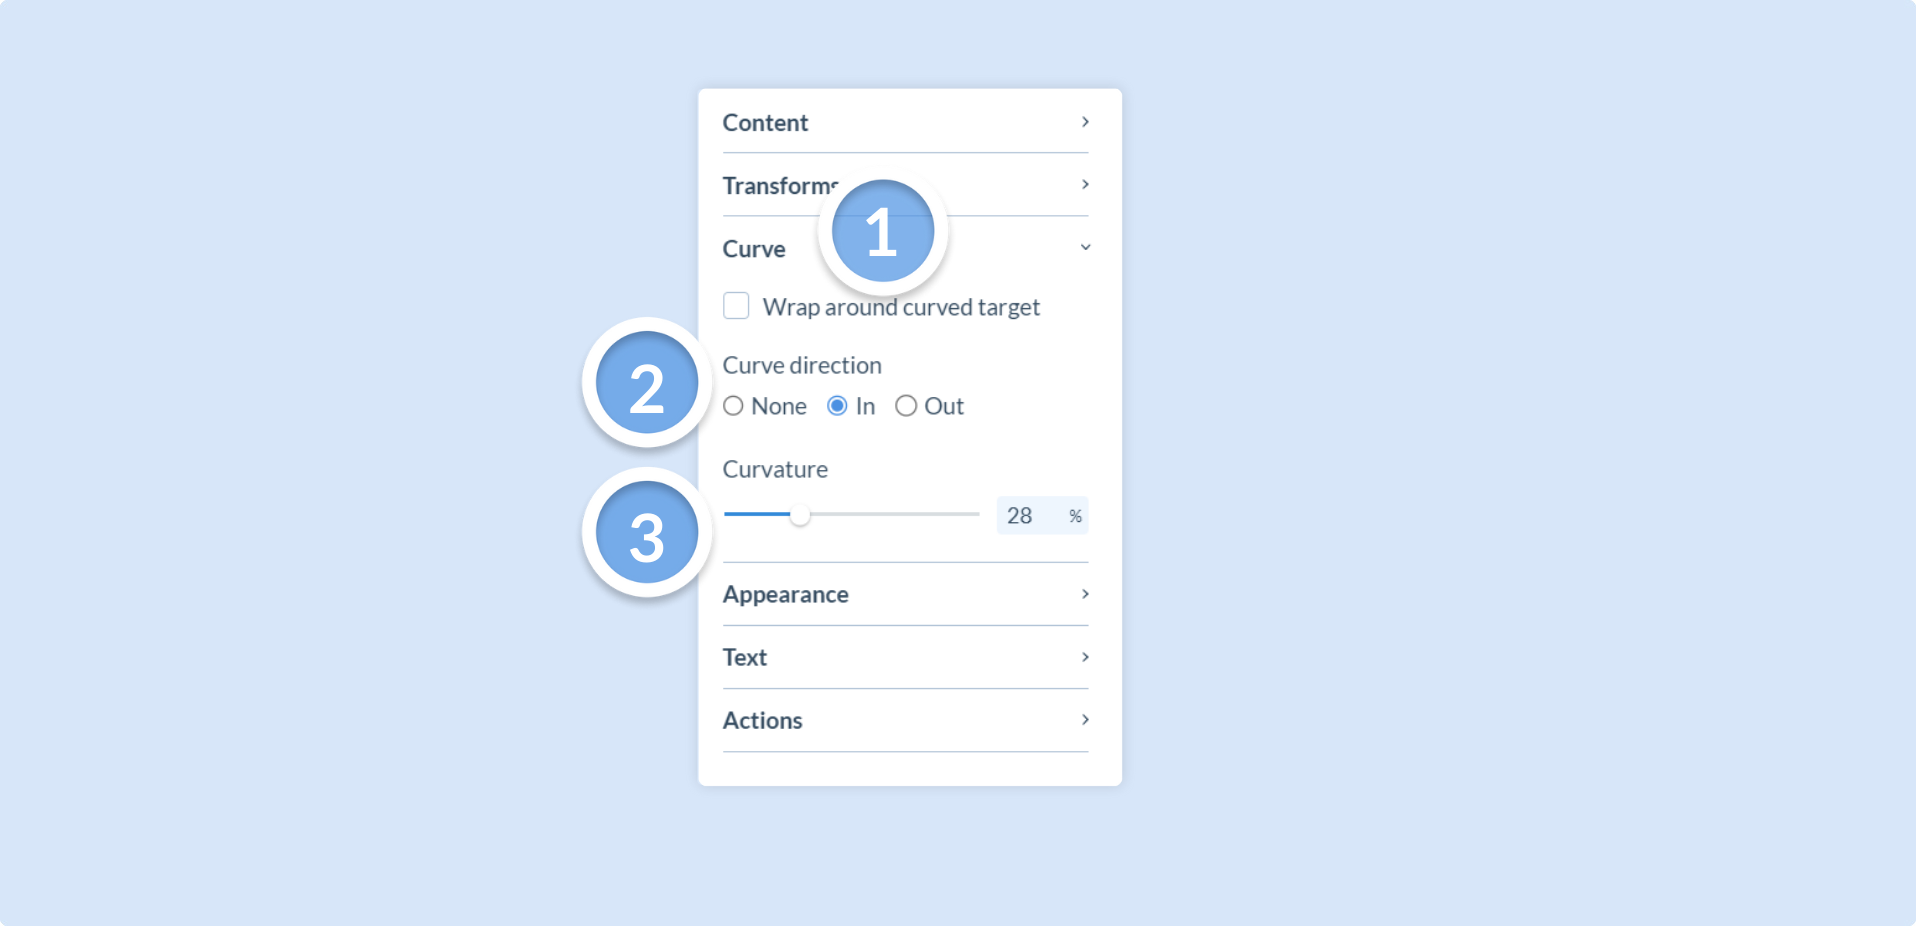
Although your target image will be curved, your Components will not be by default. To place them around your curved target image, there is a Curve property in the Project Properties panel when you select any Component, except for 3D and Applets.
The Curve property has a few options to easily modify the curvature of Components, they are described in the table below.
| Property | Description |
|---|---|
| (1) Wrap around curved target | Checkbox to enable or disable wrapping the media component around the curved target. Changes the transform gizmo for curving. |
| (2) Curve direction | Alter the curve direction for the media component. Options include None, In, and Out. |
| (3) Curvature | A percentage slider to adjust the amount of curvature applied to Components. |
If the Wrap around curved target checkbox is checked, the options above are unavailable for modification, but you can still scale, position and rotate the Component, relative to the target image.
Editing your curved target image
Once your curved target image is within the scene, you can easily replace it with another one. While the target image is selected, go to the Project Properties panel and in the Content Preview window, click Replace. It will launch the Image tracking type modal again where you can select Flat or Curved.
If you select Curved, simply upload the same target image again and update the dimensions, or, choose a completely different target image.
Previewing your Curved Image Experience
Click on the Preview button to the top right of the screen and the Preview modal will appear. This modal will show you a test QR code and an interactive Preview window with your curved target image.
Although your experience will be visible and should track to the target image within the preview window, we highly recommend previewing on the real product with a printed version of the target image on the object.
If the tracking is unstable, please check your target image again, both in dimensions and resolution.