Face Tracking
Face Tracking detects and tracks the user's face. With Zappar's Face Tracking library, you can attach 3D objects to the face itself, or render a 3D mesh that's fit to (and deforms with) the face as the user moves and changes their expression. You could build face-filter experiences to allow users to try on different virtual sunglasses, for example, or simulate face paint.
Before setting up face tracking, you must first add or replace any existing camera you have in your scene. Find out more here.
To place content on or around a user's face, create a new zappar-face component:
<a-entity zappar-face>
  <!-- PLACE CONTENT TO APPEAR ON THE FACE HERE -->
</a-entity>
The group provides a coordinate system that has its origin at the center of the head, with a positive X axis to the right, the positive Y axis towards the top and the positive Z axis coming forward out of the user's head.
Users typically expect to see a mirrored view of any user-facing camera feed. Please see the mirroring the camera view section in the Setting up the Camera article.
Events
The zappar-face component will emit the following events on the element it's attached to:
| Event | Description |
|---|---|
onVisible |
emitted when the face appears in the camera view |
onNotVisible |
emitted when the face is no longer visible in the camera view |
Here is an example of using these events:
<a-entity zappar-face id="my-face-tracker">
  <!-- PLACE CONTENT TO APPEAR ON THE FACE HERE -->
</a-entity>

<script>

let myFaceTracker = document.getElementById("my-face-tracker");

myFaceTracker.addEventListener("zappar-visible", () => {
  console.log("Face has become visible");
});

myFaceTracker.addEventListener("zappar-notvisible", () => {
  console.log("Face is no longer visible");
});

</script>
Face Landmarks
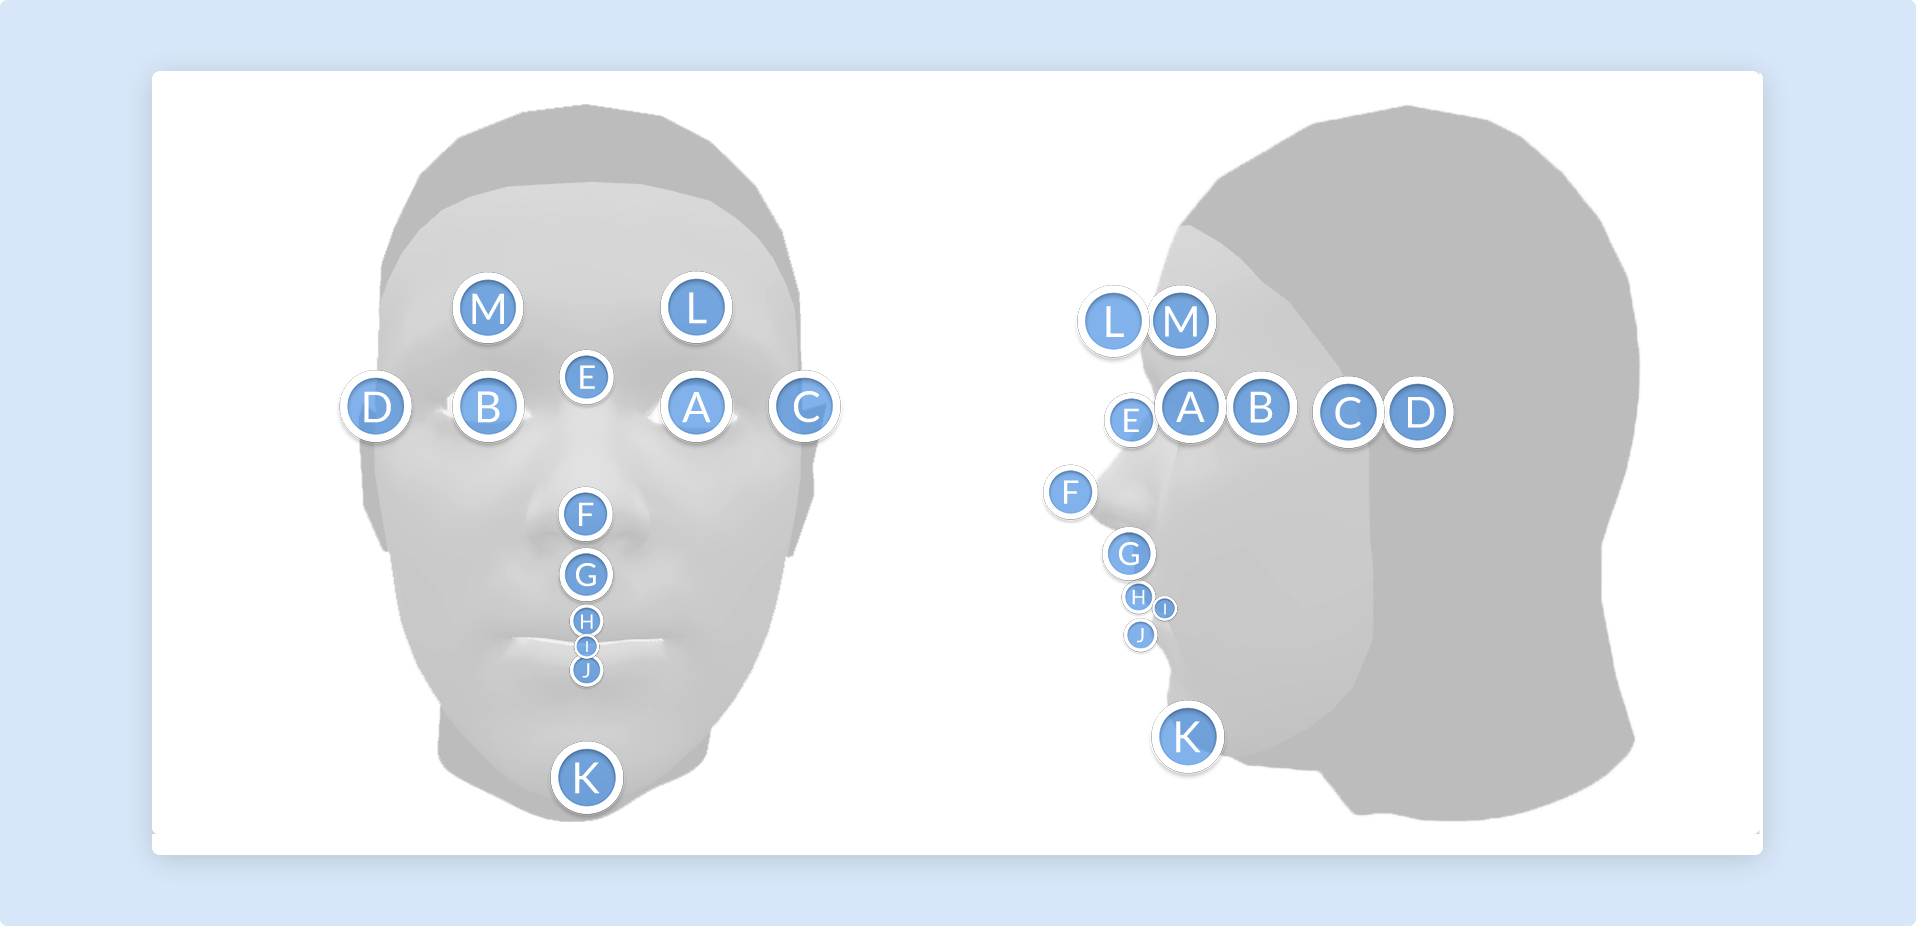
In addition to tracking the center of the head, you can use FaceLandmarkGroup to track content from various points on the user's face. These landmarks will remain accurate, even as the user's expression changes.
To track a landmark, construct a new FaceLandmarkGroup component outside a zappar-face entity; passing your face tracker, and the name of the landmark you'd like to track:
<a-entity zappar-face>
  <!-- PLACE CONTENT TO APPEAR AT THE ORIGIN (CENTER) OF THE FACE HERE -->
</a-entity>

<a-entity zappar-face-landmark="face: #face-anchor; target: nose-tip" id="zappar-face-landmark">
    <!-- PLACE CONTENT TO APPEAR ON A FACE LANDMARK HERE -->
    <a-box width="0.05" height="0.05" depth="0.05" color="#4CC3D9"></a-box>
</a-entity>
The following landmarks are available:
| Face Landmark | Diagram ID |
|---|---|
| eye-left | A |
| eye-right | B |
| ear-left | C |
| ear-right | D |
| nose-bridge | E |
| nose-tip | F |
| nose-base | G |
| lip-top | H |
| mouth-center | I |
| lip-bottom | J |
| chin | K |
| eyebrow-left | L |
| eyebrow-right | M |
Note that 'left' and 'right' here are from the user's perspective.
Face Mesh
In addition to tracking the center of the face using zappar-face, the Zappar library provides a face mesh that will fit to the face and deform as the user's expression changes. This can be used to apply a texture to the user's skin, much like face paint.
To use the face mesh, create an entity within your zappar-face entity and use the face-mesh primitive type, like this:
<a-entity zappar-face id="my-face-tracker">
    <a-entity geometry="primitive: face-mesh; face: #my-face-tracker" material="src:#my-texture; transparent: true;"></a-entity>
</a-entity>
There are two meshes included with the A-Frame library, detailed below.
Default Mesh: The default mesh covers the user's face, from the chin at the bottom to the forehead, and from the sideburns on each side. There are optional parameters that determine if the mouth and eyes are filled or not:
<a-entity geometry="primitive: face-mesh; face: #my-face-tracker; fill-mouth: true; fill-eye-left: true; fill-eye-right: true;" material="src:#my-texture; transparent: true;"></a-entity>Full Head Simplified Mesh: The full head simplified mesh covers the whole of the user's head, including a portion of the neck. This mesh is ideal for drawing into the depth buffer in order to mask out the back of 3D models placed on the user's head (see the Head Masking section below). There are optional parameters that determine if the mouth, eyes and neck are filled or not:
<a-entity geometry="primitive: face-mesh; face: #my-face-tracker; model: full-head-simplified; fill-mouth: true; fill-eye-left: true; fill-eye-right: true; fill-neck: true;" material="src:#my-texture; transparent: true;"></a-entity>Head Masking
When placing a 3D model around the user's head, such as a helmet, it's important to make sure that the user's face is not obscured by the back of the model in the camera view.
To this end, the library provides zappar-head-mask, an entity that fits the user's head and fills the depth buffer, ensuring that the camera image shows instead of any 3D elements behind it in the scene.
To use it, add the entity into your zappar-face entity, before any other 3D content:
<a-entity zappar-face id="my-face-tracker">
    <a-entity zappar-head-mask="face: #my-face-tracker;"></a-entity>

    <!-- OTHER 3D CONTENT GOES HERE -->
</a-entity>